
This Royal icing recipe is easy to use and perfect for outlining and flooding sugar cookies. Make fun and simple, beautifully decorated cookies for any holiday or occasion!

Why You’ll Love This Royal Icing Recipe
This easy Royal icing recipe is made with meringue powder and sets like a dream. You’re only 3 ingredients away from gorgeous decorated cookies for any occasion! It’s perfect for outlining and flooding cookies and piping details. Here are more reasons to love it:
- Versatile. Royal icing is a classic type of frosting that hardens as it sets. This makes it perfect for decorating cookies in loads of different ways, from outlining to filling and detailing. One recipe, endless possibilities!
- Easy. Yes, you can make bakery-worthy royal icing right in your own kitchen! All it takes is a bowl and mixer. You’ll be looking for excuses to bake a batch of cookies for decorating (as if you need one).
- 3 ingredients. You only need three ingredients to make homemade royal icing: powdered sugar, egg whites (or in this case, meringue powder), and your choice of flavorings. That’s it!

What You’ll Need
Homemade royal icing needs only 3 ingredients. Check out some quick notes below and scroll down to the recipe card for a printable ingredients list.
- Meringue Powder – Meringue powder combined with water is an egg white substitute. It’s what makes royal icing harden to a candy-like texture.
- Powdered Sugar – Also called confectioner’s sugar, sifted before you start.
- Vanilla Extract – Real vanilla extract, or you can change up the flavors using any flavoring extract you’d like.
How to Make Royal Icing
Follow these short steps to whip up a big batch of homemade royal icing. Don’t forget to scroll to the recipe card for printable instructions.


- Whip the meringue. First, you’ll beat the meringue powder with water until it’s light and foamy.
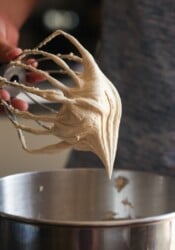
- Combine. Slowly mix in powdered sugar, followed by the vanilla extract. Gradually increase the mixing speed to high, whipping until stiff, glossy peaks start to form.


- Divide and color the icing. Divide the finished icing into separate bowls, and add your desired colors. Stir the color in by hand to avoid air bubbles. Afterward, add the royal icing to piping bags or you can thin out the icing for flooding, see below.
How to Thin Out Royal Icing
As is, your royal icing is the perfect consistency for piping outlines, textures, and details. If you’ll be using some of the icing to flood cookies (create a smooth surface), you’ll need to divide the icing and thin it out to a flooding consistency. To thin out royal icing for flooding, stir in additional water, 1 teaspoon at a time, until the consistency resembles corn syrup (see photo).

Recipe Tips
If you’ve never made icing at home before, here are my tips for getting it perfect every time:
- Get bright white icing. If you’re after a pure white royal icing, make sure that you use clear vanilla, or omit the extract altogether.
- Thicken royal icing that’s too thin. If you add too much water, or if you notice that your royal icing is on the runny side, add a little powdered sugar until you reach your desired consistency.
- Use gel food colors. Gel food coloring makes the brightest, most vibrant colors, and a little goes a long way. You’ll find gel food colors in baking and craft stores, or online. Liquid food coloring (like the kind you find in most grocery stores) tends to water down frosting.
- Royal icing alternative. If you’d prefer to skip royal icing for another kind, try the simple vanilla icing that I use for my iced oatmeal cookies. It’s made with only powdered sugar, water, and vanilla, without meringue.

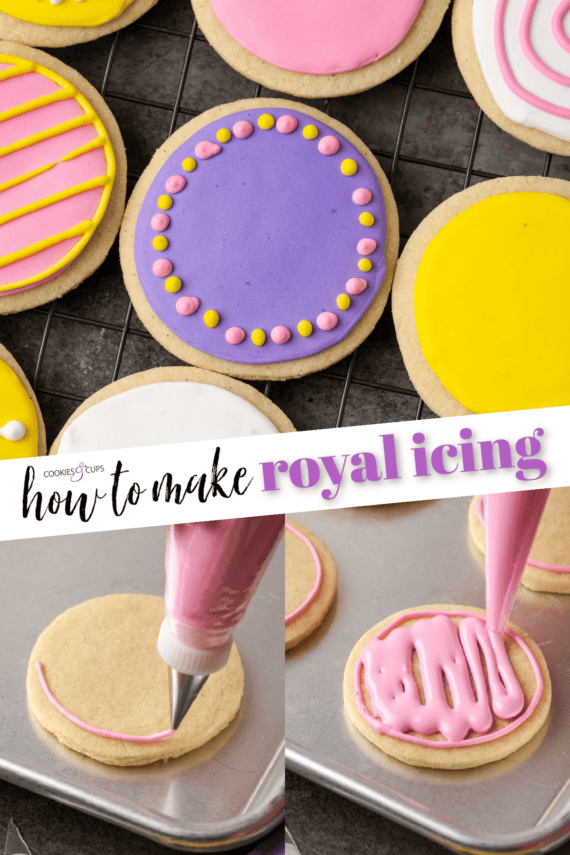
The best way to use royal icing is to pipe it with a pastry bag. Royal icing has tons of different uses depending on the consistency, from creating beautiful designs on your favorite cut out sugar cookies to gluing together a gingerbread house at the holidays. Whether you use your royal icing for piping, outlining, or flooding, the technique is the same! See below for an easy tutorial on how to flood a cookie for decorating.

Below, I’ll show you how to flood a cookie using royal icing and my favorite sugar cookies recipe. You can also use this icing on chocolate sugar cookies or brown sugar cut-out cookies. Even if you’re new to decorating cookies, you’re going to be amazed at how easy it is!


- Fill the piping bags. Begin by deciding which colors you’ll use to decorate your cookies. Color the royal icing and fill your piping bags, some with outline icing and some with flooding icing. I find it helps to place the empty piping bag into a glass and fold the top down over the sides of the glass to open up the bag.
- Outline the cookie. Use outline icing to pipe a thin outline around the outside edge of the cookie. Squeeze the top of the piping bag firmly and use your other hand to guide the icing tip in the direction you want it to go.


- Fill the outline. After you’ve outlined a few of your cookies, it’s time to fill or “flood” them. To flood the cookie, use your thinner flooding icing to carefully flood the outlined shape.
- Smooth out the icing. Gently tap and jiggle the cookie to spread the icing out. Then, use a toothpick to pop any air bubbles and bring the icing right up against the edges of the outline.
- Let the cookies dry. Let the decorated cookies dry down for a few hours, or overnight, before adding more icing details.
What Size Piping Tips Should I Use?
I recommend a small #1 or #2 piping tip for flooding and outlining cookies with icing. These basic piping tips are also great for adding finer details later on, like the lines and dots you see in the photos.

Frequently Asked Questions
The main difference between royal icing and buttercream frosting is the texture. Traditional frosting is soft and creamy thanks to ingredients like butter, while royal icing uses egg whites and dries down hard and candy-like.
In most cases, royal icing takes anywhere between 6-8 hours to dry thoroughly. After this time, it’s safe to move and stack your cookies without denting or messing up the surface of the icing. You’ll notice a thin crust start to form after about 30 minutes.
Undermixing can lead to weak, unstable royal icing. The same can be said for overmixing, which creates too much volume in the meringue. The resulting icing will be soft/brittle and may not set fully.
I’ve always used water in my royal icing recipe. That being said, I’ve heard that milk or cream also works well. Feel free to use whichever you prefer.
This is caused by “butter bleed”. If your kitchen is too warm, the butter from the sugar cookie melts and seeps into the royal icing, creating yellow-ish blotches. While your cookies will still taste delicious, there’s not much that you can do to fix it. See the next section for detailed storage tips.

How to Store
- Store the royal icing. Royal icing made from meringue powder can be kept at room temperature for 1-2 weeks. Store any leftover icing in an airtight container, with cling wrap pressed directly against the surface of the icing to prevent crusting.
- Storing decorated cookies. After you’ve frosted your cookies, make sure to let the icing harden completely. Store the decorated cookies airtight in a cool and dry location, either on the counter or in the pantry.
Can I Freeze Royal Icing?
Yes! You can freeze royal icing for up to 2 months. If you have a lot of icing left over, freeze any colors separately in an airtight container or freezer bag. Thaw the icing in the fridge and then bring it to room temperature before you use it.
You can also freeze sugar cookies decorated with icing for up to 3 months. I recommend storing the cookies in an airtight container with parchment paper between the layers. Defrost the cookies at room temperature or in the fridge.
More Frosting Recipes
- Creamy Chocolate Frosting
- Cereal Milk Frosting
- Brown Sugar Frosting
- Fluffy Marshmallow Frosting
- Perfect Party Frosting

Royal Icing Recipe
- Prep Time: 5 minutes
- Total Time: 5 minutes
- Yield: 5 cups 1x
- Category: Dessert
- Method: Bowl
- Cuisine: American
Description
This easy Royal icing recipe made with meringue powder is perfect for outlining and flooding cookies! Make fun and simple, beautifully decorated cookies for any holiday or occasion.
Ingredients
- 1/2 cup water
- 3 tablespoons meringue powder
- 1 pound box of powdered sugar (approximately 4 cups), sifted
- 1 teaspoon vanilla extract (or any flavor you prefer)
Instructions
- With paddle attachment mix the water and meringue powder on low until combined then on high about 1 minute until foamy.
- Add the powdered sugar on low speed a little at a time, add extract and then mix on medium to blend together. Now mix on high for 4-5 minutes until stiff, glossy peaks form.
- I separate and color the icing at this point.
- With the icing as is, it is perfect for outlining cookies and adding embellishments.
- If you are planning on flooding your cookies, add water, 1 teaspoon at a time,until you get the consistency of corn syrup.
- If you add too much water, sift in more powdered sugar.
Notes
- If you want a pure white frosting, use clear vanilla or omit extract.
- Store in an airtight container with a layer of cling wrap pressed directly against the surface of the icing, to prevent a crust from forming.
Nutrition
- Serving Size:
- Calories: 177
- Sugar: 23.6 g
- Sodium: 70.2 mg
- Fat: 3.7 g
- Carbohydrates: 35.2 g
- Protein: 1.1 g
- Cholesterol: 15.1 mg
Want To Save This Recipe?
Find more recipes like this:
PIN for later


Hi , I like to make royal icing for cookies but I don’t have meringue powder! Anything can substitute that ? Please teach me. Thanks so much
I don’t have a flour sifter. Will it work without? Thanks for your help!
Just whisk sugar to make sure you have no lumps!
How long does it take for the icing to dry?
How did you make the flip flop cookies? They are adorable!! I love your page..Keep up the great work!!
I used royal icing and lined them out and then thinned the icing and flooded the cookies! I added the straps after the icing dried!
I never knew what royal icing sugar frosting was. thanks
thank you for posting on how to make the icing for flooding….
thank you very much!
Amber…for outlining I use either a #3 tip or #2 tip.
For flooding I use squeeze bottles.
I hope this has helped! What tips were you using?
I was wondering what size tips you use? Which for outlining and which for flooding. I am apparently doing it wrong. Thanks for any help.
Thanks for this! I am new to this decorating thing, and love to find out what the pros use.