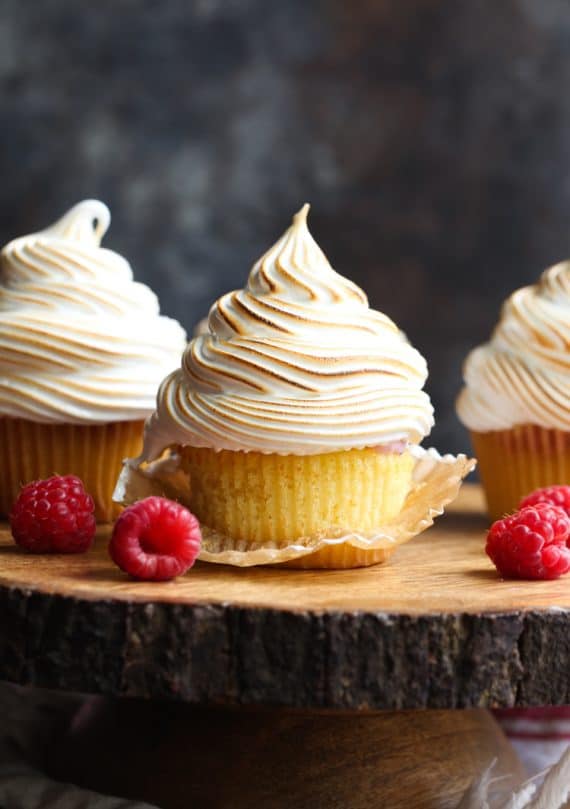
Baked Alaska Cupcakes are a smaller version of the classic showstopper! Love the mini size, which makes them perfect for parties AND you can make them ahead which is fantastic!
OK, we’re here today with round two of me pretending I’m on The Great British Baking Show on PBS. Have you guys been watching? Last week I made a “Signature” dessert, which was the extra delicious Banana Pudding Cheesecake, and I’ve heard form some of you who have already made it, that you LOVED it! I LOVE hearing that! Well, today we’re doing something a little more involved, but TOTALLY doable. You guys know I don’t do complicated desserts. But today we’re baking along with the “Charismatic Cupcake” Challenge. And I’ve got a fun one. Baked Alaska Cupcakes!
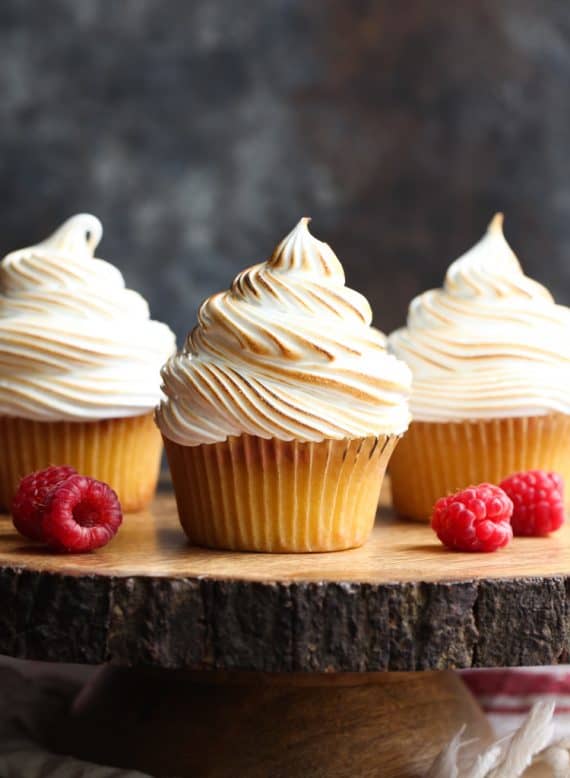
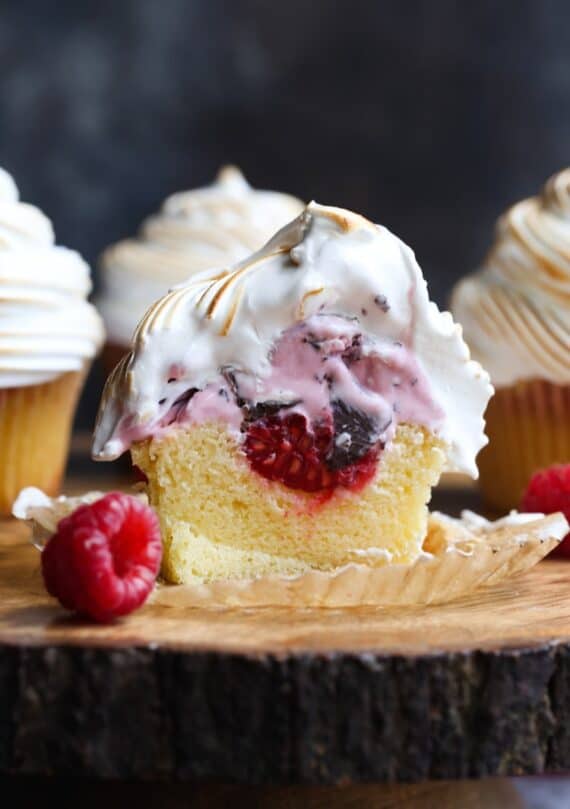
Besides being drop dead gorg, they are so delicious. The soft vanilla cupcake is topped with a fresh raspberry and chocolate chip raspberry ice cream, finished with a gorgeous swirl of toasted marshmallow meringue. Certainly, there are a few steps to making these, but they are all fairly straight forward. If I can do it, so can you!
This recipe makes 12 cupcakes. And while I made a vanilla cupcake as the base, you can absolutely get creative with your flavor combinations and bake any flavor you would like.
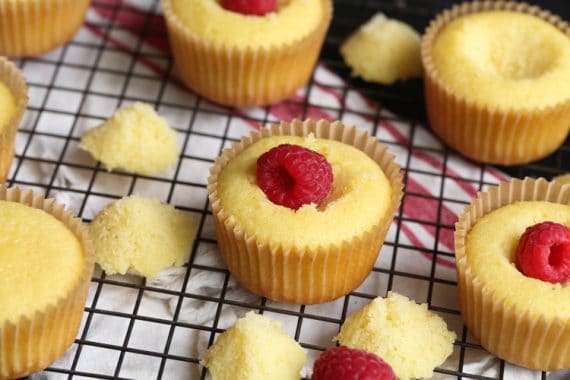
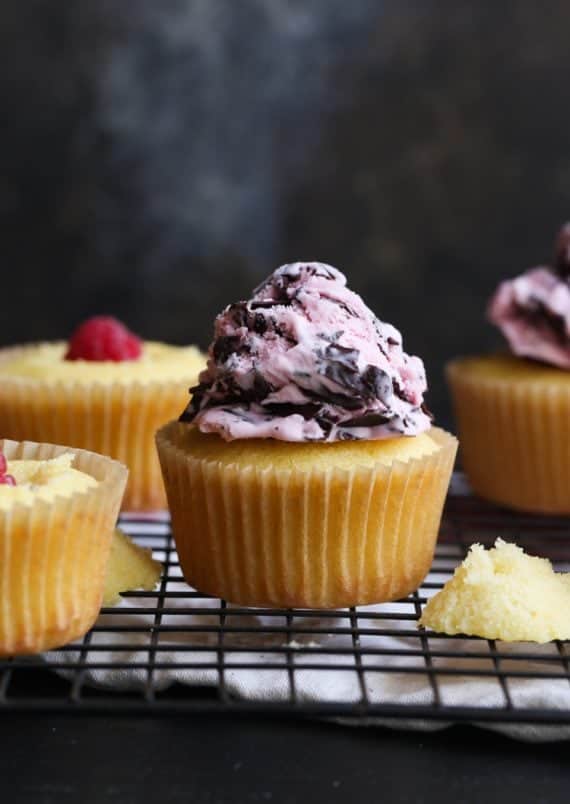
Since I chose to use a raspberry chip ice cream, I thought it would be fun to add a fresh raspberry to the cupcake as well. Again, this is where you can get creative! Just cut a small well into the top so you can nestle the raspberry right in there.
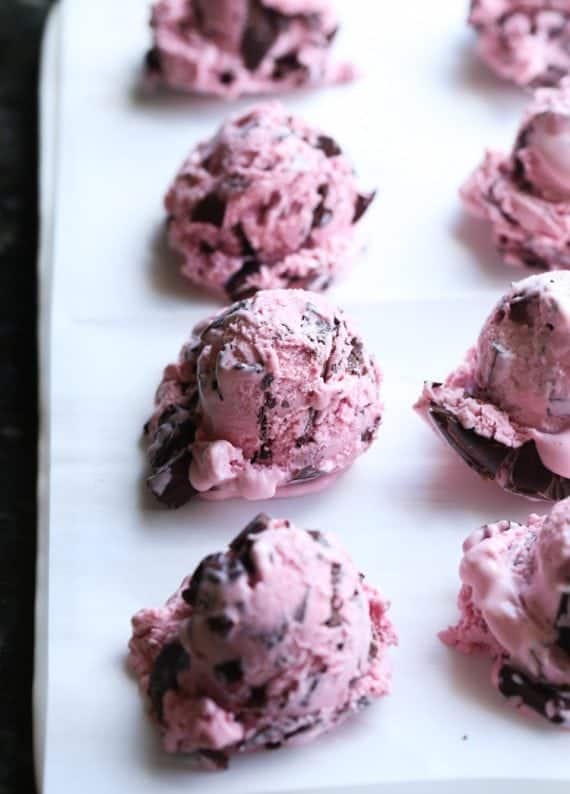
I like to scoop out my ice cream first, and then place it back in the freezer to get firm. This extra step makes assembling the cupcakes a little less messy!
While the ice cream scoops are freezing solid, go ahead and make your marshmallow meringue topping.
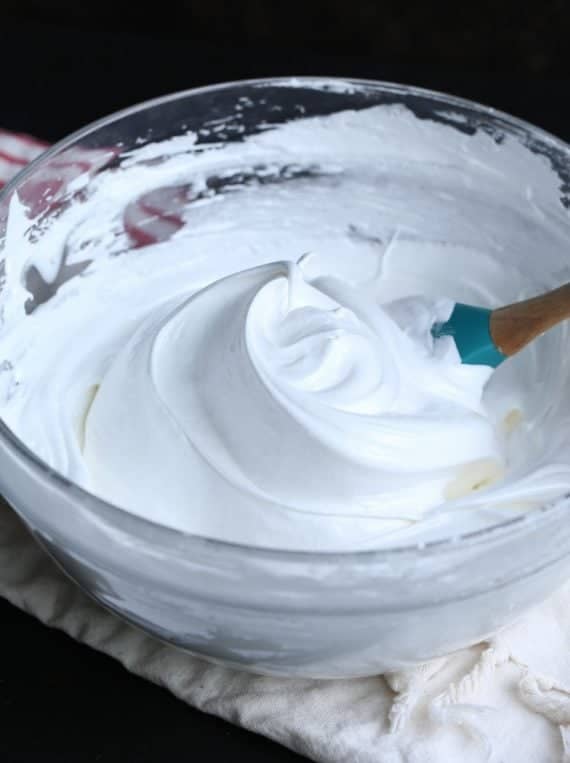
It’s the perfect amount to pipe high swirls on top of your cupcakes.
When you’re ready to assemble the cupcakes, place the frozen ice cream on top of the cupcake…
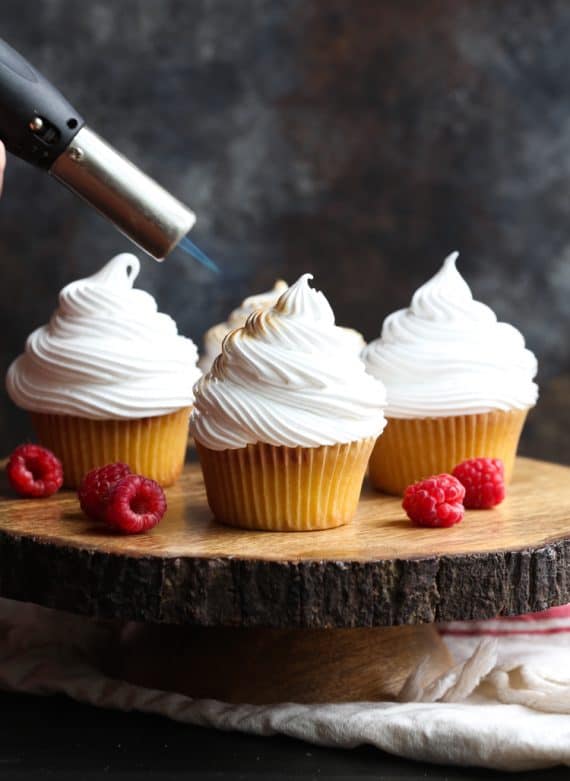
And then using a pretty large piping swirl to pipe the meringue on top of the ice cream! OR you can always spread the meringue on top using an offset spatula. Either way will be stunning!
Then, the fun part is toasting up the meringue with a kitchen torch. I know it seems like there are a lot of kitchen tools used in this recipe, but hopefully they are ones you currently have in your kitchen. If not, I will link to what I used below!
Dig in and enjoy!
Tools used in this recipe:

Baked Alaska Cupcakes
- Prep Time: 15 minutes
- Cook Time: 20 minutes
- Total Time: 35 minutes
- Yield: 10 Cupcakes 1x
- Category: Dessert
- Method: Oven
- Cuisine: American
Description
Baked Alaska Cupcakes are a smaller version of the classic showstopper! Love the mini size, which makes them perfect for parties AND you can make them ahead which is fantastic!
Ingredients
Cupcakes
- 1/2 cup butter, room temperature
- 1/2 cup granulated sugar
- 2 eggs
- 2 teaspoons vanilla
- 1 teaspoon baking powder
- 1/2 teaspoon kosher salt
- 1 cup cake flour
- 1/2 cup buttermilk
- 2 cups raspberry chip ice cream, or your preferred flavor
- 10 –20 raspberries
Meringue Topping:
- 1 ½ cups granulated sugar
- 2 egg whites
- 2 teaspoons light corn syrup
- 1/3 cup cold water
- 1/8 teaspoon kosher salt
- 1 teaspoon vanilla
Instructions
Cupcakes
- Preheat oven to 350°F. Line a muffin tin with 10 liners. Set aside.
- In the bowl of your stand mixer fitted with the paddle attachment mix the butter and granulated sugar on medium speed for 2 minutes. Add the eggs, vanilla, baking powder, and salt. Mix for 1 minutes until combined and smooth, scraping the sides of the bowl as necessary.
- In alternating portions add in the flour and buttermilk, beginning and ending with the flour. Mix for 30 seconds after last addition until evenly combined and smooth.
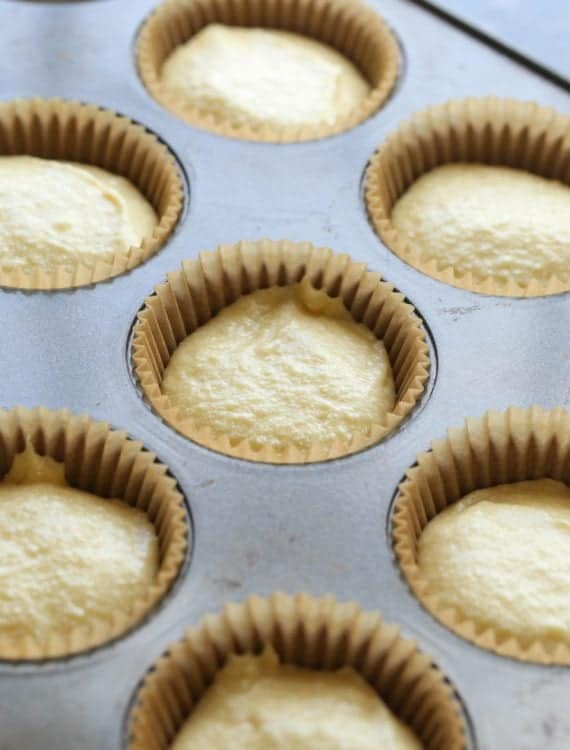
- Portion out ¼ cup of batter into each liner. Bake for 15-17 minutes, or until a toothpick inserted in the center comes out clean.
- Allow the cupcakes to cool for 5 minutes in the pan and then remove and transfer to a wire rack to cool completely.
- Line a plate with parchment paper. Using a 2- tablespoon sized scoop, portion out 10 scoops of ice cream and place onto the prepared plate. Place the plate back into the freezer for at least 15 minutes until firm.
Meringue
- To make the meringue topping, fill a medium saucepan with an inch of water and place on medium heat, bringing the water to a simmer. Place a heatsafe glass bowl on top of the saucepan, but not touching the water, creating a double boiler. Combine the sugar, egg whites, corn syrup, water, and salt in the bowl, and using a hand mixer, beat the mixture on high speed for 7 minutes, until thick and glossy.
- Remove the bowl from the heat, add in the vanilla and continue mixing on medium-high speed for 2 more minutes. Transfer meringue into a large piping bag, fitted with a large round or star tip. Alternately, you can skip this step if you prefer to spread the meringue on the cupcake using an offset spatula.
Assembly:
- Using a knife, cut a small well in the tops of the cupcakes, about 1 ½ inches in diameter. Place one or two raspberries in each well.
- Remove the ice cream from the freezer and place a scoop onto each cupcake.
- Working quickly, pipe or spread the meringue topping on each cupcake, completely covering the ice cream.
- Using a kitchen torch, lightly toast the meringue topping.
- Place back in the freezer until ready to serve.
Notes
You can sub out the raspberries for any fruit you prefer, or omit it altogether.
Feel free to use any flavor ice cream you like.
When storing the cupcakes in the freezer, store them airtight, as the meringue will absorb any flavors in the freezer. To do this, I like to flash freeze the cupcakes uncovered for 15-20 minutes and then cover tightly with cling wrap. This way, the meringue will hold the shape you piped or spread it.
Nutrition
- Serving Size: 1 Cupcake
- Calories: 579
- Sugar: 63.5 g
- Sodium: 600.8 mg
- Fat: 18 g
- Carbohydrates: 98.1 g
- Protein: 6.4 g
- Cholesterol: 99.4 mg


I love the cup cakes these are awesome and if baked at home then nothing can beat these <3
These cupcakes are love and really yummy 😀
This cup is so delicious and yummy 😀
Delicious cupcake. I can eat hundreds of them 😀
Who would not be mouthwatering with the mere color and taste of these cupcakes? I will bet this will be sold out to my children. Baking them seems to be exciting for me as well. I can’t wait to be home for this session.
What a delicious cupcake. Give me 100 of them!!!
Baked Alaska is a show stopper! I didn’t know you could make something like this ahead — I don’t always have time in the moment to get fancy with desserts, so love that I could do it ahead of time and still bust out a showstopper :). Excited to try!
While I have not yet attempted to make your Baked Alaska Cupcakes, my rating, at this stage, is based on how fantastic they look. I will definitely have a go at these – have saved the photos and printed out the recipe. Thank you for sharing.
My one and only attempted at anything ‘baked alaska’ was years ago, when I covered a block of ice cream with meringue and lightly grilled the top in the oven.
With these cupcakes, as I don’t have a cooker blow torch, would a light grill in the oven, to toast the tops of the meringue be ok?
Baked Alaska is a show stopper! I didn’t know you could make something like this ahead — I don’t always have time in the moment to get fancy with desserts, so love that I could do it ahead of time and still bust out a showstopper :). Excited to try!