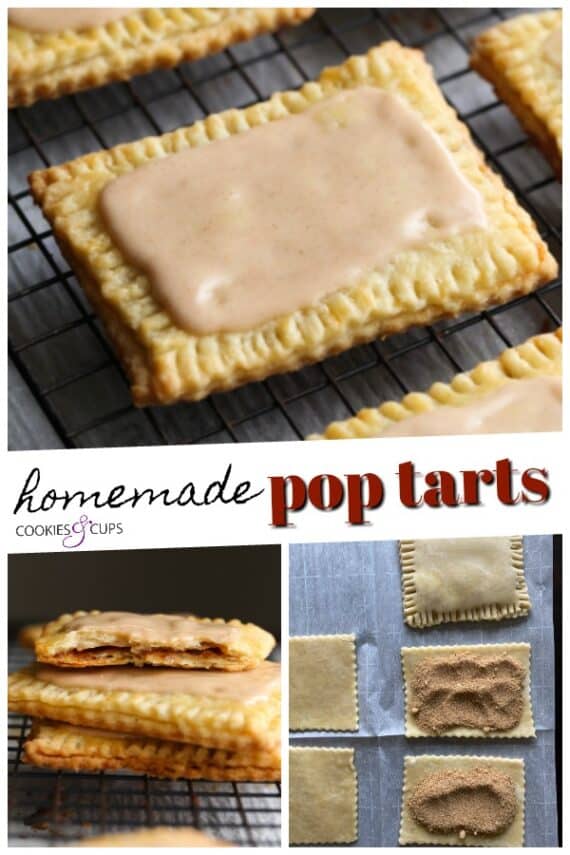
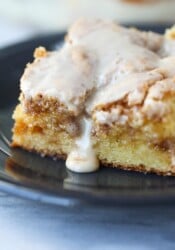
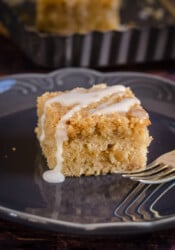
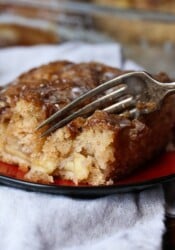
You’re going to love my Homemade Brown Sugar Cinnamon Pop Tarts! They are flaky on the outside, with a thick layer of cinnamon sugar filling on the inside, and topped with a sweet cinnamon icing. The perfect homemade breakfast treat!
Looking for more breakfast sweets? Try my Best Ever Coffeecake or these fluffy Brown Sugar Pancakes!

My Favorite Pop Tarts Are…
We have a running argument in our house about the best Pop Tart flavor…is it Strawberry or is it Cinnamon Sugar. In the past I have gone back and forth. My family is divided, and depending on which day you ask, I can swing one way or the other…but ultimately I have come to the conclusion that Brown Sugar Cinnamon is tops.
When I decided to try making these homemade I went back and forth on whether or not I should make Strawberry or Brown Sugar Cinnamon first, but you can see what I settled on…it was the right call.
Making Homemade Pop Tarts is Easier Than You Think
Sure, it’s easy to just grab a box of pop tarts. But, I bet you didn’t realize how easy it is to make your own at home. I know I didn’t! I had it in my head that it would be super difficult and so not worth it. But, I was wrong – and I’m not afraid to admit it. Plus, the pastry is so flaky and buttery, and the filling is the perfect sweetness, once you have the homemade version it’s going to be tough to go back to the boxed variety. The frosting is a variation of my easy homemade sugar cookie icing, flavored with cinnamon.
Aside from the fact that making your own toaster pastries is super easy, I love that I can control the ingredients. There’s no ingredients I can’t pronounce in here.
Recipe Ingredients For Brown Sugar Cinnamon Pop Tarts
This ingredient list is oh so easy! These are all typical baking staples that I’m sure you’ve got right in your pantry! Here’s what you’ll need:
For the pastry:
- all purpose flour
- sugar
- kosher salt
- cold butter, cut into cubes
- egg
- milk
For the filling:
- light brown sugar
- flour
- ground cinnamon
- butter
- egg
For the icing
- powdered sugar
- milk
- vanilla
- cinnamon

How to Make Homemade Toaster Pastries…
You’re going to make these homemade pop tarts in three stages. First we’ll put together the pastry dough, then we’ll fill and assemble the pop tarts. And, finally, we’ll add the frosting on top!
Pastry
- In a large bowl, whisk together the flour, sugar, and salt. Using a pastry cutter or fork, cut the butter into the flour mixture until coarsely combined, but peanut-sized pieces of the butter remain. You can also use your hands. Combine until the dough just comes together.
- Divide the dough in half, shaping each into a 4×6 inch rectangle, making sure the edges aren’t left too jagged. This will help when it’s time to roll the dough out. Cover each in plastic wrap and refrigerate for at least 30 minutes.
- Line a large baking sheet with parchment paper and set it aside.
Filling
- In a medium bowl, combine the brown sugar, flour, and cinnamon. Set this aside.
- Remove one dough from the refrigerator. On a lightly floured surface roll the dough out into a rectangle 1/8-inch thick. It will be roughly 9×12- inches. Using a knife cut the dough into 3×4- inch rectangles. Re-roll the scraps and repeat if necessary. You should get 8 pieces.
- Place the cut out dough pieces onto the prepared baking sheet. Brush each with the melted butter.
- Spread a heaping tablespoon of the reserved cinnamon sugar mixture into the center of each rectangle, leaving 1/4- inch space at the edges.
- Remove the remaining dough from the refrigerator and repeat the rolling and cutting process just like the first and place them on top of the pastry with the filling. Using a fork, press the edges together and poke a few holes in the tops of each of the tarts.
- Place the baking sheet in the refrigerator to chill the tarts for 30 minutes.
- Preheat the oven to 350°F.
- In a small bowl whisk together the egg and water.
- Remove the baking sheet from the fridge and brush each tart with the egg mixture.
- Bake for 25 – 28 minutes, until golden brown. Transfer to a wire rack to cool.

Icing
- Whisk together the powdered sugar, milk, vanilla, and cinnamon until smooth.
- Spoon the icing onto the cooled tarts and allow it to set.
Tips for the Best Homemade Pop Tarts
These homemade pop tarts are better than store-bought! Follow these tips to make sure they are the best of the best:
- Be sure to keep your pastry dough chilled as you are working with it. This will make it easier to form and prevent any unwanted sticking.
- Make sure you seal your edges nice and tight. They can easily separate and you’ll end up with your filling dripping out.
- Don’t forget to brush the tops of the pastries with the egg wash. This is what makes the pop tarts crispy and golden on the outside.
Variation Ideas
You can make a wide variety of pop tarts following this same method of making the pastry, filling, and icing. Fruit filled pop tarts are even easier because you can use jam as the filling, and simply omit the cinnamon from the icing. Here are some easy versions:
- Strawberry
- Blueberry
- Raspberry
To make them a bit more colorful, you can add sprinkles or colored sugar to the icing after it’s been drizzled over the tarts but before it sets.
How to Store and Reheat These Pastries
You can store your brown sugar pop tarts in an airtight container at room temperature for up to 3 days. There’s no need to refrigerate them.
I like to reheat mine right in the toaster, just like a pop tart. They end up warm and crispy on the outside with a soft and warm center.

Can I Freeze these Pop Tarts?
Yes! These homemade pop tarts actually freeze really well. Just let them cool completely and then place them in a freezer-safe zip-top storage bag. Place a piece of parchment paper between each Pop Tart so that you can easily grab one when you are ready to reheat. Then, you can reheat them right in your toaster!
Print
Homemade Frosted Brown Sugar Pop Tarts
- Prep Time: 1 hour
- Cook Time: 28 minutes
- Total Time: 1 hour 28 minutes
- Yield: 8 1x
- Category: Breakfast
- Method: Oven
- Cuisine: American
Description
You’re going to love my Homemade Frosted Brown Sugar Pop Tarts! They are flaky on the outside, gooey on the inside, and topped with a sweet cinnamon icing. The perfect homemade breakfast treat!
Ingredients
Pastry:
- 2 cups all purpose flour
- 1 tablespoon sugar
- 1 teaspoon kosher salt
- 1 cup cold butter, cut into cubes
- 1 large egg
- 2 tablespoons milk
Filling:
- 1/2 cup light brown sugar
- 1 tablespoon flour
- 1 1/2 teaspoons ground cinnamon
- 2 tablespoons butter, melted
- 1 large egg
- 1 teaspoon water
Icing
- 1 cup powdered sugar
- 1 tablespoon milk
- 1/2 teaspoon vanilla
- 1/2 teaspoon cinnamon
Instructions
- Pastry: In a large bowl, whisk together the flour, sugar, and salt. Using a pastry cutter or fork, cut the butter into the flour mixture until coarsely combined, but peanut-sized pieces of the butter remain. You can also use your hands. Combine until the dough just comes together.
- In a small bowl whisk together the egg and the milk. Mix this evenly into the dough until just combined.
- Divide the dough in half, shaping each into a 4×6- inch rectangle, making sure the edges aren’t left too jagged. This will help when it’s time to roll the dough out. Cover each in plastic wrap and refrigerate for at least 30 minutes.
- Line a large baking sheet with parchment paper and set aside.
- Filling: In a medium combine the brown sugar, flour, and cinnamon. Set aside.
- Remove one dough from the refrigerator. On a lightly floured surface roll the dough out into a rectangle 1/8-inch thick. It will be roughly 9×12- inches. Using a knife cut the dough into 3×4- inch rectangles. Re-roll the scraps and repeat if necessary. You should get 8 pieces.
- Place the cut out dough pieces onto the prepared baking sheet. Brush each with the melted butter.
- Spread a heaping tablespoon of the reserved cinnamon sugar mixture into the center of on each rectangle, leaving 1/4- inch space at the edges.
- Remove the remaining dough from the refrigerator and repeat the rolling and cutting process just like the first and place them on top of the pastry with the filling. Using a fork, press the edges together. And poke a few holes in the tops of each of the tarts.
- Place the baking sheet in the refrigerator to chill the tarts for 30 minutes.
- Preheat oven to 350°F.
- In a small bowl whisk together the egg and water.
- Remove the baking sheet from the refrigerator and brush each tart with the egg mixture.
- Bake for 25 – 28 minutes, until golden brown. Transfer to a wire rack to cool.
- Icing: Whisk together the powdered sugar, milk, vanilla, and cinnamon until smooth.
- Spoon the icing onto the tarts and allow it to set.
Notes
Store airtight at room temperature for up to 3 days.
Want To Save This Recipe?
PIN for later:


The pop tarts are amazing!!! SO much better than the store bought.
I absolutely do not understand the confusion in the other reviews. This recipe could not have been easier, it’s not a lot of work and if someone doesn’t understand what “cut the butter in” means, they have no right to even be reading a recipe or even be in a kitchen. Try taking a Home Ec course!
Also, there’s Google now for people who can’t figure things out on their own.
Anyway…..thank you so much for sharing your recipe! We loved it!
“Using a pastry cutter or fork, cut the butter into the flour mixture until coarsely combined, but peanut-sized pieces of the butter remain.” what’s “cut the butter into the flour mixture until coarsely combined, but peanut-sized pieces of the butter remain mean?
It means mix the butter into the flour with a pastry cutter, until the flour coats the butter pieces, which should be small, about the size of peas or peanuts.
Can you clarify your reply? I don’t understand the entire response. What’s “It means mix the butter into the flour with a pastry cutter, until the flour coats the bitter pieces, which should be small, about the size of peas or peanuts.” What’s the bitter pieces?
butter pieces. You mix the flour and the butter together with the pastry cutter. The mixture won’t be smooth, you will still have pieces of butter.
How do I cut the butter cubes into the size of peanuts?
Hun that is what a pastry cutter does it cuts the butter while blending it into the flour… look up a video you look silly
Yikes Jess you look pretty silly with your rudeness.
I knew I should have kept questioning myself, confusing. Glad I read and re read. Wasted the ingredients for the filling since missing instructions. The egg and water need to go later and it doesn’t say when to add tge butter, I added butter and egg then realized it should say to mix not o lg the ci amo, flour, brown sugar but also the butter, set aside a d use tge egg and sated to brush the tarts….
Sorry you had trouble, the egg mixture is the last step as stated in the instructions in step #13, right before you bake. And step #7 says when to use the melted butter.
My kids LOVE Pop Tarts but don’t react well to all of the artificial ingredients and are not a fan of the knockoff organic store-bought tarts. Sooo, I found this recipe to make them feel like I wasn’t depriving them. :-). I’m not a huge baker and by the time they were in the oven, I said I would NEVER make these again due to the amount of work. BUT, both kids (10&12) LOVED them! One even wanted to share one with a friend at school. They are soooo very good. Maybe I will make them again…on a special occasion. :-). Thank you for the recipe!
So glad you liked them! And yep, there are definitely a few steps to this one, but I think they’re worth it…just not every morning! Thanks for the review!❤️
I’m a huge fan of tarts. I make tarts every weekend. Yesterday, I found this recipe on my friend’s facebook timeline, and I decided to make these tarts in order to give my aunt. And you know what, the taste was really irresistible!!! My aunt was so impressed by these tarts I made. I was so happy. Thank you so much!
Glad you and your aunt enjoyed!
In step 13, do you mean to remove the baking sheet from the fridge? I went back and reread it several times, and I was a bit confused! It’s the same up in the post, as well.
These sound amazing, and I am definitely going to make these “for the kids.” ;oP
oh gosh, that’s a typo! All fixed! yes, it is the refrigerator. Thanks for letting me know 🙂
I followed the directions and used strawberry preserves for a filling. Yummy pastry crust! But the instructions to cut the butter into the flour until the crumb is the size of peanuts was a bit too large for me. It made the dough really wet when rolling out and transferring to the baking sheet if I wasn’t refrigerating every 10 minutes. Additionally, rolling the dough to 1/8 of an inch was too thin with such large chunks of butter. As a result, the tarts baked up a little flimsy and the top crust had several cracks. Flavor was delicious and buttery. Overall, I’d try this again but cut the butter into the dough a little longer so the crumb is smaller and I’d roll the dough a little thicker.
Wow…this homemade brown….tarts looks an amazing and it sounds too delicious….i can’t to wait try it…Thanks for sharing…for a beautiful or healthy recipe…!