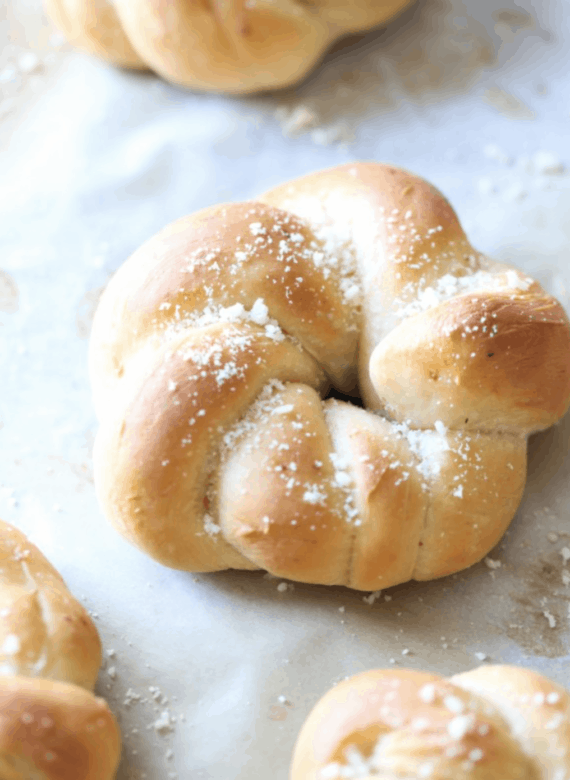
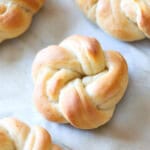
These homemade garlic knots are even better than the ones from our favorite pizza place! They’re made with soft-baked dough flecked with crispy fried garlic and brushed with garlic butter. With only 5 ingredients and minimal rising time, these buttery bread knots make the best side or appetizer!

My kids always order garlic knots whenever we get pizza delivered. Recently, I decided to make homemade garlic knots to serve with our pizza casserole! As someone who loves bread but isn’t fond of the rising, waiting, and guesswork that comes with baking with yeast, I used rapid-rise yeast and was SO happy with how these knots turned out. It does involve a little bit of rise time, but not hours like regular yeast. And, I have to say, I was rewarded with perfectly fluffy garlic knots at the end of the process.
What Makes This My Favorite Garlic Knots Recipe
- Light and buttery. As much as we love their pizzeria cousins, these homemade garlic knots aren’t swimming in oil. They’re just as soft, garlicky, and buttery, but lighter on the grease.
- 5 ingredients. Just pantry staples and fresh garlic. That’s it!
- Quicker than traditional bread rolls. Unlike, say, homemade French bread or Hawaiian rolls, this dough is more similar to pizza dough. It’s just as easy to make with rapid-rise yeast, and pretty forgiving even if you’re new to baking with yeast.
- Versatile. Believe me when I say that you can pair garlic knots with everything! From pizza to chili and spaghetti and meatballs, or as an appetizer at parties, these buttery rolls have you covered.

Ingredients You’ll Need to Make This Recipe
With only 5 ingredients, not only are these garlic knots ridiculously delicious, but they’re ridiculously simple, too. Scroll to the recipe card after the post for the printable recipe with the full ingredient amounts.
- Butter – I use the butter to brown the garlic, then strain the infused butter to brush over the knots after baking. It’s what makes this the BEST garlic knots recipe ever.
- Garlic – Fresh garlic cloves are a must! Mince the garlic finely, since you’ll fold the pieces into the dough.
- Rapid-Rise Yeast – Also called instant yeast, quick rise, or fast-rising yeast. This type of yeast is similar to active dry yeast, but it activates more quickly, shortening the rising time.
- Flour and Salt – Measure the flour using the spoon and sweep method (if you don’t have a kitchen scale). Spoon the flour from the bag into your measuring cup, and level it off for a nice, even cup of flour. Don’t scoop straight from the bag, or it risks overmeasuring.
- Parmesan Cheese (Optional) – Freshly grated, for garnish.
How to Make Garlic Knots
The dough comes together really easily, and while it takes time, the results are worth it! Plus, there are a few extra steps to these garlic knots that I think make them extra special. First, I browned the minced garlic in salted butter until it turned golden (but not burnt). Then, I strained the garlic to mix into the dough, and reserved the butter to brush on top. Here’s how to do it:


- Make the garlic butter. Melt butter over medium-low heat, and add the minced garlic. Cook until the garlic is lightly browned. Then, remove the garlic from the pan immediately so it doesn’t overcook and turn bitter.
- Strain the garlic. Now, pass the garlic butter through a fine mesh strainer. Set the butter aside for now.
- Activate the yeast. Add the browned garlic bits to a bowl with warm water and yeast. Stir until the yeast has fully dissolved.
Make the Dough
- Combine the ingredients. Next, whisk the salt and flour in your mixer. Slowly add the yeast mixture, and beat the dough for 6 minutes. Afterward, turn the dough out and shape it into a smooth ball.


- Rise. Even using rapid-rise yeast, you’ll have to allow it to rise a little bit. A trick I used was to preheat the oven to just 200°F and turn it off, without opening the oven. When the dough has come together, put it in a glass bowl and place a clean kitchen towel on top. Place this in the warm oven to rise. The dough will double in size, and it will only take about 45 minutes!

Shape the Garlic Knots


- Divide the dough. When it’s ready, you’re going to form your knots. Just punch the dough down and roll it out into a rectangle. Cut the dough into strips and roll them into ropes.


- Shape the knots. Next, tie the dough ropes into a knot as pictured, similar to how you would tie a shoe lace. Loop and tuck the ends around and under.
Bake the Garlic Knots


- Rise again. Now, place the knots onto a lined baking sheet, cover, and allow them to rise again. This time for just about 20-ish minutes in the still-warm oven. Once the rolls have risen, take them out and set them aside while you preheat the oven to 500ºF.
- Bake. Bake your garlic knots at 500ºF for 5 minutes. Warm up the reserved garlic butter from earlier, and brush it over the rolls before returning them to the oven to bake for another 5 minutes. Brush with butter one more time, sprinkle the garlic knots with Parmesan, and enjoy!
Serving Suggestions
These garlic knots can go with just about anything. Heck, I eat them alone if I can get away with it! But if you’re looking for some suggestions, I’d recommend serving these soft garlic knots with your favorite pizza, homemade lasagna, or spaghetti Bolognese. I also love fluffy garlic rolls dunked into creamy Italian sausage soup and beef stew.

Storage and Reheating
- Store at room temperature. Nothing beats a warm-from-the-oven garlic knot, but if you have leftovers, store them airtight at room temperature for up to 3 days.
- Reheat. If you’d like, warm up these knots in the oven or microwave.
- Freeze. You can freeze a batch of homemade garlic knots for up to 2 months. Let the rolls cool completely, and store them in a freezer-safe container. Thaw at room temperature before serving.
More Bread Recipes
Perfect Garlic Knots Recipe
- Prep Time: 25 minutes
- Cook Time: 1 hour 15 minutes
- Total Time: 1 hour 40 minutes
- Yield: 6 knots 1x
- Category: Appetizer
- Method: Oven
- Cuisine: American
Description
These homemade garlic knots are even better than the ones from our favorite pizza place! You need only 5 ingredients and minimal rising time, and these buttery bread knots make the best side or appetizer.
Ingredients
- 6 tablespoons salted butter
- 8 garlic cloves, minced (approximately 1 1/2 tablespoons)
- 3/4 cup warm water
- 1 1/2 teaspoons rapid rise yeast
- 1 teaspoon kosher salt
- 2 cups all purpose flour
- optional- 3 tablespoons grated Parmesan cheese
Instructions
- Spray a large bowl with cooking spray and set aside.
- Preheat your oven to 200°F. Once it reaches temperature turn the oven off and do not open the door.
- In a medium skillet over medium-low heat melt butter.
- Once the butter is melted add in the minced garlic. Cook the garlic until it’s lightly browned and remove from the heat immediately.
- Strain the butter from the garlic and set aside.
- In a small bowl combine the warm water, yeast and garlic pieces. Stir to dissolve the yeast.
Make dough:
- In the bowl of your stand mixer fitted with the dough attachment combine the salt and flour.
- Slowly pour in the yeast mixture and mix on medium speed for 6 minutes.
- Remove the dough from the bowl and form into a smooth ball.
- Place the dough into the prepared bowl, cover with a clean kitchen towel and place in the warm oven for 45 minutes or until the dough doubles in size.
- Line a baking sheet with parchment paper and set aside.
Make the knots:
- When the dough is done, punch it down and roll it slightly on a lightly floured surface into a 6×12″ rectangle.
- Using a pizza cutter cut the dough into 6, 12″ strips.
- To form the knots take each strip of dough and tie it loosely as you would tie a shoe. See above photo. Loop the ends around the dough, tucking the dough under.
- Place each knot onto the prepared pan and cover again with the kitchen towel.
- Place the baking sheet back into the oven for 25-30 minutes until they’ve almost doubled in size again.
- Remove the pan from the oven, set aside and keep covered.
- Preheat the oven to 500°F.
- When the oven is preheated, uncover the knots and place in the oven for 5 minutes.
- While the knots are baking place the bowl with the reserved butter in the microwave for 10 seconds, or until melted.
- After 5 minutes remove from the oven and brush the knots with butter. Return the pan back to the oven and bake for an additional 4-5 minutes until golden brown.
- Remove from the oven and brush with the remaining butter. Serve warm.
Nutrition
- Serving Size:
- Calories: 273
- Sugar: 0.2 g
- Sodium: 524.5 mg
- Fat: 12.7 g
- Carbohydrates: 33.6 g
- Protein: 6 g
- Cholesterol: 32.3 mg


You can also cut the string cheese into pieces and add one to each knot makes for yum yum cheesy garlic knots or leave out garlic and cheese and add sugar and cinnamon for a delicious Sunday morning treat esp when its cold and rainy…enjoy!
great idea!!
Your garlic knots turned out great! I’ll bet your kids loved them too! I used to bake bread when I was a teenager just cause it was fun to do. If you use the old fashioned kind of yeast just make sure you add a bit of sugar to the warm water so the yeast can grow and be careful of your water temp – not too hot. I like using the quickrise yeast because there’s no measuring and mixing the yeast and it’s so easy. I hope you make more stuff with yeast now that you know it’s easy. The thing I have trouble making is pie crust!!
My mouth is watering and I am dying to make these. I hope it is a small batch because I will probably find a way to eat most of these! Delicious and yours turned out so nice. Thanks for sharing.
Wishes for tasty dishes, Linda
These look so perfect and pillowy soft!!