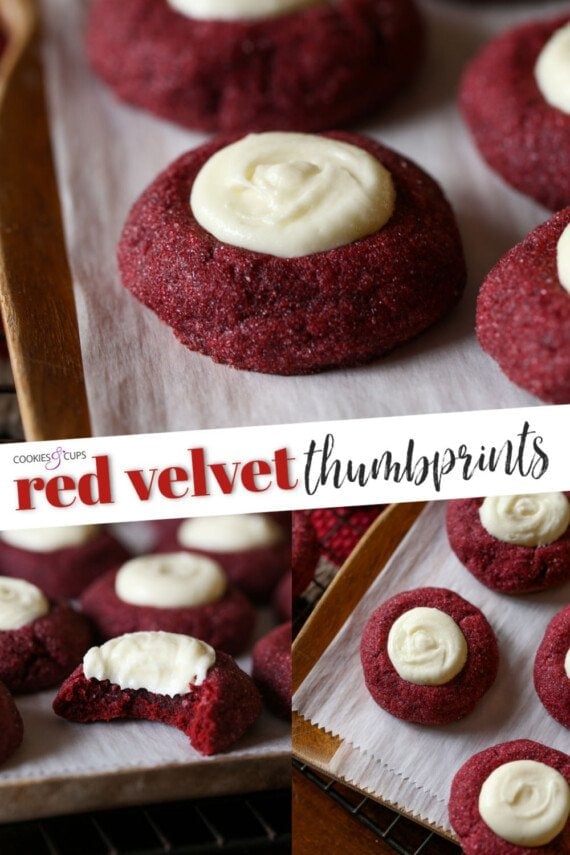
Red Velvet Thumbprint Cookies are a delicious spin on classic thumbprint cookies and red velvet cake! Little bites of red velvet and frosting will look gorgeous on your cookie platter.
These thumprint cookies are inspired by my mom’s red velvet cake recipe! It’s the BEST! If you love red velvet recipes, try my decadent red velvet cheesecake, too.

Red Velvet Thumbprint Cookies Are Little Bits Of Your Favorite Cake!
These thumbprint cookies are super sweet! They are the perfect addition to a holiday cookie platter, for Valentine’s Day, or for any red velvet lover all year long! The cookie is soft, with that subtle chocolate/red velvet flavor and is topped with creamy white chocolate buttercream!
What Is Red Velvet?
Red Velvet cake includes cocoa powder, buttermilk, and vinegar. The combination of these three causes a chemical reaction making it appear red in color. This is usually enhanced with extra red food coloring for effect. The idea for these cookies is similar, but since they are a cookie I omitted the buttermilk and vinegar, relying on the cocoa powder, baking powder, and red food coloring for the pretty red color!

Ingredients:
Make sure to scroll to the bottom of the post for the full recipe and ingredient list!
- Butter
- Granulated sugar
- Large Egg
- Vanilla extract
- Red food coloring
- Unsweetened cocoa powder
- Baking powder
- Kosher salt
- All purpose flour
What Can You Use In Place of Red Food Coloring?
The red food coloring in this recipe is hard to substitute to get a true red color. I have heard that beet powder will work, but I’ve never tried it! They also sell natural food coloring in bake shops and on amazon, which would be a good alternate!
How Do You Make The Indent in Thumbprint Cookies?
Press the dough down before you bake these. They don’t spread a lot while they bake and puff up sightly, so if you don’t press them down beforehand you will crack your cookies when you press them when they come out.
You might even need to press them a little bit more when they come out of the oven just to make the “well” a little more defined, but this is totally fine! Since you press them beforehand, this will only be minimal and won’t lead to cracking.

What Is the Filling?
But don’t feel like you have to use this frosting in these cookies. You can simply melt some white chocolate and fill the indentation with melted chocolate! OR you could use cream cheese frosting or regular buttercream!
The filling I use for these cookies is a White Chocolate Buttercream. Here’s what you will need:
- Butter
- Powdered sugar
- White chocolate. Use a good quality white chocolate instead of white chips. Chopped white chocolate melts the most creamy.
- Heavy cream
How To Store:
I store these airtight at room temperature for up to 2 days. If you need to keep these longer than 2 days pop them in the refrigerator for up to 5 days, OR freeze them for up to 30 days!
Red Velvet Thumbprint Cookies
- Prep Time: 12 minutes
- Cook Time: 10 minutes
- Total Time: 22 minutes
- Yield: 36 cookies 1x
- Category: Cookies
- Method: Oven
Description
These sweet thumbprint cookies are like little bits of your favorite cake in cookie form! Chewy, soft, and filled with frosting, these are perfect for your holiday platter or when just a bite of cake will do!
Ingredients
Cookies:
- 1 cup butter, room temperature
- 1 cup granulated sugar
- 1 large egg
- 1 teaspoon vanilla extract
- 1 tablespoon red food coloring
- 3 tablespoons unsweetened cocoa powder
- 1 teaspoon baking powder
- 1/4 teaspoon kosher salt
- 2 1/2 cups all purpose flour
- For rolling – 2 tablespoons granulated sugar
Filling:
- 1/2 cup butter, room temperature
- 1 cup powdered sugar
- 3 ounces white chocolate, melted
- 1 tablespoon heavy cream
Instructions
Instructions:
- Cookies: Preheat the oven to 350°F. LIne a baking sheet with parchment paper and set aside.
- In the bowl of your stand mixer fitted with the paddle attachment, mix the butter and sugar together for 2 minutes.
- Add in the egg, vanilla, food coloring, cocoa powder, baking powder, and salt. Mix for 1 minute until combined and smooth, scraping the sides of the bowl as necessary.
- Turn the mixer to low and add in the flour. Mix until just combined.
- Place 2- tablespoons granulated sugar in a small bowl. Form the dough into 1- inch balls, roll into the sugar, and place on your prepared baking sheet 2-inches apart. Using the back of a spoon, press an ident into the cookie. Bake for 8-10 minutes, or until set. Transfer the cookies to a wire rack to cool completely.
- Filling: In the bowl of your mixer, combine the butter and the powdered sugar until smooth, 1-2 minutes. Add in the melted chocolate and mix until creamy. Add in the heavy cream and mix for an additional 30 seconds, scraping the sides of the bowl as needed.
- Place the frosting in a piping bag or a zip-top bag with the corner cut off. Pipe a teaspoon of frosting into the indent in each cookie. Alternately, you can spread the frosting with a spoon into the indent.


Notes
Notes: Store at room temperature for up to 2 days, or in the refrigerator for up to 5 days.
Want To Save This Recipe?
Find more recipes like this:
PIN for later:


About to try these, but wondering if I can make them up to the roll stage, then freeze the dough until I’m ready to bake??
Yes absolutely!
Nice Blog !! A Very Yummy Wonderful Recipe !!! WOW Nice Photos to See. I’ll Definitely Try it. Thank You for Sharing that Lovely Food.
I cannot see the recipe and the ingredients.
The link is at the bottom , and also throughout the post that takes you to the Imperial Sugar website!
you say in the directions for the filling to add heavy cream but you don’t list it in the ingredients how much do you add
oh no, let me get that fixed asap! it’s 1 tablespoon 🙂