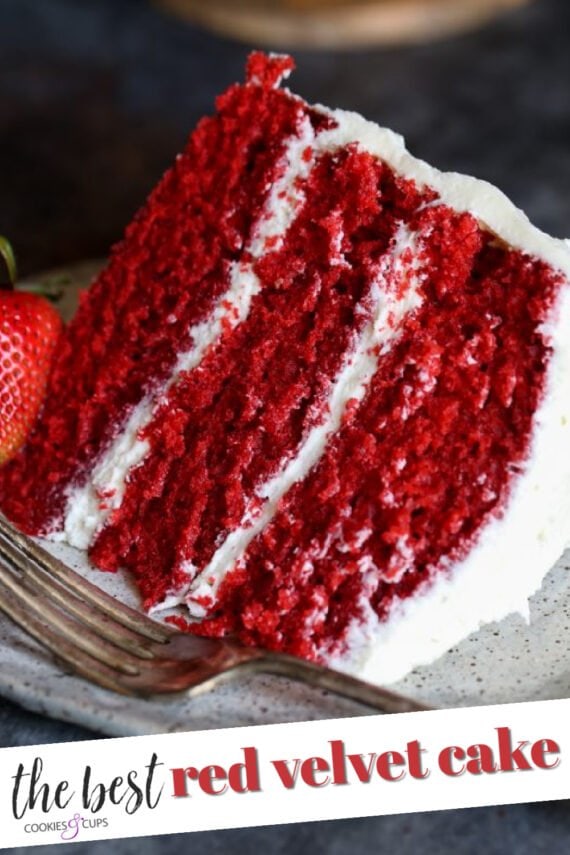
I’m sharing the Best Red Velvet Cake Recipe today! This is the recipe my mom always used. It’s soft, moist and tender, with the perfect red velvet flavor.

The Best Homemade Red Velvet Cake
My mom would always make this red velvet cake from scratch on Christmas when I was growing up. I never really thought too much about it, except that it was a “special occasion” cake. She would go to the trouble of making the cake, cooking the frosting, and carefully frosting it. It was a rustic beauty, and today we’re going to recreate it!
This red velvet cake recipe is great for Christmas and the holidays, but you can make it whenever you want, really. It would be super cute on Valentine’s Day, too! Or, you can just bake it because you’re craving a slice of rich red velvet cake with creamy frosting… I’ve definitely done that a time or two. I’ve even doubled it up with my homemade cheesecake recipe to make a red velvet cheesecake!
Regardless of the reason you make it, when you cut into your red velvet cake you’re going to be so happy. This cake just does that to your heart! It’s outrageously soft, moist, and has the perfect crumb. Let’s get started so you can get in on this goodness ASAP!
(Also, if you’re looking for more easy red velvet recipes, try these red velvet snowball cookies or these red velvet thumbprint cookies!)
Why You’ll Love This Red Velvet Cake
First of all, look at that gorgeous, vibrant red color! Picture-perfect, right?
Here are a few more reasons to love this red velvet cake:
- Super moist. Every crumb of this red velvet cake is so soft and tender. Add some fluffy, silky frosting on top, and every bite is a dream!
- Quick and easy. It takes 10 minutes to prep this cake for the oven, and 30 minutes to bake it. Easy peasy!
- Perfect for any occasion. As mentioned above, you could bake this red velvet cake for the holidays, Valentine’s Day, the 4th of July, or just because!
- Adaptable. Feel free to switch up the frosting (cream cheese frosting vs vanilla buttercream, etc.), add decorations, and more!
What Is Red Velvet Cake?
We can all see that it’s red… but what makes it “velvet?” I mean, it’s a valid question. Some people think red velvet is just a mild chocolate cake with a lot of food coloring. And while that’s KIND of right, red velvet done right is special! Simply put, it’s a cake made with buttermilk, and in my recipe also a little vinegar to really give it a tender crumb. My recipe also uses oil instead of butter, which gives the cake a fluffy texture.
What Does Red Velvet Cake Taste Like?
The little bit of cocoa powder added does give red velvet cake a VERY slight chocolate taste, but I’d describe it more like a sweet and slightly tangy vanilla buttermilk cake with a hint of chocolate. It’s unique and delicious!

Recipe Ingredients
Red velvet cake is mostly made with baking basics that you likely already have in your pantry! Here’s what you’ll need to round up (the exact amounts and full set of directions can be found in the recipe card below):
- Vegetable Oil: For extra moisture so that the crumb comes out super tender.
- Large Eggs: To bind the ingredients together and also to add moisture.
- Buttermilk: Adds a little bit of tangy flavor to the cake.
- Vinegar: This reacts with the baking soda and brings out the red undertones of the cocoa powder.
- Vanilla Extract: Pure vanilla extract offers the best flavor.
- Sugar: Granulated sugar is my go-to for this recipe.
- Unsweetened Cocoa Powder: This will offer your cake a subtle hint of chocolate flavor.
- Kosher Salt: You can use regular table salt or sea salt instead if you wish.
- Baking Soda: To help give your cake some lift.
- All Purpose Flour: I like to use all purpose flour for this recipe, but feel free to try it with cake flour if you like.
- Red Food Coloring: To help you achieve that bright, vibrant red color!
How to Make Red Velvet Cake
This cake comes together in a snap if you follow these straightforward steps:
- Preheat the oven to 350°F. Coat 3 8-inch round pans with nonstick spray, then cut parchment rounds to fit in the bottom of the pans. Place the parchment rounds in the pans and coat them again with nonstick spray. Set them aside for the moment.
- Mix the wet ingredients. In the bowl of your stand mixer fitted with the whisk attachment, add the oil, eggs, buttermilk, vinegar, and vanilla. Mix on medium speed until everything is combined. Then, add in the sugar and mix until it is incorporated.
- Start adding in the dry ingredients. Next, add the cocoa powder, salt, and baking soda, mixing on medium speed for 30 seconds, or until no lumps remain in the cocoa powder.
- Stir in the flour. Turn the mixer to low and add in the flour and red food coloring. Mix until smooth (30 seconds to 1 minute), scraping the sides of the bowl as necessary.
- Pour the cake batter into the pans. Divide the cake batter equally into the 3 8-inch or 9-inch prepared pans. An 8-inch pan gives a thicker layer and a 9-inch pan makes the layers thinner. The bake time isn’t too much different, though.
- Bake the cakes. Bake for 25-30 minutes or until a toothpick inserted in the center comes out clean.
- Let the cakes cool. Let them cool in their pans for 10 minutes and then turn the cakes out onto a cooling rack to cool completely. If the layers become domed, use a serrated knife to trim the tops when cooled, so they layer flat!
- Frost the cake. Use the frosting of your choice to frost your red velvet cake!

What Kind of Frosting Is Best for Red Velvet Cake?
I know so many of you prefer your red velvet cake with cream cheese frosting, but I’m ALL about the heritage frosting (or cooked frosting) on this cake – it makes it into a true southern classic! You can, however, also use:
- Cream cheese frosting, which is a classic choice for red velvet cake!
- Buttercream frosting, because it’s an easy option for those who don’t want to go to the trouble of heritage frosting or don’t like cream cheese frosting.
- Chocolate frosting! It might seem crazy, but chocolate and red velvet go together perfectly!
Tips for Success
As you can see, the process is pretty simple, but there are a few more tips that make baking this red velvet cake a breeze:
- What kind of food coloring do you need? I use old school McCormick food coloring, because that’s what my mom used. I know there are all sorts of fancy food dyes out now, with more natural ingredients, so please feel free to use whatever you feel comfortable with. And full disclosure, my mom’s recipe calls for TWO whole bottles of the McCormick’s food coloring, but after testing it out multiple times, I feel like you can achieve a gorgeous red color with just one bottle. There are more potent food dyes out there now where you can probably use even less, but I know almost everyone can find the McCormick’s at their local supermarket, so for ease, I write this recipe using that brand.
- Feel free to switch up the size of the pan. 3 8-inch round cake pans will be perfect. You can also use 9-inch pans if that is what you have (just know your layers will be thinner), or you can bake this in a 9×13 pan if you want to make a single layer cake.
- Don’t skip adding both the buttermilk AND the vinegar. I find that the combo of the two is what really makes the texture of this cake special.
- What to use if you run out of buttermilk. If you find that you don’t have buttermilk and don’t want to run to the store, you can make a buttermilk substitute very easily at home. Keep in mind that you will still need to add the extra vinegar the recipe calls for on top of what is added to the homemade buttermilk. Using both buttermilk and vinegar is the “secret trick” I use in my recipe to make it so tender!
Frequently Asked Questions
Not quite! As stated earlier, the cocoa powder that gets added in gives this cake a hint of chocolate flavor, but it’s really more of a vanilla buttermilk cake.
There are two main reasons that vinegar is added to red velvet cake. First, it reacts with the baking soda and contributes to the ultra-soft texture of the cake, and second, it reacts with the cocoa powder, pulling out the red undertones that give the cake its signature look.

Can I Make This Recipe Into Red Velvet Cupcakes?
Yes, you can! It should make about 36 cupcakes. Fill the liners 2/3 of the way full, and bake them at 350°F for 20 minutes, or until a toothpick inserted comes out clean.
How to Store
Red velvet cake should be stored in your refrigerator in an airtight container (or layers of plastic wrap) for 4-5 days. I like to bring it back to room temperature before I serve it, but you don’t have to!
Can I Freeze Homemade Red Velvet Cake?
Sure! You can freeze this cake (or individual slices of cake) in an airtight container for 2-3 months. When you’re ready to enjoy it again, thaw it overnight in the refrigerator and then bring it to room temperature.

More Classic Cake Recipes
If you loved this red velvet cake, be sure to check out these other classic cakes as well! They’re sure to get rave reviews.
- Classic Pound Cake
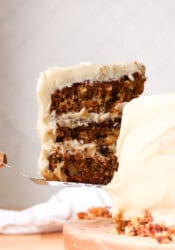
- Carrot Cake With Cream Cheese Frosting
- Perfect Vanilla Cake
- Ridiculous Chocolate Cake
- Sour Cream Cheesecake
Red Velvet Cake
- Prep Time: 10 minutes
- Cook Time: 30 minutes
- Total Time: 40 minutes
- Yield: 12 1x
- Category: Cake
- Method: Oven
- Cuisine: American
Description
This homemade red velvet cake is so moist and tender. Top it with some silky cream cheese frosting, heritage frosting, or the frosting of your choice, and it’s an automatic family favorite!
Ingredients
- 1 1/2 cups vegetable oil
- 2 eggs
- 1 cup buttermilk
- 1 tablespoon vinegar
- 1 teaspoon vanilla
- 2 cups granulated sugar
- 1 tablespoon unsweetened cocoa powder
- 1 teaspoon salt
- 1 teaspoon baking soda
- 2 1/2 cups all purpose flour
- 1 ounce red food coloring
Instructions
- Preheat oven to 350°F. Coat 3 8-inch round pans with nonstick spray. Cut parchment rounds to fit in the bottom of the pans. Place the parchment rounds in the pans and coat again with nonstick spray. Set aside.
- In the bowl of your stand mixer fitted with the whisk attachment add the oil, eggs, buttermilk, vinegar, and vanilla. Mix on medium speed until combined. Add in the sugar and mix until incorporated.
- Next add the cocoa powder, salt and baking soda, mixing on medium speed for 30 seconds, or until no lumps remain in the cocoa powder.
- Turn mixer to low and add in the flour and red food coloring. Mix until smooth, 30 seconds – 1 minute, scraping the sides of the bowl as necessary.
- Divide the batter equally into the 3 prepared pans.
- Bake for 25-30 minutes or until a toothpick inserted in the center comes out clean.
- Cool in pan for 10 minutes and then turn the cakes out onto a wire rack to cool completely.
- Frost as desired.
Notes
- I use my recipe for heritage frosting on this cake. Please note, if you use my recipe you will need to increase the recipe by 1/2. You can also use my buttercream frosting.
- Also, if you are not using liquid food coloring, the amount that you will need will change. If you use a gel coloring add until the desired shade of red is reached. I use McCormick’s brand coloring in this cake, as this is what my mom used in her recipe.
- To store. Red velvet cake should be stored in your refrigerator in an airtight container (or layers of plastic wrap) for 4-5 days. I like to bring it back to room temperature before I serve it, but you don’t have to!
- To freeze. You can freeze this cake (or individual slices of cake) in an airtight container for 2-3 months. When you’re ready to enjoy it again, thaw it overnight in the refrigerator and then bring it to room temperature.
Nutrition
- Serving Size: 1 unfrosted slice
- Calories: 475
- Sugar: 33.6 g
- Sodium: 314.9 mg
- Fat: 28.5 g
- Carbohydrates: 53.7 g
- Protein: 3.9 g
- Cholesterol: 31.4 mg
Want To Save This Recipe?
Find more recipes like this:


Perfect! The best red velvet recipe I’ve ever used.
Sooooo I accidentally made this cake a week early. Does anyone know if it will freeze well? I was planning on making a cake roll smh
Yes it will freeze beautifully!
If you’re looking for a moist delicious red velvet cake STOP RIGHT HERE!!!!!! I’ve made this cake more times than I can count. I’ve tweaked the recipe a little by doubling the cocoa powder but other than that I follow the recipe exactly. For people that are sensitive to food coloring I’ve even made this recipe leaving the food coloring out and it’s just as delicious. This cake is so good people have started to place orders for it. The problem… I don’t sell cakes! .
Super moist. Perfect cake.
I, too, like the heritage frosting with powdered sugar instead of granulated sugar. You get a creamier texture with the powdered sugar. I have made this cake and frosting twice and have gotten great results both times.
Ive been baking for the past 10yrs, common practice for me is to bake my cake sponges at 160°C/320f and Ive had 100% success everytime with all sponges. However Ive notived with this particular recipe you HAVE TO bake it at 180°C/360f otherwise your cake sponges will implode in the oven indefinitely. Ive now tried three times and all three times same result. On 180°C/360f they come out perfect. Just a heads up for anyone else that also bakes at 160°C/320f.
Amazing recipe otherwise!
Really like this recipe