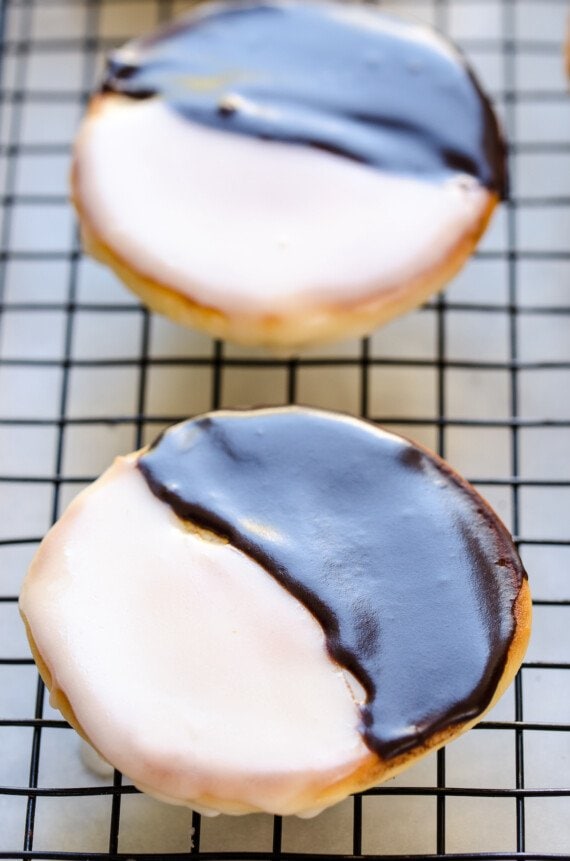
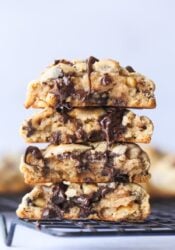
Black and White Cookies are a classic New York City bakery staple! And now you can make them at home – soft, cake-like vanilla cookies with the perfect, tender crumb. Topped with sweet and glossy, half vanilla and half chocolate icing, these cookies are the best of both worlds!

Why You’ll Love This Black and White Cookie Recipe
- Incredible texture. These pillowy, soft and buttery cookies fall somewhere between a tender cookie and a dense cake, topped with half chocolate and half vanilla icing. Their soft cakey texture is to die for.
- Perfectly sweet. Traditionally, these cookies are frosted on the flat undersides, so that’s what I did with this recipe. The frosting adds just the right amount of sweetness.
- Gorgeous. I just love how glossy the icing is on these Black and White cookies. It really makes them stand out on a cookie platter!
What Flavor Are Black and White Cookies?
The cookie itself is a buttery vanilla flavor, topped with sweet chocolate and vanilla. A deliciously sweet and chewy cookie that offers a mix of chocolate and vanilla in each bite!

Ingredient Notes
Here’s a quick look at what you’ll need to make black and white cookies. Be sure to scroll down to the recipe card for ingredient amounts.
For the Cookies
- Butter: Brought to room temperature.
- Cake Flour: The fine consistency and low protein will give the softest, fluffiest (and most authentic) cake-like cookie texture. You can also substitute cake flour by sifting 1 cup of all purpose flour (less 2 tablespoons) with 2 tablespoons of cornstarch. Sift the mixture twice for the best aeration!
- Buttermilk: If you don’t have buttermilk I have an easy recipe for a homemade buttermilk substitute that will do the trick.
- Sugar: Regular white granulated sugar is best.
- Egg
- Vanilla
- Baking Powder
- Salt
For the Icing
The icing for Black and White Cookies is made from a simple combo of powdered sugar and milk, that sets up nicely and makes these cookies great for gifting.
- Dark Cocoa Powder: Unsweetened. I like to use a dark cocoa powder for the chocolate icing, since the result is nearly black.
- Powdered Sugar
- Milk

How to Make Black and White Cookies
This recipe makes 8 large cookies, much in the same style you’d find in New York bakeries. You can certainly make smaller cookies if you prefer; just adjust the baking time to be a little less.


- Make the cookie dough. Beat together the butter and sugar, then add in the egg, vanilla, baking powder, and salt. Mix the ingredients until they’re smooth. Don’t forget to scrape the sides of the bowl! Alternate adding the flour and buttermilk, starting and ending with the flour. Mix everything until just combined; be careful to not over-mix.
- Place on a Baking Sheet: Portion out the dough using a large cookie scoop, and place the dough onto a baking sheet lined with parchment paper.


- Bake: Bake the cookies in a preheated oven until the tops are set and the edges are lightly golden. Transfer the cookies to a wire rack and let them cool completely before icing.
- Make the Glaze: Whisk together the powdered sugar and milk, then divide the icing by half. Add the cocoa powder to one half (you can add in a teaspoon of milk if you find the chocolate glaze too thick to spread).
- Ice the Cookies: Spread the white icing on one half of the cookie and chocolate icing on the other. Leave your Black and White Cookies to set completely before storing them!
Tips for Success
- To speed up the icing step: I recommend icing the white side of the cookie first, followed by the chocolate side. If you’d like to speed up the setting time of the first icing layer, place the half-iced cookies in the fridge for about 20 minutes before icing the other half.
- Ice the flat side of the cookies: Remember to ice the flat, bottom side of the cookies! We’re all just so used to icing the tops, so it’s worth making a mental note before you start.
How to Store Black and White Cookies
These cookies are best enjoyed the day you make them, as this is when they’re at their freshest! But if you have any leftovers here’s how to store them:
- Counter: Black and White cookies will keep for up to 3 days when stored airtight at room temperature – after which you should move them to the fridge.
- Freezer: These cookies can be frozen after baking (but before glazing), or you can freeze the cookie dough itself for up to 3 months. In both cases, thaw the cookies/dough completely before you glaze and/or bake them.

More Easy Cookie Recipes
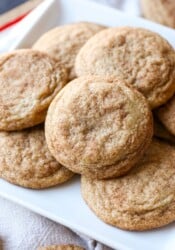
- Perfect Snickerdoodle Cookies
- White Chocolate Macadamia Nut Cookies
- Red Velvet Thumbprint Cookies
- Lemon Blueberry Whoopie Pies
- Easy Soft Sugar Cookies

Black and White Cookies
- Prep Time: 10 minutes
- Cook Time: 12 minutes
- Total Time: 22 minutes
- Yield: 8 large cookies 1x
- Category: Cookies
- Method: Baking
- Cuisine: Dessert
Description
Black and White Cookies are a classic New York City bakery staple! And now you can make them at home – soft, cake-like vanilla cookies with the perfect, tender crumb. Topped with sweet and glossy, half vanilla and half chocolate icing, these cookies are the best of both worlds!
Ingredients
Cookies
- 6 tablespoons butter, room temperature
- 1/2 cup granulated sugar
- 1 egg
- 1 teaspoon vanilla
- 1/2 teaspoon baking powder
- 1/2 teaspoon kosher salt
- 1 1/4 cup cake flour
- 1/3 cup buttermilk
Icing
- 2 cups powdered sugar
- 3 tablespoons milk
- 1/4 cup unsweetened dark cocoa powder
Instructions
- Preheat oven to 375°F. Line a baking sheet with parchment paper and set aside.
- In the bowl of your stand mixer combine the butter and sugar together on medium speed for 2 minutes.
- Add in the egg, vanilla, baking powder, and salt. Mix until smooth, scraping the sides of the bowl as necessary.
- Turn mixer to low and add in the flour and buttermilk in alternating portions, beginning and ending with the flour. Mix until just combined and smooth.
- Using a large cookie scoop (3- tablespoon sized) portion out the dough onto the prepared baking sheet 2- inches apart.
- Bake for 12-15 minutes or until the edges are lightly golden and the tops are set.
- Transfer to a wire rack to cool completely.
- When the cookies are cooled, create the glaze by whisking the powdered sugar and milk together. Divide the icing in half and add in the cocoa powder to half of the icing. You might need to add an additional teaspoon of milk to the chocolate glaze so it’s spreadable.
- Using an off-set spatula spread on the flat side of each cookie with white icing on half and chocolate icing on the other half. Allow the icing to set completely.
Notes
Store airtight at room temperature for up to 3 days.
Nutrition
- Serving Size: 1 cookie
- Calories: 307
- Sugar: 37.9 g
- Sodium: 151.1 mg
- Fat: 9.3 g
- Carbohydrates: 55.1 g
- Protein: 3.1 g
- Cholesterol: 23 mg


Hi Shelly….Can I substitute the buttermilk with whole milk or something else?
You can, or you can make your own buttermilk mixture which is super easy! Here’s how… https://cookiesandcups.com/how-to-make-buttermilk/
I moved to upstate New York in 1999, and I learned a lot of new things that I didn’t know while growing up in California. One of them was about the near battle between two kinds of cookies: there are two very distinct New York cookies that are similar to the ones you’re have presented here. One comes from New York City, and has a crisp cookie with a very hard glaze. It mimics royal icing, though I’m not sure that’s what it really is. The chocolate side does look truly black as they do in the pictures of your cookies here, and is glossy, while the white side is a matte white. However, in upstate New York, you have half-moon cookies. They are soft and chewy. Though the top is always flat, the bottom is usually rounded, akin to the top of a muffin. The frosting is always of the buttercream type, and is neither glossy nor smooth. The chocolate side is usually brown in color.
Therefore, it looks like what you have here is a kind of mix of the two cookies. The frosting of the New York City version, which is called a black-and-white, and the cookie of the half-moon version. I’d love to see your take on both cookies with the usual cookie consistencies!
We from western new york called them moon cookies
Hemstrought’s does not make black and white cookies. They make Half Moon cookies. There is a difference and there is no comparison.
No need to be so rude. Sheesh
Amazing classic NY cookie recipe!
I can’t wait to make these! If I were to make ahead, can I freeze after they’ve been frosted?
These look wonderful, but the original Black and White cookies were called Half-moon Cookies from an old bakery in Utica, New York, and they have a chocolate cookie. We used to go shopping with our grandmother in Norwich, NY and have lunch at the Bluebird Restaurant that got them fresh from the bakery in Utica. They were about 4″ across and we were diligent about eating all our lunch so we could have one for our dessert! What a great memory. I found the original recipe but I can’t remember the name of the bakery so you can look it up. Maybe googling some key words would work. Love your blog!
They look delish!! My sisters birthday is coming up and I would love to make these for her. Do you have to use cake flour or could you use all purpose flour?? Can’t wait to try these!!
You could use all purpose. The cake flour makes them a little more tender 🙂