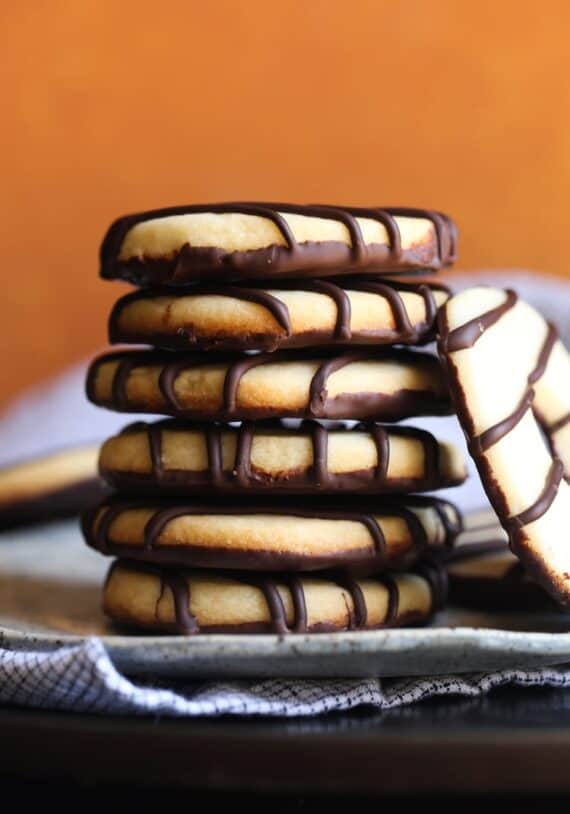
These buttery fudge stripe cookies taste just like the Keebler classic, only 100% homemade! Lightly crisp vanilla cookies are drizzled with fudgy chocolate stripes, then dipped in more chocolate in this super-easy copycat recipe.

From copycat oatmeal cream pies to homemade Oreos, I love recreating my favorite store-bought cookies. Every time I stroll down the cookie aisle at my local supermarket, it’s a treasure trove of inspiration! Keebler’s fudge stripe cookies were the latest to whisper, “make me at home!” as I brushed past. And who am I to resist a fudgy, talking cookie?
Once you’re done and the chocolate is set, all that’s left is to pour yourself a glass of milk and get dunking! I’ll serve these on a plate along with my soft chocolate sugar cookies and peanut butter balls for a dark chocolate overload whenever a craving strikes.
Why These Copycat Keebler Fudge Stripes Are Worth Making at Home
- Everything you love about the original. Crisp vanilla butter cookies? Check. Rich and creamy chocolate? Check! This fudge stripe cookies recipe is everything I hoped for and love about the classic version. Even better, since these are made in my own kitchen.
- It’s easier than it looks. You’re going to LOVE how easy it is to make your own fudge stripe cookies. The butter cookie dough comes together in minutes with zero chilling time (always a win in my books). Fudge stripes are basically cut-out cookies, and I’ll show you how to make the iconic “donut” shape.
- More ways to love them. These are perfect for dipping in milk, or even making homemade ice cream sandwiches (more on this later).

Ingredients You’ll Need
Below is everything you’ll need to make homemade fudge stripe cookies that taste even better than the Keebler original! Make sure to check the full amounts and details in the recipe card later on.
- Butter – Make sure your butter is cold from the fridge, making it easier to cut into cubes.
- Sugar – The vanilla cookies in this recipe are similar to a shortbread or sugar cookie, so I recommend using white granulated sugar for the best results.
- Egg – Egg adds richness and structure to the cookie dough.
- Vanilla – For the best possible flavor, use pure vanilla extract rather than imitation vanilla.
- Baking Powder and Salt – Baking powder keeps the cookies from falling flat in the oven, while a pinch of salt balances the sweetness.
- Flour – I stick with regular all-purpose flour, as I find that it yields the most consistent results in these cookies.
- Dark Chocolate – You’ll need about 10 ounces of dark chocolate. You can use a good-quality baker’s chocolate or your choice of dark chocolate bar.
How to Make Fudge Stripe Cookies From Scratch
Making your own fudge stripe cookies is actually SUPER simple. You will still need to chill the baked cookies a bit after they’ve been smothered in chocolate, but it’s worth it! Here’s how to make perfect homemade fudge stripe cookies.
Shape and Bake the Cookies


- Mix the cookie dough. First, you’ll cream together cold butter and sugar. When the mixture is fluffy, add an egg, vanilla, salt, and baking powder. Next, slowly add flour to form the cookie dough.
- Roll it out. Once your dough takes shape, divide it into two. Roll the first half of the dough to about ⅓-inch thick.
- Cut out the cookies. Use a 3- inch round cookie cutter to cut out circles of dough. Gather up the scraps, re-roll, and cut until you’ve used up all the cookie dough (you should end up with approximately 24 cookies). Afterward, use another, smaller round cookie cutter to cut a hole from the middle of each 3-inch circle. A round piping tip also works great for this!
- Baking time. Now, transfer the cut-out cookies to a parchment-lined baking sheet. Bake at 400ºF for about 6 minutes. At this point, the edges of the cookies should be golden when they come out of the oven.
Add the Fudge Stripes


- Melt the chocolate. While your cookies cool down on a wire rack, you’ll melt the chocolate in the microwave until it’s smooth. Next, transfer about ⅓ of the melted chocolate to a piping bag fitted with a small round tip. Check that the cookies are completely cool, then pipe the chocolate over each cookie in the signature stripe pattern. Finally, pop the cookies into the fridge to set.
- Dip the bottoms of the cookies. It’s time to finish your fudge stripe cookies! Take the cookies out of the fridge, and dip the bottoms into the melted chocolate. You may need to reheat the chocolate slightly to get it back to a dippable consistency. Place your finished cookies upside down on a wire rack, then return them to the fridge until the chocolate is completely set.
Making the Cookie Dough in Advance
You can prepare the cookie dough 1-2 days in advance and keep it airtight in the fridge, either tightly wrapped or in a container, until it’s time to bake.
You can also freeze your homemade cookie dough. Wrap the dough or seal it in a freezer bag with as much air removed as possible, then freeze the dough for up to 1 month. Defrost the cookie dough in the fridge overnight, then roll, cut out, and bake as directed.

Tips for Perfect Fudge Stripe Cookies
- Don’t forget to chill the cookies. Chilling the cookies in between drizzling the tops with chocolate and dipping the bottoms is key. This allows the chocolate to harden so that you don’t wind up with a big ol’ mess of smeared chocolate.
- It doesn’t matter in what order you dip and stripe your cookies. I do the drizzling first since I prefer to cover the stripes with dipped bottoms. Alternatively, you can dip the cookies first, then add the stripes. You do you.
- Dip the cookies so that the chocolate comes just over the bottom edge. There’s really no technical reason for this; it just looks pretty. 😉
- Tap off as much excess chocolate as you can when coating the bottoms of the cookies. I’ll sometimes use a spoon to spread the chocolate and help even it out.

Turning These Into Sandwich Cookies
For an extra-indulgent chocolate treat, spread chocolate frosting onto the fudgy bottom edge of one cookie, and place a second cookie on top to make a sandwich.
And, if you’re dessert-crazed like I am, turn your fudge stripe cookies into homemade ice cream sandwiches. I can confirm that we’ve tried this with just about every ice cream flavor. You will not be disappointed!

Storage and Freezing
- Store at room temperature. Store these fudge stripes in an airtight container in a cool, dry location for up to 5 days. The chocolate can become a bit sticky if they’re stored somewhere too warm. When in doubt (or if your kitchen tends to run warm), keep the cookies in the fridge and take them out to serve at room temperature.
- Freeze them for later. Fudge stripe cookies can be frozen for up to 2-3 months. I recommend pre-freezing the cookies on a baking sheet before transferring them to a freezer bag or container. Use parchment paper to separate any layers. Whenever you’re ready to serve them, take the cookies out of the bag and defrost them at room temperature (or in the fridge).
More Copycat Cookies Recipes

Fudge Stripe Cookies
- Prep Time: 20 minutes
- Cook Time: 6 minutes
- Total Time: 26 minutes
- Yield: 24 cookies 1x
- Category: Dessert
- Method: Oven
- Cuisine: American
Description
These chocolate-drizzled fudge stripe cookies taste just like Keebler cookies, only 100% homemade! Buttery vanilla cookies are drizzled with chocolate stripes, then dipped in more chocolate in this easy copycat recipe.
Ingredients
- 1 cup butter, cold and cubed
- 1 cup granulated sugar
- 1 egg
- 1 teaspoon vanilla
- 1/2 teaspoon kosher salt
- 2 teaspoons baking powder
- 2 1/2 cups flour
- 10 ounces dark chocolate, chopped
Instructions
- Preheat oven to 400°F. Line a baking sheet with parchment paper and set aside.
- In the bowl of your stand mixer fitted with the paddle attachment, mix the butter and sugar together on medium speed for 2 minutes until fluffy. Add in the egg, vanilla, salt, and baking powder and continue mixing for 1 minute until combined, scraping the sides of the bowl as necessary.
- Turn the mixer to low and add in the flour, mixing until incorporated.
- Divide the dough in half and roll it out on a lightly floured counter to 1/3- inch thick. Using a 3- inch round cutter, cut out the dough. Re-roll the scraps, so all the dough is used. Using a smaller, round cutter, or the back of a large piping tip, cut out the center of each circle.
- Place on the baking sheet, and bake for 6 minutes, or until the edges are lightly golden.
- Transfer the cookies to a wire rack to cool completely.
- In a large bowl, melt the chocolate in 30-second increments, stirring after each, until the chocolate is melted and smooth. Prepare a piping tip fitted with a small round tip. Fill the bag with 1/3 of the melted chocolate. Alternatively, you can use a zip-top bag with the corner cut off.
- Drizzle the chocolate in stripes on top of each cookie. Place the cookies in the refrigerator for 10 minutes to set the chocolate. Remove the cookies from the refrigerator. Reheat the chocolate, if necessary, and dip the bottoms of the cookies into the chocolate, tapping off the excess. Place the cookies upside-down back onto the wire rack and place them back in the refrigerator for 15 minutes to set.
Notes
Store the cookies airtight in a cool place for up to 5 days. I store mine at room temperature when the air conditioner is on, or in the winter.
If you live in a warm climate, the chocolate could melt slightly, so I suggest storing the cookies in the refrigerator to prevent a mess.
Nutrition
- Serving Size: 1 Cookie
- Calories: 220
- Sugar: 12.7 g
- Sodium: 54.7 mg
- Fat: 12.5 g
- Carbohydrates: 24.9 g
- Protein: 2.4 g
- Cholesterol: 28.8 mg


Also,can you make this dough ahead of time? What’s your favorite cookie?
You can make the dough ahead, yes!
Hi, these are great , everyone calls them my milanos, I bake for my friends birthday whatever their favorite cookie is and I’m making these alot !thank you! I don’t see how to send a pic but they’re very pretty as well I make hearts❤️
The recipe looks good, but rolling out warm unchilled dough was a stressful mess. I suggest rolling dough into a log, wrap it, and chill in the refrigerator before cutting. That way you can slice these and cut out a center hole without the shapes getting wonky!
Hey! I was wondering if there was anything i could use as an egg replacement? my mom has a egg intolerance and egg makes her sick, i wanted to make these for my family, im just a 14 year old kid
you can always use 1/4 cup unsweetened applesauce per egg as a replacement!
Can we use semi sweet chocolate chips??
Sure 🙂
can we make them a diffrent shape?
sure!
ok thanks
Is there somthing that we can add in the dark chocolate prior to dipping/stripping? It melts so fast in warm weather. Thanks.
Oh yes, that’s tough! The only thing I could recommend is using chocolate candy melts in place of chocolate. They tend to have a higher melting temperature.
Can I use a hand mixer for this recipe? I wish I had a stand mixer…
Yes you can!
Great post. These fudge cookies look absolutely delicious. Simply love dark chocolate. It’s organic and nutritious and has health benefits. It reduces the risk of heart failure and is a mood elevator.
When cookies talk to you, you know you’ve got to go for it! I love the idea of doing homemade versions of store bought cookies. These look amazing — you can totally see how buttery and crisp that cookie is in the picture. Yum!
I feel like truer words have never been spoken 🙂
I feel an important piece of info is being left out here in the questions. How can you simply make the genuine “Keebler Chocolate Fudge taste” simply buy using whatever store bought chocolate you want? I have NEVER had a chocolate taste like theirs and have been trying to find out how to replicate this taste. This taste IS what makes these cookies amazing and every recipe on these just says “use whatever chocolate you like!”… I came here for the Keebler Chocolate taste! Any help would be immensely appreciated!