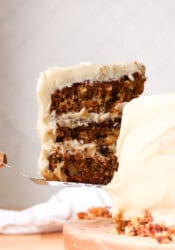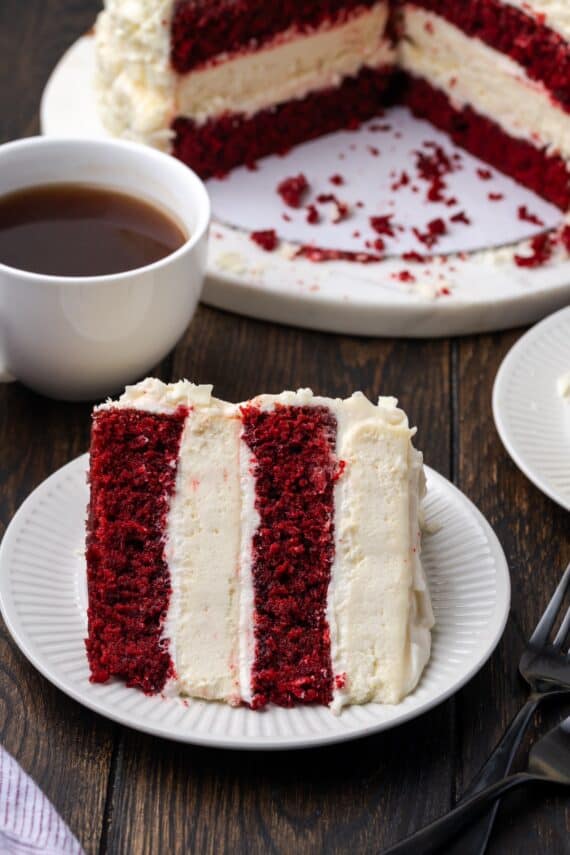
This red velvet cheesecake is a decadent, layered dessert with creamy homemade cheesecake sandwiched between soft red velvet cake and smothered with cream cheese frosting.
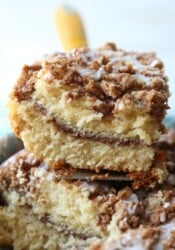
Why choose one dessert when you can have two in one?! Try my banana blondie cheesecake and cheesecake brownies next.

When I close my eyes and think of the ultimate two-in-one dessert, I’m picturing red velvet cheesecake! This recipe is inspired by the Cheesecake Factory (the authority on decadent cheesecakes, IYKYK). I made this copycat version with double layers of my best red velvet cake and easy baked cheesecake, frosted with the creamiest cream cheese frosting.
Every bite has the perfect balance of sweet and tangy, rich and creamy, soft cake and velvety cheesecake. This red velvet cheesecake would be perfect for Valentine’s Day or a birthday celebration.
Why This Red Velvet Cheesecake Is THAT Good
- Impressive but easy. Don’t let the layers intimidate you. Red velvet cheesecake is a cinch to make and even quicker to stack, and I’ll share my tips for success. You’ll be slicing into your masterpiece in no time.
- Two flavors in one dessert. You have rich, silky, tangy cheesecake and the subtle chocolatey flavor of red velvet in one cake!
- Adaptable. I make both cake layers from scratch. Depending on how much time you have (and the amount of effort you want to put into your cake), you can make a semi-homemade version with a red velvet cake mix instead.


What You’ll Need
This cake recipe consists of a red velvet sponge layer, creamy cheesecake layer, and frosting. The neat thing these components have in common is that they all rely on a handful of specific, yet easy, pantry ingredients to come out perfect.
Let’s go over what you’ll need with some notes. Scroll to the printable recipe card for the complete ingredients, amounts, and recipe details.
For the Red Velvet Cake Layers
- Dry Ingredients – Sugar, all-purpose flour, baking soda, and salt.
- Cocoa Powder – Natural, unsweetened cocoa powder is the classic choice for red velvet cake recipes.
- Oil – Choose a neutral-flavored vegetable oil, like canola or similar.
- Eggs and Vanilla – Take these out of the fridge so they come to room temperature.
- Vinegar – Just a small amount of white vinegar. The reaction between the vinegar, buttermilk, and natural cocoa powder in traditional red velvet cake is what gave it its signature reddish color. We’re adding food coloring to this recipe, but the vinegar still plays a role in making the cake extra tender.
- Red Food Coloring – Gel food colors are more potent, and you won’t need as much for a deep, red cake.
- Buttermilk – If you don’t have buttermilk in the fridge, save yourself the trip to the store and make a homemade buttermilk substitute instead. Simply combine 1 scant cup of milk with 1 tablespoon of white vinegar or lemon juice, let it sit for 5 minutes, then stir and add it to the batter as directed.
For the Cheesecake Layers
- Cream Cheese – The kind that comes in blocks, brought to room temperature. Full-fat cream cheese yields the creamiest cheesecake.
- Sour Cream – If you don’t have sour cream, Greek yogurt or plain yogurt are good substitutes.
- Eggs – Lightly beat the eggs before you begin.
- Sugar and Flour – Granulated sugar and all-purpose flour work best here for a consistently smooth cheesecake.
Which Frosting Should I Use?
I borrowed the easy cream cheese frosting from my carrot cake recipe to frost this cake. I thought the sweet-tangy flavors complemented the red velvet cake and cheesecake layers without being overly sweet or buttery.
Of course, don’t let that stop you from using classic vanilla buttercream or Swiss meringue buttercream. This cooked heritage frosting adds a nice, rustic touch, and I use it in my original red velvet cake recipe.

How to Make Red Velvet Cheesecake (Step-By-Step)
Here’s an overview of what to expect when making this show-stopping red velvet cheesecake recipe. Be sure to scroll to the recipe card for the printable instructions.
First, Bake the Red Velvet Cake


- Mix the batter. Combine the dry ingredients for the cake, then add the wet ingredients. Add the food coloring before mixing in the vinegar and buttermilk.
- Bake. Afterward, divide the cake between two greased and lined 8-inch round pans. Bake the cakes at 350ºF for 30-35 minutes.
- Cool. Leave them to cool in the pan for 10 minutes before removing the cakes. They’ll need to cool completely and chill in the fridge overnight along with the cheesecake layers.
Make the Cheesecake
Lower the oven temperature to 300ºF. You can use the same pans you used to bake your cake layers to bake the cheesecakes, just clean them out and re-line them.
- Prepare a water bath. Add about ½ inch of water to a roasting pan large enough to fit both round pans (or, use two water baths). Place the water bath(s) into the oven while you mix the cheesecake batter.


- Make the cheesecake filling. Beat cream cheese with sugar, then add the sour cream, followed by the eggs and vanilla. Fold in the flour by hand. Again, divide the batter between the two pans.
- Bake. Bake your cheesecake layers in the water bath for 25 minutes, until they’re mostly set with a little jiggle in the middle.
- Cool gradually. At this point, switch off the oven and leave the cheesecakes to cool inside with the door cracked. You can leave them in there for a few hours, as long as it takes to come to room temperature (a trick I picked up from my mother-in-law).
- Chill. Run a knife around the edges of the cheesecakes before covering the pans and placing them into the fridge to chill with the cakes overnight. After chilling, the cheesecake should pop right out if you invert it. If it’s a bit stuck, place the bottom of the pan in a hot water bath and use a spatula to help it loosen gently.
How to Assemble and Frost the Cake


- Make the frosting. This time, cream butter and cream cheese together, then add the vanilla. Slowly add powdered sugar, 1 cup at a time, and then whip the frosting for 5 minutes so that it’s fluffy. After, knock the bottom of the bowl against the counter to release any air bubbles. Meanwhile, use a vegetable peeler to shave white chocolate curls from a bar (these can go into the fridge while you stack your cake).
- Frost the first layer. If needed, level the red velvet cake layers. Starting with the first layer, spread about ¾ cup of frosting over the cake, right to the edges.


- Stack the cake. Add the first cheesecake layer carefully on top, and spread that with more frosting before adding the second cake layer. You might notice the layers are slipping a bit, but don’t panic. Move the assembled cake to the fridge for an hour, and the frosting should set. Keep the remaining frosting chilled while you’re at it.
- Frost the cake. Use the leftover frosting to cover the top and sides of the chilled cake.


How to Decorate Red Velvet Cheesecake
I like to shave chocolate curls from a white chocolate bar to press into the frosting to decorate. You can be as creative as you’d like, and change up the decorations depending on the occasion. Drizzle the cake with pourable chocolate ganache, or add fresh strawberries on top. If you’ve leveled your cakes, crumble up the red cake trimmings to sprinkle over the cake as a garnish.
Frequently Asked Questions
Absolutely. If you’re using a red velvet cake mix as a shortcut for the cake layers, be sure to pick up the ingredients listed on the box that you’ll need to make the cake.
Yes! You’ll need to prepare the cheesecake the day before, so it has time to chill in the fridge overnight. You can also bake the cakes up to 2 days ahead. Another option is to freeze the cake and cheesecake layers until you’re ready to thaw and assemble. See below.

Pro Tips and Variations
- Measure the flour correctly. Too much flour results in a dry, crumbly cake. Make sure to measure using a kitchen scale. If you don’t have one, use the spoon and sweep method, where you spoon the flour from the bag into the measuring cup and level it off afterward to avoid overmeasuring.
- Don’t overmix the cake batter. After you’ve added the flour, take care not to overmix the batter. Overmixing can lead to a dense cake and cheesecake.
- Cool the cheesecakes gradually. This step is key as it prevents sinking and cracking. Sudden temperature changes can cause the cheesecake to crack (this is also why it’s important not to open the oven prematurely!). After baking, crack the door, and leave the cheesecake in the oven for at least an hour, or until it’s cooled.
- Make a double-chocolate version. Chocoholics, I see you! Swap the classic cheesecake layers with chocolate cheesecake instead. You can even frost the cake with my chocolate cream cheese frosting, in this case.

How to Store
- Refrigerate. Store leftover cake in an airtight container, like a cake carrier, in the fridge for up to 4 days.
- Freeze. Whenever possible, freeze the cake layers before assembling and frosting. Wrap the cheesecakes tightly in the pans and double-wrap the red velvet cake layers in plastic wrap. Freeze for up to 2 months and thaw the layers in the fridge before building the cake.
More Cheesecake Recipes

Red Velvet Cheesecake
- Prep Time: 2 hours
- Cook Time: 65 minutes
- Total Time: 3 hours 5 minutes
- Yield: 12 servings 1x
- Category: Cheesecake
- Method: Oven
- Cuisine: American
Description
This red velvet cheesecake is a decadent mash-up of two desserts, with double layers of creamy homemade cheesecake and soft red velvet cake, smothered with cream cheese frosting.
Ingredients
For the Red Velvet Cake:
- 2 1/2 cups all purpose flour
- 1 1/2 cups granulated sugar
- 2 tablespoons cocoa powder
- 1 1/2 teaspoons baking soda
- 1 teaspoon kosher salt
- 1 1/2 cup neutral oil (like vegetable or canola)
- 2 large eggs
- 2 teaspoons white vinegar
- 1 teaspoon vanilla extract
- 1 ounce red food coloring
- 1 cup buttermilk
For the Cheesecake:
- 24 ounces cream cheese, room temperature
- 2/3 cup granulated sugar
- 1 cup sour cream
- 3 large eggs, lightly beaten
- 1 teaspoon vanilla extract
- 3 tablespoons all purpose flour
For the Frosting:
- 8 ounces cream cheese, room temperature
- 1/2 cup butter, room temperature
- 1 teaspoon vanilla extract
- 5 cups powdered sugar, sifted
- 4 ounces white chocolate (or white chocolate chips)
Instructions
For the Red Velvet Cake:
- Preheat the oven to 350ºF. Spray two 8-inch round pans with nonstick spray and line the bottoms of the pans with parchment rounds.
- Combine the flour, sugar, cocoa powder, baking soda, and salt in the bowl of a stand mixer. Mix on low speed until it is combined.
- Add the oil, eggs, and vanilla. Mix until the dry ingredients are just incorporated.
- Add the food coloring.
- Combine the vinegar with the buttermilk. With the mixer on low speed, pour in the buttermilk mixture. Once it has all been added, increase the mixer speed to medium-low and beat for one minute.
- Divide the cake batter evenly between the two prepared pans.
- Bake in the preheated oven for 30-35 minutes or until a toothpick inserted in the center comes out clean.
- Remove from the oven and cool in the pan for 10 minutes before turning the cakes out onto a wire rack to cool completely.
- Once cooled, wrap the cakes in plastic wrap to store overnight while the cheesecake layers chill.
For the Cheesecake:
- Reduce the oven to 300ºF. Clean the pans used for the cake layers, then spray them with nonstick spray and line them with fresh parchment paper.
- Place a large roasting pan with ½” of water in the oven while you’re mixing the cheesecake. Make sure the pan is large enough to fit both round pans, or use two pans of water.
- Add the cream cheese and sugar to the bowl of a stand mixer. Beat on medium speed until smooth.
- Add in the sour cream and beat again for 30 seconds or until combined. Scrape down the bowl.
- Add the eggs and vanilla and mix on low speed until just combined.
- Stir in the flour by hand with a rubber spatula.
- Divide the batter evenly between the prepared cake pans.
- Place the cheesecake pans in the water bath and bake for 25 minutes or until the edges are set and the center is just barely jiggly. Turn the oven off and crack the door. Let the cheesecake cool down inside the oven.
- Once cooled, remove the cheesecakes from the oven and run a knife around the edge of the pan. Cover the pans with aluminum foil and refrigerate overnight.
- Once the cheesecakes are chilled, you should be able to turn them out onto a cooling rack. If they stick, run the bottom of the pan under hot water, then use a spatula to gently lift one edge from the bottom of the pan. The cheesecake should easily release once the suction to the bottom of the pan is released.
For the Frosting:
- Combine the cream cheese and butter in the bowl of a stand mixer. Beat on medium speed until smooth. Scrape down the bowl.
- Add in the vanilla extract.
- With the mixer on low speed, add 1 cup of powdered sugar at a time. Once all of the sugar has been added, increase the speed of the mixer and beat for about 5 minutes until light and fluffy. Knock out any air bubbles before frosting to get a smooth finish.
To Assemble the Cake:
- Use a vegetable peeler to cut white chocolate curls if using white chocolate. Place them in the refrigerator while you assemble the cake.
- If your cake layers have domed tops, level them off with a serrated knife. Place one layer of red velvet cake on your serving plate. Add about 3/4 cup of frosting on top of the cake and spread it to the edges.
- Top the frosting with one layer of cheesecake.
- Spread another 3/4 cup of frosting on top of the cheesecake layer.
- Add another layer of cake. Then repeat a layer of frosting and the second layer of cheesecake.
- The layers may feel like they are sliding around a bit because the frosting doesn’t stick to the cheesecake very well. Place the whole cake in the refrigerator, uncovered, for at least an hour to set the frosting. Make sure to refrigerate the remaining frosting while you’re waiting.
- Once chilled, cover the outside of the cake with the remaining cream cheese frosting.
- Gently cover the sides of the cake with the white chocolate curls or white chocolate chips. Don’t press too hard or your curls will break.
Notes
Store airtight in the refrigerator for up to 5 days for best freshness.