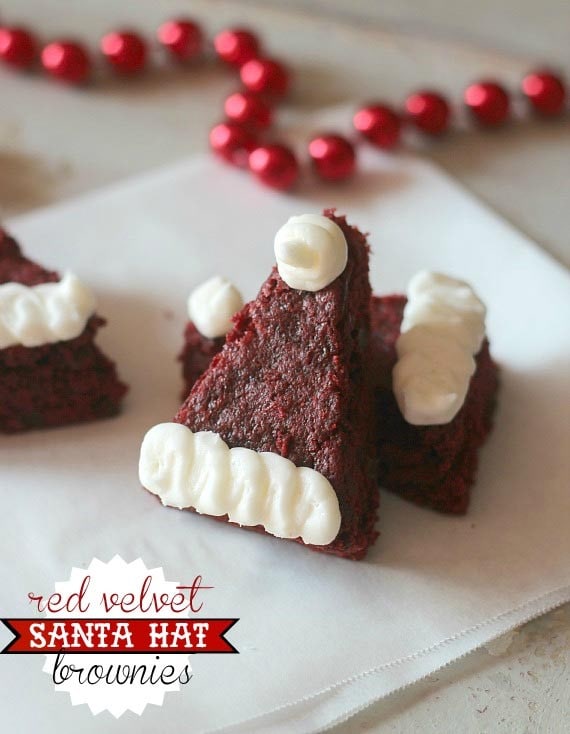
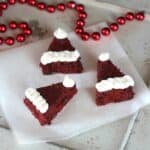
Make soft, fudgy red velvet brownies shaped like Santa hats for the holidays! These Santa hat brownies are easy to make using a box of cake mix, and they’re decorated with fluffy white frosting.
You’ll also love these red velvet thumbprint cookies and red velvet snowball cookies!

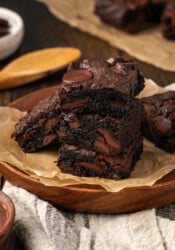
These cute little Santa hat brownies are red velvet cake mix brownies. They have the classic, festive red coloring of a red velvet cake, frosted with a white frosting trim and pompoms to look like Santa’s hat. The brownies can cool overnight for an easy make-ahead Christmas dessert. They’re easier to slice that way!
The Cutest Red Velvet Santa Hat Brownies
- Semi-homemade. I cut down on prep time with a box of red velvet cake mix. You can make the frosting from scratch or buy store-bought, too!
- Fudgy and chewy. Red velvet has a mildly chocolatey flavor, but these brownies are just as fudgy as ever, made with melted butter and chocolate chips.
- Perfect for the holidays. Does it get more festive than delicious brownies cut out and decorated to look like Santa hats? These are an easy dessert to bring to holiday potlucks and Christmas parties. They’re also fun to bake with kids!

What You’ll Need
Using a box of cake mix brings the shopping list down to just 5 ingredients! Here are notes on what you’ll need to make your red velvet Santa hat brownies. Scroll to the recipe card for the printable recipe with the full amounts and details.
- Red Velvet Cake Mix – I use a 15-ounce Betty Crocker cake mix. You can use another brand, such as Duncan Hines, or any box you’d like.
- Egg – Bring the egg to room temperature beforehand, and it’ll blend more smoothly into the batter.
- Butter – Melted. You could also use vegetable oil or canola oil.
- Chocolate Chips – I use mini chocolate chips. You can use dark, semi-sweet, or white chocolate, or flavored baking chips, like peppermint.
- Frosting – You’ll use frosting or icing to create the fluffy trim and pompom on your Santa hat brownies. I use vanilla frosting, but you can borrow the cream cheese frosting from my carrot cake recipe if you’d prefer. Other good options include marshmallow frosting or Swiss meringue buttercream.
How to Make Santa Hat Brownies
The brownies are quick and easy to prepare for the oven. Follow the steps below:
- Get ready to bake. First, preheat the oven to 350ºF. Meanwhile, grease a 9×13” baking pan.


- Make the brownie batter. Mix the cake mix with egg, melted butter, and water. Then, fold in the chocolate chips.


- Bake. Spread the batter into your greased pan. Bake the brownies at 25-30 minutes, until they’re just set in the center. A toothpick stuck into the brownies about 2” from the edge should come out clean.
- Cool. Let the brownies cool completely before you slice them. You can even bake these the day before, and cool them overnight.
- Slice into triangles. Use a sharp knife to cut the cooled brownies into hat-shaped triangles.
Decorate the Brownies
I frosted these brownies with my homemade vanilla buttercream frosting. You won’t need the whole recipe to decorate the brownies, so you can halve it, or use the leftovers to frost a batch of gingerbread cupcakes.
- Make the trim. Using a piping bag (or a zip-top bag with the corner snipped off), pipe a line of white frosting along the bottom edge of the triangle. You can also pipe out a row of small rosettes.
- Add a pompom. Using the same piping bag, press out a small dollop of frosting at the tip of the triangle to make a pompom.
- Add garnishes. For an extra-festive touch, you can decorate your frosted brownies with sprinkles, rosemary sprigs, or any decorations you’d like!

Tips and Variation Ideas
- Don’t overmix the brownie batter. Overmixing deflates the air pockets in the batter, resulting in dense, flat brownies.
- Pan choice matters. Brownies baked in a metal pan will have crispier edges. Meanwhile, brownies baked in a glass or ceramic pan may need a little longer in the oven. Test them for doneness at the earliest suggested baking time (25 minutes).
- Don’t test the center of the brownies. Unlike cakes and quick breads, brownies should be soft-baked in the center. For this reason, when you do a toothpick test, insert the tester 1-2” from the edge of the pan rather than in the middle. If the toothpick comes out clean, the brownies are done. They’ll continue to set up while they cool in the pan.
- Cool completely before frosting. First, you want the brownies to be completely cool before you slice them into triangles. Secondly, if you frost the brownies while they’re still warm, the frosting may melt right off.
- Use a different brownie recipe. You can use any store-bought mix or homemade brownies recipe you’d like for the base. I chose red velvet because it gives the brownies a reddish hue, like Santa’s hat. You could also make blondies and color the batter red using gel food dye.

How to Store
- Store airtight. Store the frosted Santa hat brownies in an airtight container at room temperature for up to 2 days. You can keep them in the fridge for 3-4 days.
- Freeze. If you’d like to freeze these red velvet brownies, I recommend doing so before you frost them. Freeze the brownies in a freezer-safe container or freezer bag for up to 2 months. Thaw them at room temperature before frosting and decorating.
More Christmas Dessert Recipes
Red Velvet Santa Hat Brownies
- Prep Time: 10 minutes
- Cook Time: 25 minutes
- Total Time: 35 minutes
- Yield: 24 brownies 1x
- Category: Dessert
- Method: Oven
- Cuisine: American
Description
These soft, fudgy red velvet brownies are decorated like Santa hats for the holidays! These Santa hat brownies are easy to make using a box of cake mix, topped with fluffy white frosting.
Ingredients
- 1 box Red Velvet Cake Mix (I used Betty Crocker, 15.25 oz)
- 1 egg
- 3/4 cup butter, melted
- 1/2 cup water
- 1 cup mini chocolate chips
- Vanilla frosting or cream cheese frosting to decorate
Instructions
- Preheat oven to 350°
- Spray 9×13 liberally with cooking spray.
- In a large bowl combine cake mix, egg, melted butter and water. Stir until mixed in evenly.
- Stir in chocolate chips.
- Pour into pan and spread evenly. Bake for 25-30 minutes until the center is just set.
- Let cool completely.
- Cut into triangles to mimic hats.
- Frost as a hat if desired.
Notes
- Brownie recipe adapted from Duncan Hines.
Nutrition
- Serving Size:
- Calories: 119
- Sugar: 7.9 g
- Sodium: 21.2 mg
- Fat: 9.2 g
- Carbohydrates: 9.3 g
- Protein: 1.1 g
- Cholesterol: 23 mg


I am excited to try these tonight! Do you know if there are any altitude adjustments?
You could look on the box of cake mix.. i think they have the adjustments on there
Thanks!
Hey Shelly! I loved this idea so much that I reposted it on my blog! Check it out:
http://untetheredasacloud.wordpress.com/2012/12/01/samedi-sommaire-1-2-bienvenu-decembre/
Thanks for all the deliciousness!
Smiles and all the best,
Savannah
untetheredasacloud.wordpress.com
These are such a simple idea. I don’t know why I haven’t seen these before. Cute idea 🙂
These are absolutely adorable!!!
so simple but amazing! i’ll be making these for a holiday party on saturday!
Too cute!
How CLEVER!! WHYYYY didn’t I think of this? So simple, and cute! Love!! Now, to find an occasion to take them, so I won’t eat them all. 🙂 MERRRY CHRISTMAS!!
What a creative idea to cut the brownies in triangles to make hats. So cute!
Okay, those are too adorable. I heart cake mix. Like, I’d marry it if I could. 😉
I am SO doing these with cream cheese frosting! Love how festive they are.