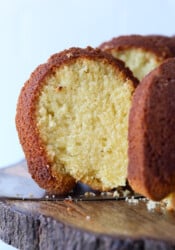
This chocolate hazelnut cake channels a classic flavor combination into two decadent, fudgy cake layers bursting at the seams with rich chocolate hazelnut cheesecake mousse! Make this cake ahead for a special occasion, as the mousse will need time to chill in the fridge.
Nutella lovers, this chocolate hazelnut cake recipe has your name all over it. Also, try my fudgy Nutella brownies and gooey Nutella-stuffed chocolate chip cookies. And if layer cakes are your thing, don’t miss my insane Reese’s cake.

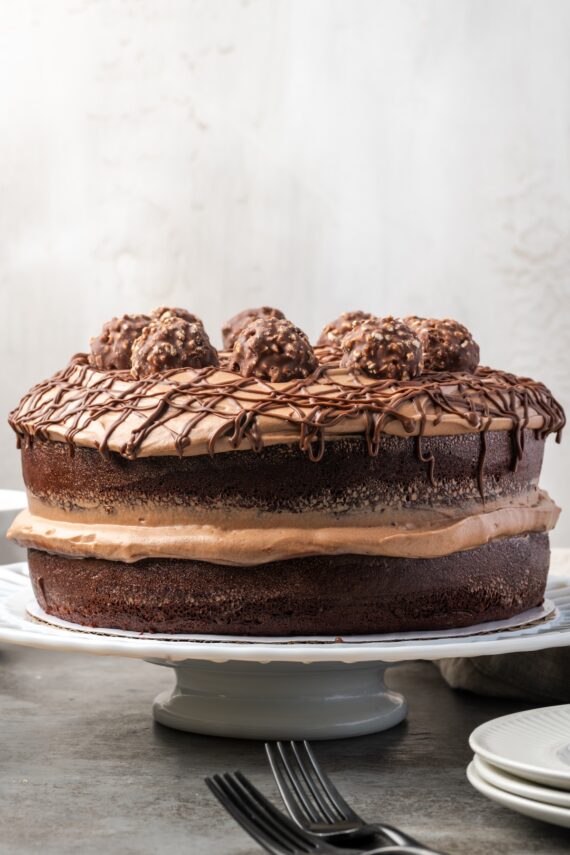
This chocolate hazelnut cake has two thick, fudgy chocolate cake layers filled with creamy chocolate hazelnut spread and the silkiest cheesecake mousse. It’s THE show-stopping sort of cake that’s perfect for a special occasion, but the recipe is straightforward. Many of you have commented to say you’ve made this cake for birthdays and holidays, and I love that it’s found a spot on so many dessert tables!
Reasons to Love This Chocolate Hazelnut Cake Recipe
- One bowl. Many cake recipes call for mixing the wet and dry ingredients separately before combining them into the batter, but not this one. It’s a one-bowl wonder that makes cleaning up even quicker afterward.
- Creamy cheesecake mousse. I could have filled this cake with Nutella frosting (also delicious), but I couldn’t resist kicking things up a notch. The mousse layer is semi-inspired by my no-bake Nutella cheesecake. It’s rich and tangy, but pillowy-soft, so it melts in your mouth.
- Make-ahead-friendly. This chocolate hazelnut cake is a great dessert to make ahead for holidays and special occasions. Since the mousse and cake are even better after they’ve chilled in the fridge, I like to get a head start the day before, so I can assemble the cake before serving.


Ingredients You’ll Need
This is a classic chocolate cake filled with a fluffy, decadent chocolate hazelnut cream cheese mousse. The ingredients are easily found in your local grocery store, and I cover the important ones below with some notes. Scroll down to the recipe card after the post for the printable ingredients list with the full amounts and details.
- Dry Ingredients – You’ll need your baking essentials like all-purpose flour, sugar, baking powder, baking soda, and salt.
- Cocoa Powder – Since this cake contains baking soda, you’ll want to use natural unsweetened cocoa powder.
- Eggs, Milk, and Vanilla – If you think of it, bring fridge-cold ingredients like eggs and milk to room temperature beforehand. You can use whole milk, 2%, or any kind of milk you’d like.
- Oil – I make this cake with vegetable oil instead of butter for an extra moist, tender crumb. Any neutral-flavored oil, like canola, works perfectly.
- Hot Water – Adding hot water to chocolate cake batter enhances the flavor, moisture, and overall texture of the final cake. You could also use warm milk or hot brewed coffee (and, no, you won’t actually taste the coffee!).
For the Mousse
- Heavy Whipping Cream – Please, use full-fat heavy whipping cream! Full-fat cream yields the creamiest, thickest mousse.
- Cream Cheese – The kind that comes in bricks, brought to room temperature.
- Chocolate Hazelnut Spread – Like Nutella (always a classic) or Hershey’s spreads. You can use any shelf-stable chocolate hazelnut spread you prefer, though I do not recommend natural versions (the kind you have to stir) as the oil tends to separate. You’ll need additional spread to melt and drizzle over the cake.
- Powdered Sugar – Also called icing sugar or confectioner’s sugar. You may need more or less, depending on the consistency of your mousse.

How to Make a Chocolate Hazelnut Cake
First things first, we’ll make two thick chocolate cakes that we’ll use for the layers, then we’ll prepare the mousse. This chocolate hazelnut cake recipe is pretty approachable, but I recommend reading through the steps below to know exactly what to expect when you start your cake. You’ll find printable instructions further down in the recipe card.


- Mix the dry ingredients. Start by whisking together the flour, sugar, cocoa powder, baking powder, baking soda, and salt.
- Add the wet ingredients. To the same bowl, add the remaining cake ingredients while slowly mixing until the batter is combined.
- Bake the cakes. Next, divide the chocolate cake batter evenly between two greased and lined 8” round cake pans. Bake the cakes for 25-35 minutes, until a toothpick stuck in the center of the cake comes out mostly clean, or with a few moist crumbs.
- Cool. Rest the cakes in the pans for 10 minutes, then run a knife around the edges and remove them from the pans. They’ll need to cool completely to room temperature.
Make the Filling
For the best results when making the homemade whipped cream for the filling, chill your stand mixer’s bowl and whisk attachment in your freezer for 10 minutes beforehand. Cold ingredients and cold tools are key!


- Whip the cream. Beat heavy cream in a cold bowl until stiff peaks form. Afterward, transfer the whipped cream to the fridge to stay cold while you mix the other filling ingredients.
- Combine the other ingredients. Now, beat your cream cheese with chocolate hazelnut spread, and slowly add the powdered sugar and vanilla. Beat until that’s smooth and creamy.
- Fold in the whipped cream. Lastly, gently fold in the prepared whipped cream. Return the mousse to the fridge for at least 4 hours before you assemble the cake (I’ll sometimes make the mousse the day before and chill it overnight).
Assemble the Cake
When you’re ready to assemble this chocolate hazelnut cake, I recommend leveling the cake layers using a cake leveler or a serrated knife. This way, you’ll have a neat, level canvas to build your layer cake:


- Start with the first chocolate cake layer. Spread about ½ cup of chocolate hazelnut spread evenly over the cake. Pile about half of the chilled mousse on top, and spread that out, leaving a 1” border from the edge of the cake.
- Add the second layer. Place the second cake layer carefully on top of the mousse. Next, spread the remaining mousse generously over the top of the cake.
- Decorate! Meanwhile, melt ¼ cup of chocolate hazelnut spread in the microwave. Drizzle the pourable spread all over the cake, and garnish with your favorite chocolate-hazelnut candy, like Ferrero Rocher. Afterward, keep the cake refrigerated until it’s time to serve.

Tips for Success
- Chill the mousse. The longer the mousse has time to chill, the firmer it becomes. If you’re struggling with a runny chocolate hazelnut mousse, I recommend chilling the mousse in the fridge for at least 4 hours before you fill the cake. Even better, I’ll sometimes refrigerate it overnight.
- Make it ahead. Keep the assembled cake refrigerated until it’s time to serve. If you can prepare the cake well in advance, you’ll have smoother slices when you cut it.
- Baking times will vary. I give a range for the baking time as the exact time depends on factors like your oven and the pans you’re using. Your cakes may need more or less time, so check them at the earliest suggested time and go from there.
- Test the cakes for doneness. The best way to know if your chocolate cakes are finished baking is to test the center using a toothpick. If the toothpick comes out clean, the cakes are done!
- Time-saving tip: This recipe turns out just fine with a boxed chocolate cake mix in a pinch. Choose your favorite.

How to Store
- Refrigerate. This chocolate hazelnut cake is best served on the day it’s assembled. If you have leftovers, make sure to store them in the fridge as soon as possible so that the mousse keeps its shape. Keep this cake covered in a cake carrier or similar and enjoy it within 2 days.
- Freeze. I wouldn’t freeze the fully assembled layer cake, however, you can bake the cake layers in advance and freeze them before they’re filled and frosted. Once the chocolate cakes have cooled, wrap them in plastic wrap or foil and freeze them for up to 2 months. Thaw the cakes in the fridge before assembling the cake.
More Chocolate Cake Recipes
Chocolate Hazelnut Cake
- Prep Time: 30 minutes
- Chilling Time: 4 hours
- Cook Time: 25 minutes
- Total Time: 4 hours 55 minutes
- Yield: 10 slices 1x
- Category: Dessert
- Method: Oven
- Cuisine: American
Description
This show-stopping chocolate hazelnut cake is a thick and fudgy chocolate layer cake filled with creamy chocolate hazelnut spread and silky cheesecake mousse.
Ingredients
For the Cake:
- 1 3/4 cups flour
- 2 cups granulated sugar
- 3/4 cup unsweetened cocoa powder
- 1 1/2 tsp baking powder
- 1 1/2 tsp baking soda
- 1 tsp salt
- 2 eggs
- 1 cup whole milk
- 1/2 cup vegetable oil
- 2 tsp vanilla
- 1 cup hot water
For the Filling:
- 8 oz heavy whipping cream
- 8 oz cream cheese, room temperature
- 3/4 cup Chocolate Hazelnut Spread
- 2 cups powdered sugar
- 1 tsp vanilla
To Assemble:
- 3/4 cup Chocolate Hazelnut Spread
- Chocolate Hazelnut Candy
Instructions
Make the Cake:
- Preheat the oven to 350°F.
- Spray two 8″ round cake pans with nonstick spray. Line the bottom of pans with parchment circles, cut to fit the pans. Spray the pans again to coat the parchment paper. Set aside.
- In the bowl of your stand mixer, combine the flour, sugar, cocoa powder, baking powder, baking soda, and salt. With the paddle attachment on low, stir to combine.
- Add the remaining ingredients with the mixer still on low. Once all the ingredients are combined, turn the speed up to medium-low and mix for 2 minutes.
- Divide the batter evenly among the 2 cake pans and bake for 25-35 minutes, until the center is set and a toothpick comes out clean.
- Allow the cakes to cool in the pans for 10 minutes and then remove them from the pans and cool completely on a wire rack.
Make the Filling:
- In the bowl of your stand mixer fitted with the whisk attachment, beat the heavy cream until stiff peaks form, 1-2 minutes. Transfer to another bowl and place it in the refrigerator until ready to use.
- In the stand mixer, beat cream cheese and chocolate hazelnut spread until smooth. Slowly add in powdered sugar and vanilla and beat until smooth and incorporated.
- Fold in reserved whipped cream. Afterward, return the mousse to the fridge to chill for at least 4 hours, or overnight.
To Assemble:
- When you’re ready to assemble, level one of the cakes by using a serrated knife or a cake leveler to remove the dome. Spread 1/2 cup of chocolate hazelnut spread over the cake. Next, spread half of the chilled cheesecake mousse on top, spreading it out until it’s about 1 inch from the edge of the cake. Place the second cake layer on top, and top that with the remaining mousse.
- Microwave the remaining 1/4 cup of chocolate hazelnut spread for 30-45 seconds until it reaches a pourable consistency. Drizzle it over the cake and garnish with chocolate hazelnut candy.
- Store the cake in the refrigerator until you’re ready to serve.
Notes
- Chocolate cake recipe from All Recipes.
- For best results, chill the finished cake overnight before slicing.
Nutrition
- Serving Size:
- Calories: 657
- Sugar: 69.5 g
- Sodium: 530.6 mg
- Fat: 31.4 g
- Carbohydrates: 91.8 g
- Protein: 7.8 g
- Cholesterol: 88.2 mg


Can you please tell me if this can be made up ahead of time before putting it into the cake and if so how long can it be stored in the fridge.
looks easy enough but the batter is in my oven and has been for 35 mins and still liquid in the middle plus its dripping all down onto the bottom of my oven. Not working so far.
I made this cake and it is absolutely amazing! The cake is super moist. Loved it. My whole family loved it. This will be my go-to chocolate cake from now on!
Love hearing this!!! So glad you liked it!
Just made this for my daughter’s b day. It was a hit!
Full disclosure .. I used my own chocolate cake recipe but used the filling recipe which was amazing! I added toasted finely chopped hazelnuts in between the layers for texture and added flavour but it was so fluffy and yummy on its own. Will definitely make again. Was worried for a sec that the filling was going to squish out but it didn’t at all. So good. Thanks
This is my favourite recipe, ever. I’ve made it about 5 times now and it never fails. Thank you!!
Forgot the rating on my comment, we love this cake and the frosting. Really sweet, but it’s cake so totally allowed.
Just made this for the second year in a row for my daughters birthday (per her request). Both times the filling oozed out of the cake. Delicious cake, but could not get it to look like your photos. Jumped on here to check out the comments.
NOTE: in the printed recipe is does not say to chill the mousse filling before assembly. This is probably the biggest culprit in my “oozing”.
Also, do you think I could add additional Whipped cream – to help stiffen the mouse and to cut the sweetness?
Use less sugar in the frosting. No point trying to balance out the sugar with extra fat if you prefer it without the added sugar. I’ve never made it with the full amount of sugar as I add the sugar slowly to taste and about a quarter of the suggested amount is plenty for me
Ive just made this for my husbands birthday. Unfortunately the creme doesnt hold so well under the weight of the cake. I used double creme as thats all we have here in the UK. Its extrememly sweet, i reduced the cake suger amount to 1.5 cups seen as the receipe was so sugar laden. It tastes good though.
The cake was amazing but the mousse was too runny to put on the cake. I had to use double cream (I couldn’t get whipping cream) Would this have made a difference? Should I adapt the mousse for English ingredients?
Val Brighton
I had the same issue. The mousse was too runny and the cake was sliding all over the place. Don’t know how to correct it
I have been making this mousse for a few years. It’s the family favourite for birthdays. I add a little bit of dissolved gelatin and it holds its shape better.
I used my recipe for the chocolate cake and i was looking for a hazelnut filling online. STumbled upon your gorgeous cake and I’ve decided on the spot to try you right filling. So easy to make and the taste is beyond delicious. Couldn’t be any happier with the end result. Recipe saved in my book, anybody should give it a try. THANK YOu!
So glad you liked it!!