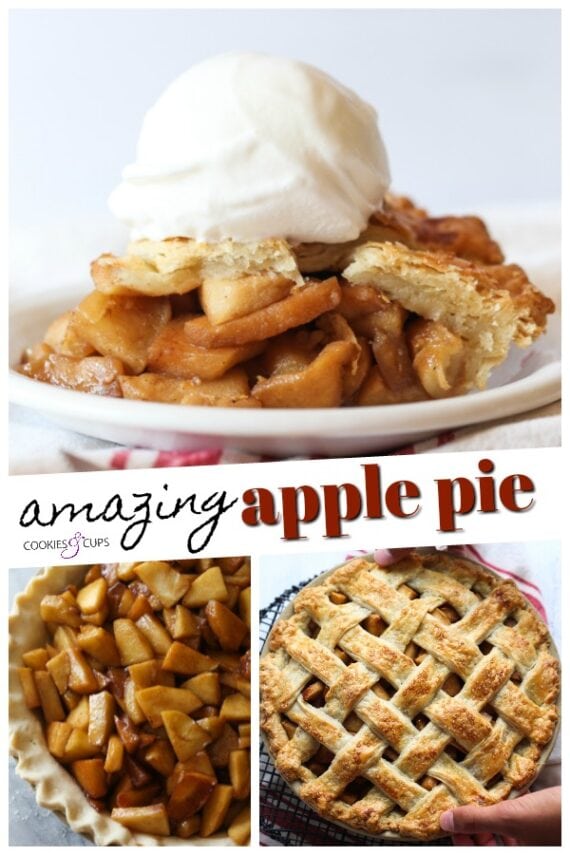
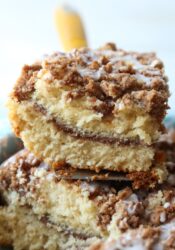
This is hands-down the best homemade apple pie recipe, ever! It’s brimming with rich and buttery caramelized apple pie filling tucked beneath a perfect lattice top. I use my favorite flaky pie crust for this cozy and classic, fail-proof Thanksgiving dessert!

Apple pie is pretty iconic. It’s a classic, all-American, favorite fall dessert. There’s Dutch apple pie and even apple pie bars, but everyone needs a trusty, traditional apple pie recipe. No Thanksgiving is complete without it in our house, and this is the homemade apple pie that I make every year without fail.
My best-ever apple pie recipe keeps it classic, but never boring. It’s brimming with cozy, spiced flavors rolled up in the most incredible caramelized apple pie filling, tucked beneath a lattice crust. It’s one of my most-requested holiday desserts, and I just know that your family will love it as much as we do.
Why This Easy Apple Pie Recipe Works
One of my favorite things about this recipe is how uncomplicated it is. I’m all about big results with minimal effort, and this apple pie definitely delivers! Here’s what makes this the best apple pie recipe:
- Cook the apples first. Your basic apple pie recipes call for simply piling chopped fresh apples into the unbaked crust. But we’re not doing basic pie, here. This pie is loaded with apples that I caramelize before baking. It’s a simple, fast technique that makes all the difference in terms of a perfectly-cooked filling!
- Perfect crust. I set this pie in my classic all-butter pie crust recipe, linked in the Ingredients section below. It’s super easy to make! There’s nothing quite like a buttery, flaky pie crust filled to the brim with sweet-tart caramelized apples.
- Make-ahead friendly. This classic apple pie recipe can be prepared ahead of time, and the assembled pie can be kept in the freezer either baked or unbaked. I love making double the pies when apples are in season, to enjoy flavorful homemade pie all year!

Ingredients You’ll Need
Below is a short overview of everything you’ll need to make the perfect apple pie from scratch. Remember to scroll to the recipe card below the post for the full ingredient amounts and details!
- Pie Crust – I use a homemade pie crust (see below and in the recipe card). You can also make this recipe using your own homemade crust, or a ready-made, refrigerated pie crust from the grocery store.
- Apples – Choose a good baking apple, like Granny Smith, Jonagold, or similar (see below). My favorite is Granny Smith. I love the tartness paired with the spices and sweetness of the pie filling.
- Cinnamon Sugar – The classic, sweet, and cozy flavoring of an apple pie. It’s as easy as combining ground cinnamon with granulated or brown sugar. Feel free to add in a pinch of nutmeg if you’d like, or you can use an apple pie spice blend from the store.
- Butter – I sauté my apples with cinnamon sugar and a bit of butter to create the rich and saucy, caramelized apple pie filling.
- Egg – You’ll need one egg whisked with water for an egg wash to brush over the pie crust before baking. An egg wash helps the lattice crust bake up beautiful, glossy, and golden.
- Turbinado Sugar – Optional, to sprinkle over the pie for extra crunch.
The Best Apples for Apple Pie
Some apples are better for making pies than others. Good apples for baking are Granny Smith (my personal fave), Braeburn, Cortland, Fuji, Jonagold, or McIntosh apples. These varieties bake up firm and aren’t overly sweet, which is ideal for cooking and baking. They’re also widely available.
If you’d like, go ahead and use a combination of different apples in your pie filling for a more complex flavor and texture. Avoid red delicious apples when making apple pie, as these don’t cook as nicely.

How to Make Apple Pie From Scratch
A classic apple pie is a must for fall baking. This recipe begins and ends with a buttery, flaky pie crust below and on top, with a generous amount of rich, tender apples in between. Everyone needs a go-to recipe, and I hope this one will be yours! Let’s get into it.
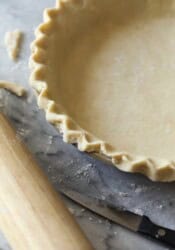
Prepare the Pie Crust
My homemade pie crust is the starting point for so many pie recipes on my site, from this easy apple pie to my homemade pumpkin pie, chocolate chess pie, and my sweet potato pie (another favorite fall dessert).
The first step is to prepare your chosen pie dough. Then, follow these steps to make your crust:
- Portion the pie dough. Divide the dough in half. Wrap one portion in Saran Wrap and place it in the fridge. You’ll use this portion later on when making the lattice topping. You’ll use the first half to line your pie plate.
- Roll out the dough. Roll the pie crust out into a circle, about 1/8 of an inch thick. Gently press the pie crust into a 9-inch pie plate.
- Trim and chill. Using a knife, trim away the overhanging dough from the sides of the pie plate. Then, use your fingers to crimp the edges. Pop your prepared crust into the fridge to chill while you prepare your apples for the filling.
If you’re making this pie with a store-bought refrigerated or frozen pie crust, you’ll need to follow the thawing and handling directions on the package.
Homemade Apple Pie Filling
Along with a perfect crust, the key to any apple pie lies in the best apple pie filling. I’ve created an uber-simple filling recipe that’s jam-packed with tender apples and cozy spices. Here’s how to make it:


- Combine the apples with cinnamon sugar. Add your sliced apples to a big bowl, then whisk up your cinnamon sugar in a separate, smaller bowl. Sprinkle this over the apples and toss to coat.
- Cook the apples. Working in two batches, add the apples to a hot skillet with melted butter. Fry the apples for a few minutes to soften them slightly and to get the sugar nice and caramelized. Afterward, spread the caramelized apples and sauce out on a baking sheet (this helps to speed up the cooling process).


- Fill the pie crust. Once your apples have cooled, it’s time to fill the pie! Take your chilled pie crust out of the fridge and pour the cooled caramelized apples into the prepared crust.
- Add the top crust. There are two options when it comes to your top crust. You can top your pie with a double-layer crust, like you’ll find on my skillet apple pie, where you simply roll out the second piece of dough and place it over the apple filling. Trim and crimp the edges, then use a knife to slice four “vents” in the top of the crust, where the steam can escape. Alternatively, in the next section, I give an easy tutorial on how to make a beautiful lattice top like the one you see in the photos.
How to Lattice a Pie Crust
The perfect way to finish off an apple pie for the holidays? A gorgeous lattice top! It only looks super fancy, but it’s actually quick and easy to make in the time it takes to preheat the oven.
Here’s a short tutorial on how to make a lattice pie crust. Once you’ve mastered a perfect lattice crust, use it for more desserts, like cherry pie, berry slab pie, and even mini apple pies.


- Roll out the pie dough. Take your wrapped pie dough out of the fridge. Dust some flour over a clean work surface and then, same as you did for the bottom crust, roll out the dough to about 1/8-inch thick.
- Cut the dough into strips. Next, cut the dough into half-inch strips. You can use a sharp knife; otherwise, I like to repurpose my pizza cutter!


- Weave the lattice. You’ll use your strips to create the classic “woven” effect of a lattice top. First, lay 5 or so of the cut strips vertically over the top of the pie, evenly spaced. Next, fold back every other strip (see photo). Lay one of your unused strips horizontally across the pie, perpendicular to the vertical strip layer. Then, unfold the folded strips back so that they’re lying over the perpendicular strip.


- Repeat. Continue with the other vertical strips, folding and then unfolding them over the next perpendicular strip. You’ll start to see your woven pattern taking shape! Repeat the process until you’ve used up all your strips to complete your lattice top.


- Trim and seal the edges of the pie. Finally, use a knife to trim off any overhanging ends, and crimp the edges using your fingers. Your apple pie is almost ready to bake!
Bake Your Apple Pie
Now it’s time to bake your apple pie. With your oven preheated to 375°F, the last thing left to do is to lightly brush your crust with an egg wash for that photo-ready, glossy finish:


- Add an egg wash. Whisk one egg with water and brush a light layer over the top of the pie crust. If you’d like, give the top a sprinkle with turbinado sugar for extra crunch.
- Bake. Bake the pie at 375ºF for 45-50 minutes, just until golden. See below for more pie-baking tips!
Save Time and Make the Pie Crust in Advance
Another wonderful thing about my flaky pie crust recipe is that you can prepare the dough up to 1-2 days in advance. Divide the dough as directed, and wrap both dough balls tightly in plastic wrap to store in the fridge. To make it easier to roll out the chilled dough, take it out of the fridge about 10-15 minutes beforehand. You can also roll out and press the dough into your pie plate to wrap and refrigerate ahead of time.

Tips For the Perfect Apple Pie
The perfect apple pie doesn’t take much, but it does call for a bit of attention to some minor details. In case you’re new to pie-making, here are some final tips to keep in mind:
- Cook the apples beforehand. This is the difference between a “meh” apple pie recipe and the best apple pie recipe. It adds delicious buttery flavor, and most importantly, pre-cooking the apples prevents a giant cavity from forming under the top crust after it’s baked. The cavity scenario happens when uncooked apples reduce as they bake, leaving empty space beneath the lid.
- If you must make this recipe without sauteing the apples, make sure to toss the raw apples with a bit of flour along with the cinnamon sugar. This helps to absorb excess liquid and thicken up the filling.
- If your pie is browning too quickly, use a pie shield, or place a piece of aluminum foil gently over the crust while it finishes baking so that it doesn’t burn.
- Check the pie for doneness. Your apple pie is done when the juices are visibly bubbling beneath the crust. You can also take the pie’s temperature to be sure. An internal temperature of 200ºF means your pie is ready to come out.
- Let the pie cool before slicing. Allow your pie to cool for at least one hour before serving. This gives the filling time to set up for firmer, less messy slices.
- Make extra apple pie filling and use it to make Apple Pie Dip!
Topping and Serving Suggestions
It doesn’t get better than a slice of warmed-up apple pie topped with a fat scoop of melty vanilla ice cream. Hello, apple pie a la mode. This homemade pie is equally delicious topped with a swirl of whipped cream and quick microwave caramel sauce (for fall bonus points, try my apple cider caramel sauce or pumpkin spice caramel sauce!).

How to Store Homemade Apple Pie
- Store the pie covered. You can safely store this apple pie covered at room temperature for up to 2 days. Any longer than that, and I recommend storing it in the fridge. Cover your pie lightly in plastic wrap and refrigerate it for up to 5 days. Don’t wrap it too tightly as the crust may become soggy. I love warming individual slices in the microwave for 30 seconds or so prior to serving.
- To freeze an unbaked apple pie, wrap the prepared pie in plastic wrap, plus a layer of foil. Store the pie frozen for up to 1 month. You can bake the unwrapped pie straight from frozen, adding 10-15 minutes to the baking time.
- To freeze the baked pie, follow the directions for wrapping and freezing above. Whenever you’re ready to serve, allow the pie to thaw, unwrapped, at room temperature before placing it into a 350ºF oven to warm through.
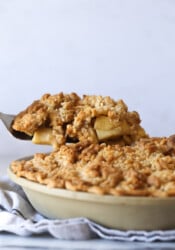
More Easy Apple Desserts

Homemade Apple Pie
- Prep Time: 30 minutes
- Cook Time: 45 minutes
- Total Time: 1 hour 15 minutes
- Yield: serves 10 1x
- Category: Dessert
- Method: Oven
- Cuisine: American
Description
A classic homemade apple pie recipe brimming with the best apple pie filling made from rich and buttery caramelized apples. Tucked into a thick, flaky pie crust and finished with a beautiful lattice top!
Ingredients
- Recipe for Pie Crust
- 3 1/2 – 4 pounds Granny Smith Apples, peeled and sliced into 1/4-inch pieces
- 1/2 cup granulated sugar
- 1 teaspoon ground cinnamon
- 1/3 cup butter
- 1 egg
- 1 tablespoon water
- 2 tablespoons turbinado sugar for sprinkling (optional)
Instructions
- Roll one pie crust out on a floured surface to 1/8- inch thick.
- Transfer the dough to a 9-inch pie plate and press gently to fit. Cut the excess dough hanging over the edges, leaving about 1 inch.
- Crimp the edges using your fingers around the edge of the pie plate. Refrigerate the dough.
- Place the sliced apples in a large bowl. Set aside.
- In a small bowl combine the granulated sugar and cinnamon. Sprinkle this on top of the apples, tossing to coat.
- Heat a large skillet over medium-high heat. Melt half of the butter in the pan.
- Pour half of the apples into the hot skillet and fry for 6-7 minutes until they are slightly softened and caramelized at the edges. Remove the apples and sauce created from the skillet onto a large baking sheet to cool completely. Repeat with remaining butter and apples.
- When the apples are cooled, remove the pie crust from the refrigerator and pour the apples into the crust.
- Preheat oven to 375ºF.
- Roll out the remaining pie dough on a lightly floured surface to 1/8- inch thick.
- For a Double Layer Crust: Place the pie dough on top of the apples, cutting the excess dough at the edge. Crimp the pie crust together with the bottom crust. If necessary, lightly wet the bottom crust with a little water to help stick together. Make 4 slices in the top of the dough to vent steam to escape while baking.
- For a Lattice Crust (as Shown in the Video): Roll out your dough the same as with a double-layer crust. Cut the dough into even strips about 1/2-inch to 3/4-inch wide using a sharp knife or pastry/pizza wheel. Lay several strips down across the top of your pie. To create the woven effect, fold back every other strip of dough, then lay another strip perpendicular to the strips in that first layer you put down. Unfold the folded strips over the perpendicular strip. Repeat the process until you have a cross-hatch pattern for your entire top crust.
- Whisk together the egg and the water. Lightly brush the egg mixture on top of the pie dough. You won’t use it all. Sprinkle with turbinado sugar, if desired.
- Bake for 45-50 minutes until golden. If the pie crust is browning too much, use a pie shield or foil to prevent it from burning.
- Allow your pie to cool for at least 1 hour before slicing.
Notes
Store airtight at room temperature for up to 2 days, or in the refrigerator for up to 5 days.
Nutrition
- Serving Size: 1 slice
- Calories: 394
- Sugar: 28.8 g
- Sodium: 419.1 mg
- Fat: 16.7 g
- Carbohydrates: 58 g
- Protein: 5.7 g
- Cholesterol: 34.9 mg


Truly appreciate the way you made this delicious recipe. Everything is so nicely described that really helped me.
Hi Shelly!
Can I “make “ the apples the night before?
I made your pastry crust recipe, and am letting the pastry crust “rest” over night .
Putting everything together tomorrow,and baking it then.
Thanks!
Lisa
Sure!
Hi – I could not get my apples to caramelize like yours. Did I use to many apples? I used 4 pounds of apples – I weighed then after slicing and coring.
Possibly overcrowding the pan, maybe it was too small… or the heat wasn’t high enough?
Sounds awesome but who cuts a 9″ pie into 10 pieces? 6 or 8, yes but 10? I plan to bake this with my gala apples. Thought about a crisp for the topping but how can you go wrong with carmelized apple pie
A Covid-19 lockdown win! Kids (11yo girl, and a just 9yo boy) have made your pie crust and pies. Second one in three days. First was the pecan nut pie, now your apple pie. We’re going to be rolling out of this lockdown with plenty of winning baking skills! They’re delicious!!
This makes me so happy!!! Your kids are superstars!!
Cant wait to try
This recipe looks wonderful. My granddaughter has requested apple pie for her birthday and I’m going to use this. Have you ever froze the filling to use for later?
You could definitely do that!
This sounds wonderhul! Do you use a lower baking temp of 350 because apples are partially cooked? Most other recipes bake at higher temp. Thank you!
Michele
Bake at 375°F!
Sounds wonderful……..Baking temp would help though.
375°F 🙂
very yummy and tasty. Love the Design part to make it cool.
Hi.. I can’t seem to find the pastry recipe. Please inbox me. Dying to try this.
Valbolton8@gmail.com
Thank you.
Here’s the link to the pie crust! https://cookiesandcups.com/pie-crust-recipe/
Yum! This sounds amazing! Can’t wait to make it! ?