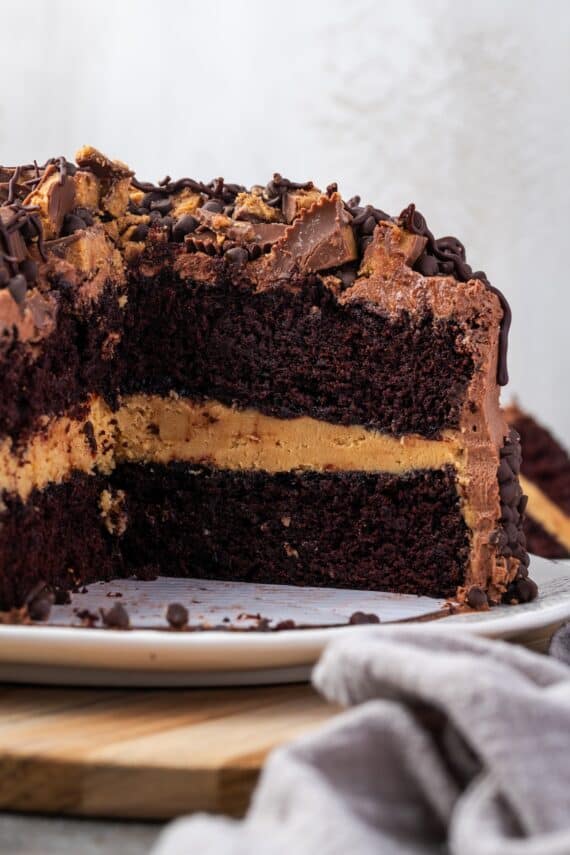
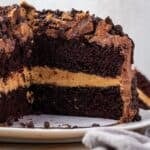
This Reese’s cake is a moist chocolate cake filled with an insane amount of peanut butter frosting and topped with heaps of Reese’s peanut butter cups!
After you’ve gone crazy for this Reese’s cake, try my ridiculous chocolate cake and cookies and cream cake next.

This Reese’s cake is over the top. It’s a ridiculously fudgy chocolate cake filled with a super-thick layer of peanut butter frosting, smothered with chocolate frosting, and topped with heaps of peanut butter cups. The only thing I could think of as I drizzled melted chocolate over the finished cake was: this is insane!
Reasons to Love This Insane Reese’s Cake
- It tastes like a giant Reese’s cup! It might not be for the faint of heart, but this Reese’s cake is definitely for the chocolate and peanut butter lover in your life. Rich, fudgy, chocolatey, peanut butter-y… All the Reese’s flavors, wrapped up in a WILD chocolate cake.
- Packed with peanut butter cups. I top this cake with chopped peanut butter cups and melted chocolate. Not only does it up the “insane” factor but it also does wonders for an imperfect frosting job.
- Easy to make. The fudgy chocolate cake is a classic, easy recipe, as is the chocolate frosting. It’s my favorite cake and frosting combination, and I use it ALL the time. I even include it in my book.

Ingredients You’ll Need
Don’t let the insanity deter you. This Reese’s cake starts with my easy chocolate layer cake recipe, which is super simple and uses only common pantry ingredients. I’ve included some notes below. Scroll down to the recipe card for the printable recipe with the full ingredient amounts and recipe details.
- Dry ingredients – All-purpose flour, granulated sugar, baking soda, baking powder, and salt.
- Cocoa Powder – I recommend unsweetened natural cocoa powder.
- Eggs and Milk – Bring these to room temperature.
- Oil – Choose a neutral-flavored vegetable oil or canola oil.
- Vanilla Extract – You could also use an equal amount of vanilla paste.
- Butter – At room temperature.
- Peanut Butter – You’ll want to use shelf-stable, creamy peanut butter like Jif or Skippy. Crunchy peanut butter would add extra texture. Avoid natural peanut butter that needs stirring, as the oils tend to separate and make the filling greasy.
- Powdered Sugar – Also called confectioner’s sugar.
- Milk – Whole milk, 2% milk, or any kind you’d like.
- Chocolate Frosting – I include the recipe for my easy chocolate frosting made from room-temperature butter, cocoa powder, powdered sugar, and vanilla with warm water.
- Peanut Butter Cups – Chopped up, for garnish.
- Chocolate Chips – To melt with milk for the chocolate ganache drizzle. I use mini chocolate chips as they melt faster, but regular chocolate chips or chopped chocolate bars will also work.

How to Make This Reese’s Cake
First, we’ll bake our moist chocolate cake layers, then, we’ll load them up with peanut butter frosting (my version of the center of a peanut butter cup) and chocolate frosting. Follow the steps below and scroll down to the recipe card for the printable instructions.
- Line the pans. While the oven preheats to 350ºF, grease and line two 9-inch cake pans with parchment paper.


- Mix the dry ingredients. Next, whisk together the sugar, flour, cocoa powder, baking powder, baking soda, and salt.
- Add the wet ingredients. Slowly add in the eggs, milk, oil, and vanilla, and mix the batter for 2 minutes. Scrape down the down the bowl as you go. After, turn the mixer down to low again and add the hot water, mixing to combine.


- Bake the cakes. Now, divide the chocolate cake batter between the two prepared pans. Bake at 350ºF for 30 minutes, or until a toothpick stuck into the cake comes out clean. Cool the cakes in the pans for 10 minutes before removing them to a wire rack to cool completely before frosting.


- Make the peanut butter frosting. Start by creaming the butter and peanut butter together, then slowly add the powdered sugar. Then, slowly mix in ¼ cup of milk until the filling is smooth.
- Fill the cake. Place the first cake layer onto a plate or cake stand. Using an offset spatula, spread the peanut butter filling generously over the cake. Afterward, place the second cake layer on top of the filling.
Frosting and Decorating the Cake
Once your chocolate and peanut butter Reese’s cake is assembled, it’s time to go all out with garnishes:


- Frost the cake. Mix the frosting ingredients with warm water in a bowl. Once the frosting comes together, increase the speed and beat for 2 minutes. Let the finished frosting cool for 15 minutes, and then spread it over the top and sides of the cake.
- Decorate. Top the frosted cake with chopped peanut butter cups and make a “skirt” of chocolate chips around the bottom edge of the cake.
- Add chocolate ganache. Meanwhile, melt ¼ cup of chocolate with 1 ½ cups of milk in a microwave-safe bowl. Heat in increments, stirring in between, until smooth and melted. Afterward, transfer the melted chocolate to a small Ziploc baggie with the corner snipped off, and pipe the chocolate all over the decorated cake.

Recipe Tips and Variations
- Measure the ingredients correctly. Make sure to weigh ingredients like flour using a kitchen scale or measure using the spoon and sweep method to avoid overmeasuring. Spoon the flour from the bag into the measuring cup (don’t scoop straight from the bag) and then level off the cup with the back of a knife.
- Don’t overmix the cake batter. Overmixing leads to a dense, tough cake, so only mix until the cake batter is just combined.
- Use brewed coffee instead of hot water. Coffee enhances the chocolate flavors in baked goods, without tasting like coffee. So, for extra fudginess, use hot coffee in place of water in the cake (and frosting).
- Add caramel sauce. For another layer of indulgence, why not throw over a drizzle of caramel sauce while you’re drizzling the chocolate?

How to Store
- At room temperature. You can store this insane Reese’s cake covered airtight at room temperature for up to 3 days or in the fridge for 5-7 days. A cake carrier comes in handy for storing layer cakes.
- Freeze. I don’t recommend freezing the finished cake, however, you can bake the cake layers ahead of time and freeze them before adding the frosting and filling. Wrap the baked, cooled cakes tightly in plastic wrap and store them frozen for up to 2 months. Thaw the layers at room temperature before filling and frosting them.
More Chocolate Cake Recipes
Insane Reese’s Cake
- Prep Time: 30 mins
- Cook Time: 30 mins
- Total Time: 1 hour
- Yield: serves 16 1x
- Category: Dessert
- Method: Oven
- Cuisine: American
Description
This Reese’s cake is a moist chocolate cake filled with an insane amount of peanut butter frosting and decorated with heaps of peanut butter cups and chocolate!
Ingredients
For the Cake
- 2 cups granulated sugar
- 1 3/4 cups flour
- 3/4 cup unsweetened cocoa powder
- 1 1/2 teaspoons baking soda
- 1 1/2 teaspoons baking powder
- 1 teaspoon kosher salt
- 2 eggs
- 1 cup milk
- 1/2 cup vegetable oil
- 2 teaspoons vanilla
- 1 cup very warm water
For the Peanut Butter Filling
- 3/4 cup butter, room temperature
- 1 1/2 cups creamy peanut butter
- 3 cups powdered sugar
- 1/4 – 1/3 cup milk
For the Chocolate Frosting
- 1 cup butter, room temperature
- 1 cup unsweetened cocoa powder
- 8 cups powdered sugar
- 1 teaspoon vanilla
- 2/3 cup very warm water
Garnish
- 10–12 full-sized peanut butter cups chopped
- 2 1/4 cup mini chocolate chips, divided
- 1 1/2 teaspoons milk
Instructions
- Preheat oven to 350°F. Coat 2, 9-inch cake pans with nonstick spray. Cut 2, 9-inch rounds of parchment paper and place in the bottoms of the pans. Spray again with nonstick spray. Set aside.
- In the bowl of your stand mixer fitted with the paddle attachment, mix together the sugar, flour, cocoa powder, baking soda, baking powder, and salt on low speed until combined.
- With the mixer still on low, add in the eggs, milk, vegetable oil, and vanilla. Turn mixer up to medium and mix for 2 minutes, scraping the sides of the bowl as necessary. Turn the mixer back down to low and slowly add in the hot water. Mix for an additional minutes until combined.
- Divide the batter between the 2 prepared pans. Bake for 30 minutes, or until a toothpick inserted in the center comes out clean.
- Allow the cake to cool in the pan for 10 minutes and then remove and transfer to a wire rack to cool completely.
Make the Peanut Butter Filling
- In the clean bowl of your stand mixer, fitted with the paddle attachment mix the butter and peanut butter together on medium speed until smooth. Turn the mixer to low and slowly add in the powdered sugar. Turn the mixer to medium and mix for 1 minute until combined.
- Turn the mixer back to low and add 1/4 cup milk. Mix for an additional minute, scraping the sides of the bowl as necessary, until creamy and combined. If desired, add additional milk to achieve desired result.
- Transfer one of the cooled cakes to a plate or cake stand. Spread the peanut butter filling on top of the cake. Place the other cake on top of the peanut butter filling.
Make the Chocolate Frosting
- In the bowl of your stand mixer fitted with the paddle attachment, combine the butter, cocoa powder, powdered sugar, vanilla, and warm water and mix on low speed, until the mixture just comes together.
- Slowly increase the speed to medium and beat the frosting for 2 minutes, scraping the sides of the bowl as necessary.
- Let the frosting cool for 15 minutes before covering the cake.
To Garnish
- Once you have the cake covered in the chocolate frosting, pile the chopped peanut butter cups on top. Next, sprinkle 2 cups of milk chocolate chips on top and around the bottom of the cake.
- Place the remaining 1/4 cup chocolate chips and 1 1/2 milk into a microwave-safe bowl. Heat in 15-second increments, stirring in between each, until the chocolate is smooth. Place the melted chocolate into a small zip-top bag and snip the corner off. Drizzle the melted chocolate all over the cake.
Nutrition
- Serving Size: 1 slice
- Calories: 971
- Sugar: 120.7 g
- Sodium: 632 mg
- Fat: 44.6 g
- Carbohydrates: 143.7 g
- Protein: 14.3 g
- Cholesterol: 24.5 mg


This is a great recipe if you are a chocolate peanut butter lover. However, it is super rich and like others mentioned too much frosting. I actually thought the filling was a good amount and probably could have stopped at that. I made one small change and added a cup of coffee versus the hot water in the cake. The batter is runny but it cooks well and the cake is moist. My only change would be to half the icing BUT I will agree with Shelly and say it’s better to have too much then not enough – I hate when I do not have enough icing.
The flavor of the cake is amazing, but I was very unsuccessful with trying to take it out of the pan after only 10 minutes. Ended up with a crumbled mess I also used butter and flour instead of parchment paper so that could be my issue.
Just so you know I only made the peanut butter filling and used that to frost the cake and my family loved it. If you don’t like extremely sweet cakes I would recommend doing this. Also warning if you make both the filling and the frosting half them because the recipe calls for way to much.
Just made this for my wife for her birthday. Cake is excellent. Being a less experienced baker, I followed the recipe exactly. The problem was that the amount of filling and icing used in the cover photo is probably half of what the recipe actually made. Well, I didn’t realize this until I had used ALL the filling and ALL the icing to make my cake! It tastes good, but there’s so much excess filling and icing that no normal human Pancreas could ever keep up! A simple adjustment to the recipe that cautions the inexperienced baker to use only a portion of what’s made, or an adjustment to the quantities would create a 5 star worthy cake.
I just tried making this cake and I followed the recipe to the letter and I was met with cake batter overflowing the pans and burning on the heating element of the oven. I don’t know how I could have gotten anything wrong following the recipe to the letter. I thought the batter looked fine before the hot cup of water.
You probably overfilled your pans or accidentally put to much or to little of something. It is a very watery batter though.
Isn’t this just Hershey’s chocolate cake recipe? Did you give them creds?
Does the icing use salted or unsalted butter? If salted, how much salt should I add when using unsalted butter for each icing recipe?
I use salted, but it’s a personal preference. If you use unsalted you can add 1/4 teaspoon to the icing.
What about making this as a sheet cake or 9×13 pan?
You could but the fun part about this cake is the filling is peanut butter and the frosting is chocolate and you couldn’t really have both in a 9×13 or bundt 🙂
Wowie!! This cake is not for the faint of heart! Just made it for my husband’s birthday and it was over-the-top decadent. Definitely one small slice is all you need! I followed your terrific recipe exactly, but made 1/2 the peanut butter filling and 1/2 the chocolate frosting … and there was still plenty to fill and frost 2 layers. I also cut the decorative Reese’s cups and mini-chocolate chips by 2/3. I just wanted to say how much I appreciate being able to make ANY of your recipes for the first time, and know in advance that they will taste amazing. Also, loved that your frosting recipe was ample to do the job … how many times have I followed others’ recipes only to have to make a second batch of frosting to have enough for the sides. Thank you!!
So glad you liked it and I agree…I always run out of frosting, so I try to make sure there is plenty when I write recipes for cake…rather have too much!
Can you use natural PB for the filling? Or does it require the other stuff?
I’ve never tried this with natural peanut butter, but I imagine it will work fine!
I used natural and it worked great!