
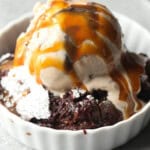
Beautifully simple (and easy to make!), this Brownie Pudding is sure to win your heart. It’s basically the best brownie you’ve ever had times ten with a warm, gooey, fudgy center that you’ll have to eat with a spoon.

Why You’ll Love This Brownie Pudding Dessert
- An out-to-dinner classic made at home. This recipe was inspired by my craving for one of those gooey molten chocolate lava cakes from Chilis, Applepees, or [instert American chain restaurant here]. This homemade brownie pudding hits that exact spot. Rich chocolate brownie-like cake with a warm, melty, chocolate center. And you don’t even have to leave the house!
- Minimal prep time. You’ll only need to take about 15 minutes out of your day to prepare this dessert. Then it just has to bake and cool for a bit. Sit back, relax, and enjoy the smell of molten chocolate wafting through the air.
- Customizable. This relatively simple recipe is easy to customize to your taste preferences. Feel free to experiment with different kinds of chocolate chips. Consider adding a dash of peppermint or coconut extract. Mix in some nuts. You name it! Check out the section below titled “Tips & Variations” for inspiration.

Recipe Ingredients
Gather your ingredients around you, roll up your sleeves, and get to baking. Here’s what you’ll need. Be sure to scroll to the recipe card below for exact measurements.
- Butter – I always use salted butter. It’s a little unconventional but I refuse to back down. I just think it adds a certain je ne sais quoi! Especially to chocolate desserts.
- Light brown sugar and granulated sugar – I like using both. The brown sugar deepens the flavor just the tiniest bit, taking this dessert over the edge. Be sure to pack the brown sugar tightly into the measuring cup to get the proper amount.
- Eggs
- Vanilla – If you want to get a little playful, you could add a dash of almond extract or coconut extract here as well. I’ll even go crazy and add a little peppermint extract around the holidays.
- Cocoa powder – I tend to lean toward natural, unsweetened cocoa powder. If you’re looking for a richer chocolate flavor, though, Dutch-processed cocoa powder is your friend.
- All-purpose flour – A quality 1:1 gluten-free flour will also work.
- Chocolate chips – Use semi-sweet, milk, dark…whatever you want. I actually used Hershey’s Baking Kisses this time. Love those little guys.
How To Make Brownie Pudding
This restaurant-quality brownie pudding is wonderfully easy to put together. Here’s a quick overview of how it’s done. Be sure to scroll to the recipe card below for more detailed instructions.
- Prep. Preheat the oven to 325°F and spray a 2 quart baking dish with cooking spray.
- Melt the butter. Melt the butter in a microwave-safe dish and set aside.


- Beat. Beat the sugars and eggs together on medium-high speed for ~10 minutes.
- Add the vanilla. Turn the mixer to low speed and add the vanilla.
- Sift. Sift in the cocoa powder and flour.


- Finishing touches. Stir in the melted butter and fold in the chocolate chips.
- Make a water bath. Spread the batter into the prepared baking dish. Place the brownie dish in a larger dish filled with enough hot water to come halfway up the side of the brownie dish.
- Bake. Bake for 1 hour.
- Cool. Remove the brownie pudding from the oven and allow it to cool 20-30 minutes before serving.

Tips for Success
Striving for perfection? Here are a few simple tips and tricks that will help you get this brownie pudding dessert right the first time.
- Get the oven temperature right. Oven thermostats are notorious for being off and this dessert is particularly sensitive to under/over-baking. I highly recommend using an oven thermometer to double-check the temperature before popping the pudding in the oven.
- Don’t over-mix. Once you add the flour to the batter, it’s important not to mix past the point of everything being incorporated. Over-mixing can cause the glutens in the flour to overdevelop, which can mess with the texture of the pudding, making it tough.
- Make a water bath. Making a water bath can feel like a hassle but it really is a necessary step for this dessert. It will help ensure that your pudding bakes evenly and will also help prevent cracks from forming on the top.
- Don’t over-bake. This brownie pudding loses so much of its charm if you overcook it. Take the dessert out of the oven as soon as the edges look set. A toothpick inserted into the center of the pudding won’t come out clean, but that’s how you want it. Nice and gooey!
Fun Variations
Feel free to throw your own personal spin on this dessert. Here are some fun ideas for you.
- Experiment with chocolate. I used classic Hershey’s Baking Kisses in this pudding but you can totally mix things up and choose something different. Milk chocolate chips, semi-sweet chocolate chips, or dark chocolate chips would do the trick. Feeling adventurous? Try white chocolate chips or peanut butter chips instead.
- Have fun with mix-ins. Sometimes I like folding things other than chocolate chips into the pudding batter. Toasted pecans, coconut flakes, and/or your favorite chopped candy bar would be fun.
- Extract extravaganza. I kept it simple with vanilla extract here but a dash of coconut or almond extract would be fun, too. During the holiday season, I’ll even add a drop or three of peppermint extract. Why not!?

Serving Suggestions
I feel like brownies and vanilla ice cream go hand in hand. Turns out that brownie pudding and vanilla ice cream do as well. Any kind of ice cream, really. Want to make your own? Try my 2 Ingredient Ice Cream or this Caramel Apple Ice Cream. Go over the top and add a drizzle of Microwave Caramel Sauce while you’re at it.
I also love serving this ooey-gooey masterpiece with a swirl of whipped cream or Whipped Nutella Frosting and fresh, seasonal berries.
Proper Storage
- Refrigerator. Once the brownie pudding is fully cooled, cover the baking dish tightly with plastic wrap and store it in the fridge for up to 4 days.
- Freezer. Allow the pudding to cool to room temperature before covering the baking dish tightly with a double layer of plastic wrap. You can store it in the freezer for up to 3 months. Allow the pudding to thaw in the fridge before serving.
- To reheat. This dessert is enjoyable straight out of the fridge, but it’s even better warmed up. Remove the plastic wrap, cover the baking dish with aluminum foil, and bake at 300°F for 10-15 minutes or until warm. Otherwise, spoon a serving into a bowl and microwave it in 30-second intervals until heated through.

More Brownie Desserts To Try
- Banana Bread Brownies
- Strawberry Brownies
- Fudgy Nutella Brownies
- Bourbon Pecan Brownies
- Fudgy Cake Mix Brownies
- Sweet and Salty Brownies
Brownie Pudding
- Prep Time: 20 minutes
- Cooling Time: 20 minutes
- Cook Time: 1 hour
- Total Time: 1 hour 40 minutes
- Yield: 6–8 servings 1x
- Category: Desserts
- Method: Baking
- Cuisine: American
Description
You won’t be able to keep your spoon out of this easy brownie pudding. It’s basically the best brownie you’ve ever had times ten with a warm, gooey, fudgy center. So good!
Ingredients
- 2 sticks butter, melted
- 1 cup light brown sugar, packed
- 1 cup granulated sugar
- 4 eggs
- 1 tsp vanilla
- 3/4 cup cocoa powder
- 1/2 cup flour
- 3/4 cup chocolate chips
Instructions
- Preheat oven to 325°
- Melt butter in microwave safe dish and set aside.
- Spray a 2 qt baking dish with cooking spray.
- In a large mixing bowl beat both sugars and eggs for 10 minutes on medium-high speed until mixture thickens.
- Turn mixer to low. Add in vanilla and sift cocoa and flour into mixture, stirring until just combined.
- With mixer still on low pour in melted butter.
- Stir in chocolate chips.
- Spread batter into prepared baking dish. Place baking dish into a larger dish and fill larger dish with hot water, coming halfway up the side of brownie dish.
- Bake for 1 hour. Edges will appear set, but a toothpick will not come out clean.
- Let cool about 20-30 minutes and serve with ice cream or whipped cream.
Notes
adapted from Barefoot Contessa
Want To Save This Recipe?
Find more recipes like this:


I absolutely love this recipe!! It was super easy to make, and served at least 10 people- more than I was expecting!! I love how if you eat it while it’s warm, it’s like lava cake, while if you eat it while it’s cooled down a bit it’s like a brownie!! (I guess that’s why it’s called brownie pudding!!) My whole family LOVED it, I will definitely be making again!
(Just a tip: be careful not to burn yourself on the water!!) 🙂