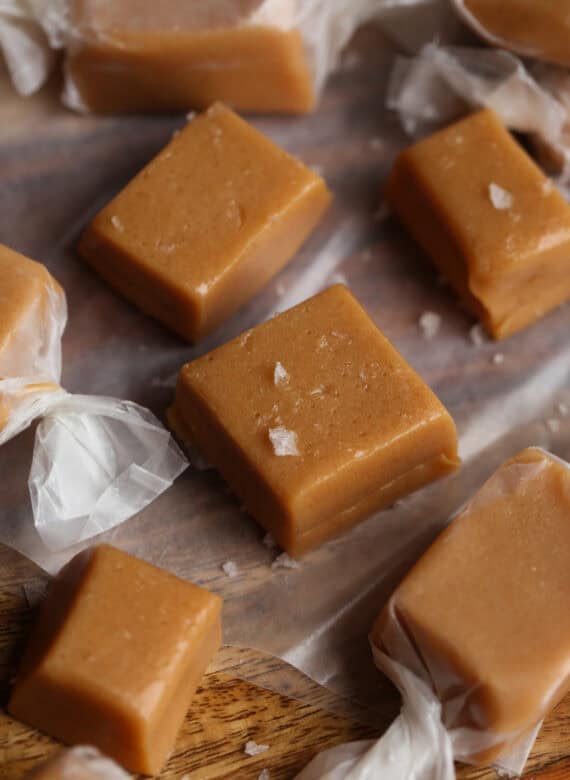
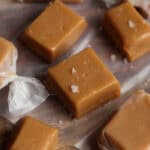
These homemade caramels are soft, chewy, and finished with flaked sea salt. I’ll show you how easy they are to make with pantry staples. Wrap them up to give as gifts or add them to your dessert platters!
These are perfect for giving away in decorated jars for teacher and hostess gifts. Or, serve chewy caramels next to Christmas cookies on your holiday party platters. Also, try these festive holiday rum balls, divinity candy, and crock pot candy!

Homemade caramels are pretty special. I make these every year around the holidays, along with chocolate fudge and turtle candy. They’re one of my most beloved candy recipes, full of nostalgic buttery flavors with a soft, chewy texture. There’s a bit of stirring involved (OK, maybe a good amount of stirring), but I can guarantee that these chewy, creamy caramels made from scratch are worth the effort!
What Makes These Chewy Homemade Caramels So Special
- Easy method. As mentioned, stirring is the main fixture of caramel candy making. The process takes over an hour, but it’s really simple, I promise. Plus, golden, creamy caramel awaits! These chewy treats are the best I’ve ever eaten.
- No baking. The silver lining of this easy stovetop candy is that you don’t need the oven! This is perfect during the holidays when my kitchen is a baking marathon of sugar cookies, butter cookies, and pumpkin pie.
- Made with love. There’s something super special about homemade caramels. You can practically taste the love that goes into making them! Buttery, sweet-salty, melt-in-your-mouth love. Store-bought caramels just don’t compare.

What You’ll Need For This Recipe
Not including the flaky salt we’ll sprinkle over afterward, homemade caramels come down to 5 easy ingredients, which you’ll find below. Scroll down to the recipe card for the full amounts.
- Sugar – Both granulated sugar and light brown sugar are needed for this recipe.
- Butter – It’s the key to caramel’s rich, buttery flavor. I use Challenge salted butter in this recipe. Cut the butter into cubes before you start.
- Vanilla Extract – You could also play around with different extracts, like peppermint.
- Light Corn Syrup – Corn syrup keeps the sugars in the caramel from crystallizing.
- Half and Half – You can also use heavy cream. I don’t recommend lower-fat options
- Sea Salt – Make sure to use flaked sea salt, like Maldon salt. Table salt won’t work here.
What Does Corn Syrup Do in Caramel Making?
In simple terms, corn syrup keeps the sugars in the caramel from crystallizing. Crystallization = grainy candy, which isn’t what we’re going for. Corn syrup is an important ingredient for smooth and creamy homemade caramels.

Tips and Tricks for Making Caramels & Variations
Get ready to stir! Time and patience are the trick to making perfect homemade caramels. On top of that, a candy thermometer that’s fast and accurate, like a ThermaPen, will also make the process that much smoother. These are some tips and tricks for making caramel that I’ve picked up over many Christmases:
- Use the right pan. I use my Le Creuset Dutch oven for this, but any heavy-bottomed pot does the trick. The heat distributes evenly, and there’s less of a chance the caramel will burn.
- Line the pan with foil. Don’t skip this step! I always give the pan a coating of cooking spray, too. It makes the caramel easy to remove.
- Patience is key. Be prepared to stand next to your stovetop stirring for a good hour or more. You’ll need to stir the caramel constantly until the temperature reaches 250°F. I know this might sound excessive, but trust the process! As the mixture heats, it will bubble and thicken, and turn amber in color.
- Keep the focus on stirring. Once the temperature reaches 230°F, it can jump up to 250ºF quickly. Staying focused on the task at hand is the key to success.
- Use a sharp knife. Make sure you use a sharp enough knife when cutting the caramel into bite-sized pieces. Otherwise, a bench scraper works extremely well if you have one! Caramels are much easier to cut when they are room temperature or slightly below.
- Don’t salt too soon. Allow it to cool down for 30 minutes before sprinkling the top with sea salt. If you add the salt too soon, it’ll dissolve into the caramel.
- Chocolate-covered caramels. Once you’ve cut your caramels, dip them one at a time into melted chocolate. You can melt chocolate in a double boiler or the microwave (see my peanut butter balls).
Do You Need a Candy Thermometer for Caramel?
If you don’t have a candy thermometer, you can still make these delicious homemade caramels. After the caramel has been bubbling away and is thick and amber colored, drop a spoonful of the hot caramel into a cup of ice water. Pinch the caramel with your fingers into a ball. The caramel is ready when the texture feels firm and pliable!

Wrap Them For Gifting
Cut wax paper squares that fit the size of your caramels, and wrap the candies tightly! This keeps them from sticking and makes them easy to assemble for gifting. You can even make things festive with different paper designs and colors.
How to Store
- Store them airtight. Homemade caramel candy stays fresh at room temperature for a week or two, and up to one month in the fridge. Store caramels in an airtight container or zip-seal bag to keep them from drying out.
- Freeze. Caramels freeze super easily! Store the wrapped caramels in a resealable freezer bag, and keep them frozen for up to 3 months. Thaw them either in the fridge or at room temperature before serving.
More Homemade Candy Recipes
Homemade Caramels
- Prep Time: 5 minutes
- Cook Time: 90 minutes
- Total Time: 1 hour 35 minutes
- Yield: 50 candies 1x
- Category: Candy
- Method: Stove Top
- Cuisine: American
Description
These homemade caramels are soft, chewy, and finished with flaked sea salt. They’re easy to make with pantry staples, and great for gifting!
Ingredients
- 2 cups granulated sugar
- 1 cup light brown sugar
- 2 cups half and half
- 1 cup light corn syrup
- 1 cup (2 sticks) Salted Challenge Butter, cubed
- 1 tablespoon vanilla extract
- 1 tablespoon of flaked sea salt (or more depending on your preference)
Instructions
- Line a 9×9 baking pan with foil and coat with nonstick spray, or butter. Set aside.
- In a medium heavy saucepan combine the granulated sugar, brown sugar, half and half, corn syrup, and butter over medium-low heat. Cook and stir constantly until the mixture reaches 250°F on a candy thermometer. The mixture will bubble up and get thick as it cooks, while turning an amber color. The process will take over an hour, so be prepared to stir!
- Once it reaches 250°F remove the pan from the heat and stir in the vanilla.
- Pour the mixture into the prepared pan. Wait 30 minutes and sprinkle with sea salt.
- Cover the pan with foil and place in refrigerator until set.
- Remove the candy from the pan with the foil. Gently peel the foil from the sides and bottom of the caramel. Allow the candy to come to almost room temperature before cutting into pieces.
- Wrap each candy with a small piece of wax paper.
Nutrition
- Serving Size: 1 piece
- Calories: 100
- Sugar: 16.5 g
- Sodium: 183.1 mg
- Fat: 3.8 g
- Carbohydrates: 17 g
- Protein: 0.3 g
- Cholesterol: 10.2 mg


Can you share the exact recipe with measurements for the corn syrup substitute?