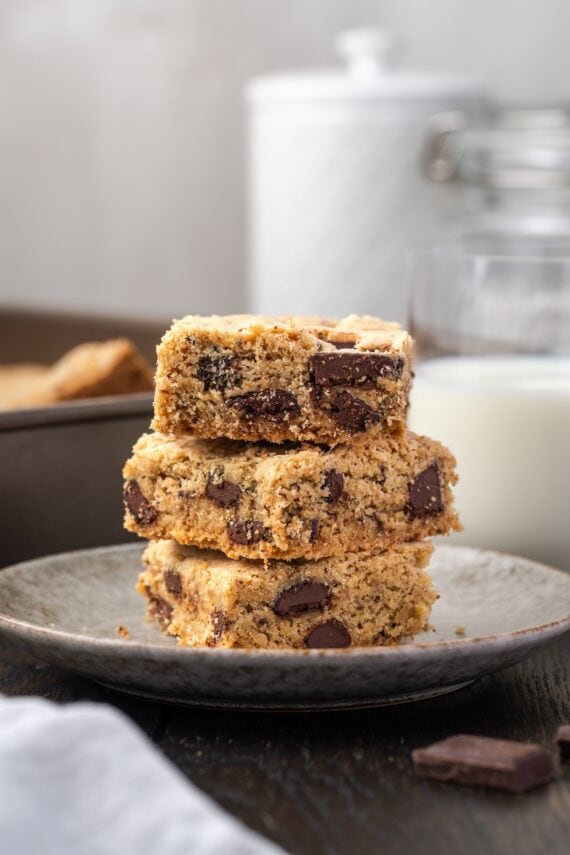
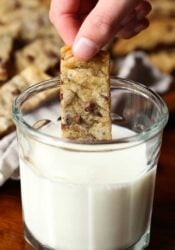
Thick, soft, and chewy chocolate chip cookie bars are easy to make and perfect for baking and slicing into squares whenever a craving strikes. No chilling or rolling required!
I love making my favorite cookie recipes in dessert bar form. Try my 7-layer magic bars, M&M cookie bars, and classic sugar cookie bars next.

Tender, gooey, irresistible, and loaded with chocolate. Let’s just say, I’m in Trouble with a capital “T”! I made chocolate chip cookie bars twice last week. They were so delicious, they barely lasted long enough to update the photos!
Soft, buttery cookie bars are yet another example of “sweatpants cookies”, a.k.a., you’ll want to get out your stretchy pants for these. Bars are the perfect way to satisfy a craving for chewy chocolate chip cookies, without the effort of chilling, rolling, or baking multiple batches of dough.
- One bowl. Mix the dough in one bowl, spread it into a pan, and bake. It’s the lazy baker’s dream. You don’t even need a mixer!
- Easy to make. There’s no need to chill the dough, roll the dough, or worry about the cookies spreading when making cookie bars.
- Crowd-pleasing. Whether you’re partial to soft middles or crispy edges, these soft-baked chocolate chip cookie bars make everyone happy.

Ingredients You’ll Need
These are some quick notes on the pantry staples you’ll need to make these chewy chocolate chip cookie bars. Scroll to the recipe card for the full, printable recipe with amounts.
- Flour – Measure the flour using the spoon and level method to avoid overmeasuring, which makes cookies dry. Spoon the flour from the bag into your cup measure, and level off the top with a knife.
- Baking Soda – Check the date on the package to make sure it’s not expired. Also, make sure you’re using baking soda and not baking powder, which isn’t the same thing.
- Sugar – I like to use a combination of white sugar and brown sugar for extra moisture. You can use all of one kind of sugar if needed.
- Eggs and Butter – If you think of it, bring the eggs and butter to room temperature before you start. I always bake with salted butter, but you can use unsalted if you prefer.
- Chocolate Chips – Or, in this case, chocolate chunks. Chopped chocolate is also a good choice.

You can make the chocolate chunk cookie dough with or without a mixer. I bake these cookie bars in a large, 9×13-inch baking pan and cut them into smaller squares, which makes them perfect for sharing (or freezing for later).


- Mix the cookie dough. Start by creaming the butter with both sugars, then beat in the eggs, vanilla, baking soda, and a pinch of salt. Add the flour slowly, and fold in the chocolate chunks.


- Bake. When you’ve mixed the cookie dough, press it evenly into a greased 9×13-inch baking dish. Bake the cookie bars at 350ºF for 30-35 minutes. The goal here is to have them just set in the middle and golden brown at the edges. Take care not to overbake!
- Cool. Leave the bars to cool completely in the pan before you slice them.

Baking Notes
- Don’t overmix. Once you’ve added the flour to the wet dough, don’t overmix. Overworking the dough will make the cookies flat and dense.
- Check that the cookie bars are baked. You want your chocolate chip cookie bars to be just set in the center, but not wet or gooey. They’ll continue to set up as they cool down in the residual heat of the pan. If they come out fully baked, they’ll be hard and crumbly by the time you serve them.
- Line the baking dish. If you grease the pan well, you shouldn’t have any issues removing these bars from the pan. But, for extra insurance against sticking, you can line the pan with parchment paper. Let it overhang from the sides of the pan, and you can lift your bars right out once they’ve cooled, for easy slicing.
- Cool the bars before you serve them. Well, I’m all for digging into a gooey, freshly baked cookie with a spoon (that’s what a skillet chocolate chip cookie is for). However, for best results and neat slices when serving your chocolate chip cookie bars, wait until they’ve cooled completely to room temperature.
- Sprinkle with sea salt. As soon as the bars come out of the oven, sprinkle them with coarse or flaky sea salt for a delicious sweet-salty contrast and crunch.
Pro Tip: Make Brown Butter Chocolate Chip Cookie Bars
You can brown the butter before you add it to the cookie dough, as I do in my brown butter chocolate chip cookies. Browning butter brings out a rich, nutty flavor.

Storage and Freezing
- Store airtight. Store these chocolate chip cookie bars in an airtight container on the counter for up to 3 days.
- Freeze. Cut the bars before you freeze them. If you stack them, separate any layers with parchment paper. Store them in a container or freezer bag and freeze for up to 2 months. Thaw the cookie bars at room temperature when it’s time to serve, and enjoy!
- Prep Time: 10 minutes
- Cook Time: 30 minutes
- Total Time: 40 minutes
- Yield: 36 squares 1x
- Category: Cookies
- Method: Oven
- Cuisine: American
Description
Soft and chewy chocolate chip cookie bars are easy to make and perfect for baking and slicing into squares, no chilling or rolling required!
Ingredients
- 2 3/4 cup all-purpose flour
- 1 teaspoon coarse sea salt
- 1 teaspoon baking soda
- 3/4 cup white sugar
- 3/4 cup brown sugar
- 2 eggs
- 2 teaspoons vanilla extract
- 2 sticks butter (1 cup)
- 2 cups chocolate chunks. You can also use chopped chocolate.
Instructions
- Preheat oven to 350°F. Coat a 9×13 baking dish with nonstick spray and set aside.
- In the bowl of your stand mixer fitted with the paddle attachment, mix the butter and both sugars for 3 minutes on medium speed until light and fluffy.
- Add in the eggs, vanilla, baking soda, and salt and mix for 1 minute on medium speed until combined, scraping the sides of the bowl as necessary.
- Turn the mixer to low and slowly add in the flour, mixing until just combined. And finally stir in the chocolate.
- Spread the cookie dough into the prepared pan and bake for 30 – 35 minutes, or until the center is just set. The edges will be golden brown.
- Allow to cool completely in the pan before cutting into bars.
Notes
- Store airtight at room temperature for up to 3 days for best freshness.
- Freeze cut bars airtight for up to 2 months. Thaw at room temperature.


Can I be honest? I read the intro to this recipe and thought “these look good and all, but COME ON. Are they really that good?” uhm…yes. Yes, they are THAT good! I can’t WAIT to try more of your recipes. I might as well just throw my skinny jeans OUT!
Yum! Bake them in little ramekins and underbake just a bit for a great cookie experience. Everything but your pants will thank you!
My husband LOVED The Music Man and I began singing as soon as you started this post!
Oh, now we're ALL in trouble!!!
These bars look delicious! I would do extra hours at the gym to be able to eat as many as I want of them 🙂
Ditto on the sweatpants comment! Blogging about food is hard on the waistline! Yummy, naughty bars!
I LOVE your blog and all the creative-ness! I wish I had half the imagination you have! I'm going to try a few of your yummies over the weekend for a "back to school" teacher treat basket…have to start "racking" up points early in the year!
Thank you for sharing
Yum, I want trouble and a pan of those! They look and sound wonderful. MMMMMmmmm.
~ingrid
These look too easy to not make tonight! Yum!
tracy…uh,YEAH!! I had to get these off my camera, everytime I turned the darn thing on I saw them…and they are too easy to NOT make!