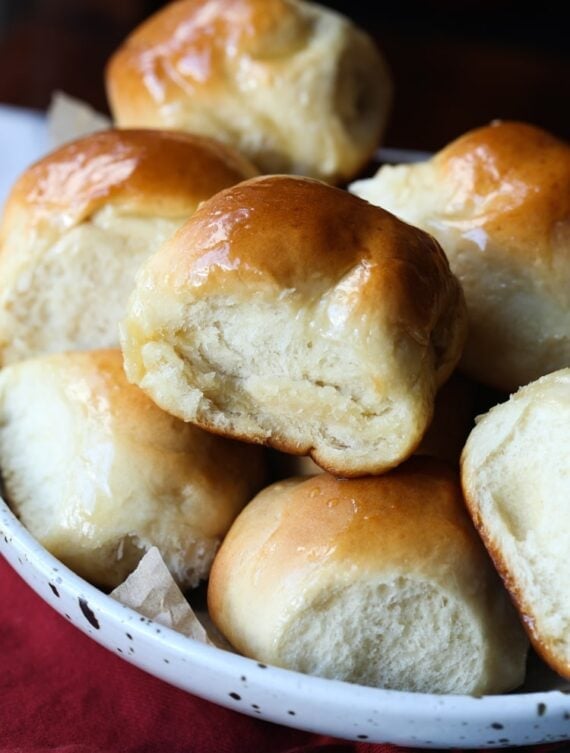

This easy dinner rolls recipe makes soft, fluffy homemade rolls fit for any holiday table. Top the baked rolls with creamy honey butter for a truly irresistible side dish!
You can also pair these fluffy dinner rolls with cheesy ground beef casserole for an easy weeknight dinner.

Why You’ll Love This Easy Dinner Rolls Recipe
There’s nothing like a warm sweet dinner roll, fresh from the oven and brushed with honey butter. Don’t be surprised if these homemade dinner rolls kickstart a new holiday tradition in your house! Here’s why they’re the best:
- Quick. This recipe uses rapid-rise yeast, which speeds up the rising time. Have these rolls ready for the oven in an hour or less.
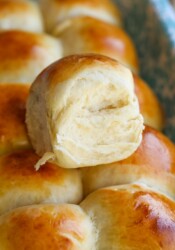
- Soft, fluffy bread rolls. If you’re new to baking yeasted rolls from scratch, let this recipe be your guide. Bread-baking doesn’t have to be complicated. One bite of these soft dinner rolls, and you’ll be hooked.
- Sweetened with honey. A touch of honey goes a long way in this roll recipe. Honey gives the dough a hint of sweetness and chew. Paired with savory sides, it’s seriously irresistible.

What You’ll Need
Soft dinner rolls call for a richer, fattier dough than the kind needed for crusty bread (like French bread, for example). Below is what you’ll need to make the rich dough for these dinner rolls. Don’t forget to scroll to the recipe card for the full ingredient amounts and instructions.
- All-Purpose Flour
- Yeast – I always have Fleischmann’s RapidRise® Yeast on hand for dinner roll recipes like this one and my Parker House rolls. Instant yeast makes the rising time so much quicker.
- Salt
- Milk – You can use whole milk (my first choice for the best texture), 2% milk, or skim milk.
- Butter – I use salted butter, but you can use unsalted if you prefer.
- Honey – The sugars in honey sweeten the dough and feed the yeast. Don’t forget to set some aside for the honey butter topping!
How to Make Dinner Rolls
I’m a firm believer that soft homemade dinner rolls shouldn’t be reserved for special occasions. With recipes as easy as this one, you’ll want to bake them all the time. Let’s get started:
- Combine the ingredients. First, combine flour with yeast and salt in the bowl of your stand mixer. In a separate bowl, warm milk, water, butter, and honey in the microwave, then add the warmed ingredients to your flour mixture. Mix to combine.
- Form the dough. One half-cup at a time, add in the remaining flour and continue to beat until the dough forms a ball.
- Knead the dough. You can do this using your hands or the dough hook attachment on your mixer. Knead the dough for 6-8 minutes until it’s elastic and smooth. Afterward, cover the dough and leave it to rest for a few minutes.


- Divide the dough. Next, divide and shape the dough into 12 even-sized balls. Tuck these into a greased baking pan.
- Rise. Cover the dough again and leave the rolls to rise in a warm spot. After about 30 minutes, the rolls should be doubled in size.
- Bake. Bake your dinner rolls at 375ºF for 20 minutes, until browned. When they come out of the oven, brush the tops with a combination of melted butter and honey.
- Serve! Serve your rolls warm with your favorite mains. See below for ideas.

Tips for The Best Homemade Dinner Rolls
I hope you’re inspired to give these from-scratch dinner rolls a try. If you’re new to baking with yeast, here are some final tips to keep in mind for the best results:
- Check expiration dates. Make note of the dates on the package to ensure that the yeast you’re using hasn’t expired.
- Measure the flour correctly. This is key to avoiding a dense dinner roll! Don’t scoop the flour straight from the bag. If you don’t have a kitchen scale, use the spoon and level method to measure your flour instead.
- Don’t over-proof. Your rolls are ready for the oven once they’ve doubled in size. Be careful to not let the dough rise too much, as it can deflate.
- If you don’t have a stand mixer, no problem. You can make these rolls by hand with a bit of elbow grease. I recommend mixing the dough using a wooden spoon or spatula.
- Keep your rolls warm after baking. Move your dinner rolls to a bowl or basket and cover them with a dish towel to trap the warmth.

Easy Variations
Feel like jazzing things up? Here are some easy add-ins that you can mix into your dough when adding the flour:
- Herb Dinner Rolls – Add 1-2 tablespoons of fresh or dried rosemary, basil, thyme, or Italian seasoning.
- Garlic Dinner Rolls – Add a teaspoon of garlic powder to the dough, and brush the tops with garlic butter.
- Cheddar Dinner Rolls – Sprinkle in grated cheddar cheese (no more than 1 cup). Any hard cheese variety will work.
- Parmesan Garlic Rolls – Borrow the garlicky parmesan and herb topping from my parmesan garlic biscuit rolls.

Serving Suggestions
Warm, oven-fresh dinner rolls are welcome at our table with any meal, any time. They’re perfect for dunking into a bowl of creamy chicken gnocchi soup or Sloppy Joe stew or serving alongside saucy short ribs with a side of green salad. These rolls also make the perfect holiday side dish next to a juicy roast turkey with mashed potatoes, cranberry sauce, and stuffing. You can even turn these rolls into sliders and serve them with turkey chili for Super Bowl Sunday. The possibilities are endless!
Proper Storage
These rolls are at their best when they’re served warm, but you can store any leftovers for up to 2 days at room temperature. Make sure that the rolls are cooled completely before storing them airtight. I always like to re-warm these rolls in the microwave or oven before serving.
Can I Freeze Homemade Dinner Rolls?
Yes! Dinner rolls are very freezer-friendly, which always comes in handy during the holidays. Once the baked rolls have cooled, place them in an airtight container or freezer bag and keep them frozen for up to 2 months. Defrost the rolls at room temperature before warming them up and serving.
More Holiday Sides
- Cranberry Focaccia Bread
- Crock Pot Corn Bread
- Sweet Potato Biscuits
- Fluffy Homemade Popovers
- Pumpkin Sage Drop Biscuits

Dinner Rolls
- Prep Time: 60 minutes
- Cook Time: 20 minutes
- Total Time: 1 hour 20 minutes
- Yield: 12 rolls 1x
- Category: Bread
- Method: Baking
- Cuisine: Dinner
Description
This easy dinner rolls recipe makes soft, fluffy homemade rolls topped with creamy honey butter. They’re a perfect side dish for dinner parties and holiday meals!
Ingredients
-
2 1/4 – 2 1/2 cups all-purpose flour
-
1 (2-1/4 tsp.) packet Fleischmann’s® RapidRise® Yeast
-
1/2 teaspoon kosher salt
-
1/2 cup milk (whole, 2%, 1% or skim)
-
1/4 cup water
-
2 tablespoons salted butter
- 1/4 cup honey
Topping:
- 1/4 cup salted butter
- 1 1/2 tablespoons honey
Instructions
- Combine 1 cup flour, dry yeast and salt in bowl of your stand mixer fitted with the paddle attachment and stir until blended. Combine milk, water, butter, and honey in a small microwave-safe bowl. Microwave in 30 second increments until very warm but not hot to the touch (120°F – 130°F). Add to flour mixture.
- Mix for 2 minutes on medium speed, scraping the sides of the bowl as needed. Add in 1/2 cup more flour mix for 2 more minutes on high speed. Stir in just enough of the remaining flour (3/4 to 1 cup) so that the dough will form into a ball.
- Replace the paddle attachment for the dough hook attachment and mix on medium speed for 6-8 minutes, until the dough is smooth and elastic and springs back when lightly pressed with 2 fingers. Alternately you can do this step by hand, kneading the dough on a lightly floured surface for 6-8 minutes. Cover with a towel and let rest for 10 minutes.
- Cut the dough into 12 equal pieces and shape into balls using your hands. Place in greased 8-inch round or square pan. Cover the rolls with a towel and let them rise in a warm place, until they’re doubled in size, about 30 minutes.
- Bake rolls in preheated 375ºF oven for 20 minutes or until golden brown.
- For the topping combine the butter and honey in a microwave safe bowl and heat for 30 seconds until butter is melted. Mix together and brush the melted honey butter on warm rolls.
- Serve warm.
Notes
Store airtight for up to 2 days. Best served warm.
Nutrition
- Serving Size: 1 roll
- Calories: 174
- Sugar: 8.5 g
- Sodium: 237.9 mg
- Fat: 5.3 g
- Carbohydrates: 28.7 g
- Protein: 3.4 g
- Cholesterol: 13.5 mg


I’m sad this recipe didn’t work for me for some reason. I placed them in a 9 inch glass pie baking dish, but I guess they needed a bigger dish or I wasn’t supposed to use a glass dish to bake in because they were so close they didn’t fully cook inside. It smelled and tasted like unbaked breakfast biscuit dough. 🙁 the tops were cooked and delicious though lol
Use a bread/ meat thermometer. Bake till it’s 202 degrees Fahrenheit
Hi! Don’t we have to add eggs to the recipe?
Nope, no eggs in this bread.
I’m having trouble with it rising
This is seriously the best roll recipe I’ve ever used!! Literally a carbon copy of any restaurant’s “big fat yeast roll”. I can’t get enough of these soft little pillows of honey love! I thought they’d make good baked donuts-inject some jelly in the middle and cover with confectioners sugar glaze! I’m definitely gonna use this dough to make my next batch of “Cinnabon” rolls
I have a lot of regular yeast that I’d like to use. How much should i use for this recipe? And how long do i let the dough rest to rise?
I absolutely love these rolls and so does my family! They have the perfect amount of sweetness and they are easy to make. I made dinner rolls on Thanksgiving and I was not pleased with them. I searched high and low for another dinner roll recipe that I could not screw up and was lucky enough to find this recipe. I am so amazed at how easy and how much quicker it is to make these dinner rolls, I could make them any day of the week. If you are new to making dinner rolls, this is your recipe.
Can these be made in a food processor? They look absolutely delicious!!
I have been on the hunt for the perfect yeast roll recipe for years. Mine always turn out dry or caked. This recipe is really different from any I’ve tried and your pictures look like what I’m looking for (like a Golden Corral type yeast roll). I just made 2 versions of your recipe: one with bread flour and the other with all purpose. I used bread flour first and noticed the dough was really tough after the 6-8 minute kneading with dough hook. I followed the amounts exactly. I made again with AP flour and carefully watched the dough and was just short of using the last cup of flour when I noticed it was really dry so added about a tsp of water. I left the dough a bit sticky. I just rolled both out into rolls and set them in the oven to rise. The bread flour dough was really tough to cut so I’m thinking it was overkneaded (was worried about that before I started because of the bread flour so not surprised). I am so excited for this recipe so I will be playing with it to figure out my perfect roll. Any additional pointers or experience you’ve had with this would be welcome!
Hi Shelly
I want to make this recipe a week inadvanced, how do I go about making,forming and freezing this recipe. And, also do I thaw them in the refrigerator the night before baking.
I’ve often frozen yeast dough such as pizza crusts or crescent rolls. Just form them (I’d suggest lining the pan with foil) then stick it in the freezer. Pull them out the night before and let them rise in the fridge. I also just let them rise the same day on the counter. They will come out fine.
I don’t know what I missed here. I have been baking bread for over 40 years, so I have a little experience in getting good as well as bad results.
Every recipe for yeast bread I have made calls for letting the dough rise double in size once after kneading and before shaping and a second time after shaping.
Your recipe called for letting it rest 10 min after kneading. I was a little skeptical, but decided to try the recipe as written. (I have been pleasantly surprised with other recipes I was unfamiliar with.)
I followed the recipe exactly, except I hand kneaded.
But when it said after shaping to let rise for 30 min. until doubled in size, I was sure that must have been a misprint.
I warmed the oven to 100º and let it rise 30 minutes, there was hardly any difference from when I began.
I left them in the oven over an hour and they still had not doubled, but I decided to cook them anyway, hoping it would work out.
Mistake, as the center was still raw, even after adding another 10 minutes to the cooking time.
I’m sorry, but bread will not double in 30 minutes, and really needs to rise twice. Yes, I checked my yeast and it was good for another year.
If I misread the recipe I’ll take the blame, but I have looked it over a number of times.
Hi! I use Rapid Rise (Instant Yeast) in this recipe, as per the ingredient list. Sounds like this was the problem. You are correct that when using regular yeast you will need a double rise, but Instant Yeast doesn’t require that. Sorry you had a bad experience, but if you try them again with Instant Yeast let me know!
Instant did the trick for me. Great rolls! I used the bread machine like another commenter did, perfect.
To be clear, I would put them in fridge after shaping them when wanting to make ahead?