Instant Pot Corn on the Cob is by far the easiest way to enjoy perfectly cooked corn on the cob in minutes! Topped with a fresh homemade Herb Butter, this recipe is the perfect summer side dish.

The Easiest Way to Cook Corn on the Cob
This is a foolproof way to enjoy perfectly steamed corn on the cob in minutes. And when I say minutes, I mean literally two or three! The Instant Pot cooks up corn with tender, juicy kernels faster than you can make the compound herb butter to go with it. No joke.
The pressure cooker has been a game changer when fresh corn is in season. No steaming up the kitchen, no firing up the grill – just sweet, crisp corn that’s ready to serve in basically the blink of an eye. If you’ve never tried this method before, prepare to be amazed. You’re going to love it!

What You’ll Need
This simple corn recipe only requires a handful of ingredients, and most are for the butter. Below is what you’ll need to make this Instant Pot corn on the cob. Make sure to refer to the recipe card for the full amounts required:
- Corn on the Cob: Look for corn with fresh, golden silks, and husks that are green with no brown patches or streaks. You’ll also need some water to add into the Pot with the corn for steaming.
- Butter: Salted or unsalted. Make sure to get your butter to room temperature so that it’s easier to combine.
- Fresh Parsley: Chopped, to compliment the seasoning in the compound butter.
- Seasoning: I use a blend of thyme, basil garlic powder, salt and pepper.
Should I Shuck Corn Before Cooking?
For this Instant Pot recipe, you don’t even need to shuck the corn before cooking! I will often cook my corn with the husks and all, no sweat. If you do opt to leave the husks on, just add a minute or so to the cooking time.
Can I Use Frozen Corn?
We all know that nothing beats the freshness of in-season corn on the cob. However, this recipe will work with frozen ears of corn, any time of the year. Add two minutes to the cooking time if you’re using frozen corn.
How to Make Instant Pot Corn on the Cob With Herb Butter
Sometimes, I like to time myself against my pressure cooker to see if I can make the herb butter faster than it cooks the corn! It’s a tight race, I tell ya. Here’s how to have your corn on the cob and the compound butter ready to serve:


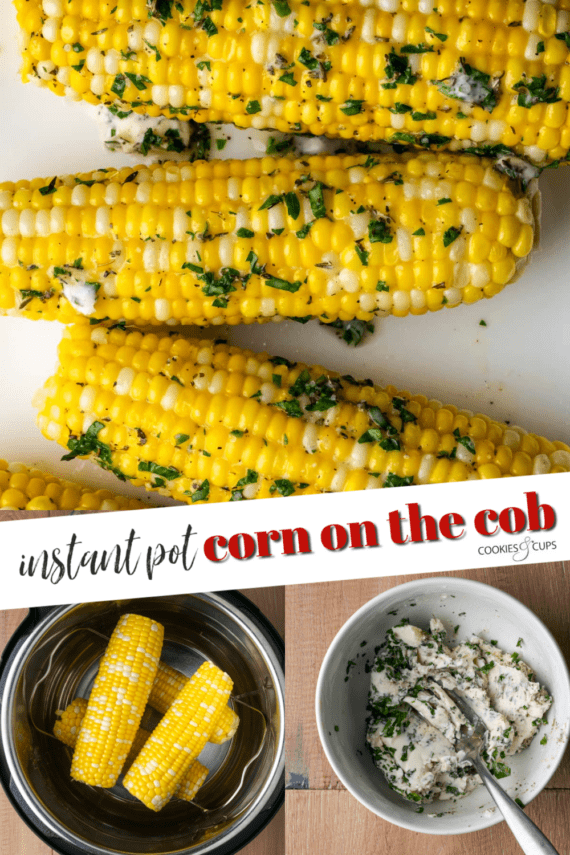
Prepare the Herb Butter: In a small bowl or dish, work the softened butter, herbs, and seasonings together using a spatula or fork. Once everything is evenly distributed, cover and refrigerate the butter until you’re ready to use it.


Prepare the Corn: Stack the ears of corn (either shucked or with the husks on) in alternating directions on top of the rack inside the Instant Pot. Stack just until the fill line – you should be able to fit about six ears of corn inside a 6-quart IP. Add some water, then close the lid and seal.
Cook and Serve: Pressure cook the corn on High for about 3 minutes, then vent using the quick release. Take your corn out of the Pot, slather it with herb butter, and serve!
How Long Does Corn Take to Cook in a Pressure Cooker?
Cooking corn in the Instant Pot normally takes between 2-3 minutes on High Pressure – that’s it! (Keeping in mind that your Instant Pot will take a few minutes to come to pressure outside of the actual cooking time).
As mentioned earlier on, certain factors like leaving the husks on or using frozen corn can impact the cooking times. See the recipe card for further details and adapt the time as needed.

Tips for Success
Keep the below pointers in mind when making this sweet and crispy corn in your Instant Pot:
- Maximize Space in the Pot: If needed, break or cut the ears of corn in half to help them fit better inside the Instant Pot. When using half ears of corn, you can also turn them on their ends inside the Pot to really fit in as many as possible.
- Use the Quick Release: Make sure to Quick Release the pressure on the Pot after the cooking time is up. Naturally releasing the pressure will lead to corn that is overcooked.
Serving Suggestions
Biting into a fresh ear of corn on the cob is like taking a bite out of summer! There are so many ways to enjoy your corn once it’s buttered up and ready to serve:
- Corn on the cob is a classic barbecue side dish. Try serving next to Crockpot BBQ Pulled Chicken or Root Beer Pulled Pork, Sour Cream Cornbread, and Loaded Baked Potato Salad.
- Enjoy corn on the cob with easy summer grilling recipes like Easy Rosemary Chicken Kabobs, Chicken Pineapple Skewers, and Bruschetta Burgers.
- Make it a family-friendly meal with Instant Pot corn on the cob, Crispy Air Fryer Chicken Tenders, and Sweet Dinner Rolls or Crockpot Mashed Potatoes.

Storing and Reheating Leftovers
Fresh corn on the cob is always at its best the day you buy it. However, fresh ears can be stored in the fridge with their husks intact for up to 3 days before cooking.
After cooking, I like to wrap the ears in foil and place them together in an airtight container in the fridge for up to 4 days. There are a few ways to reheat the corn on the cob:
- In the Microwave: Heat the corn (without the foil) in a microwave safe dish, in 20-second bursts until warmed through.
- In the Oven: Place corn in the cob wrapped in aluminum foil into the oven at 350ºF for 5-10 minutes.
- On the Stovetop: The jacuzzi method! Bring a pot of water to the boil, then drop the corn in for 3 or so minutes to heat through.
The compound butter can also be kept in the fridge for about 5 days to spread over your leftover corn. I also love to melt leftover herb butter over toasted Homemade French Bread for quick and easy garlic bread.
It’s also possible to freeze both the corn as well as the butter for longer storage, see the next section.
Freezing Instructions
Corn is best frozen off of the cob. Once your cooked corn has cooled, use a knife to trim off the kernels, then place them in a freezer bag. Corn kernels can be kept frozen for up to 12 months! Frozen corn makes a great addition to soups and chilis.
To freeze the compound butter, wrap it tightly in parchment paper and place the butter in a freezer-safe container to store for up to 3 months.
More Foolproof Instant Pot Recipes
- Instant Pot Salsa Verde Chicken
- Instant Pot Butter Rice
- Chicken Enchilada Soup
- Instant Pot Korean Beef
- Instant Pot Chicken Piccata

Instant Pot Corn on the Cob with Herb Butter
- Prep Time: 10 minutes
- Cook Time: 10 minutes
- Total Time: 20 minutes
- Yield: 6 servings 1x
- Category: Side Dish
- Method: Instant Pot
- Cuisine: American
Description
Instant Pot Corn on the Cob topped with homemade herb butter is is a perfect summer side dish! This recipe is by far the easiest way to enjoy perfectly cooked corn on the cob in minutes.
Ingredients
- 6 ears Corn on the Cob
- 1 1/2 cup Water
- 1/2 cup Butter, room temperature
- 1 tablespoon Fresh Parsley, chopped
- 1/2 teaspoon Thyme
- 1/2 teaspoon Kosher Salt
- 1/2 teaspoon Garlic Powder
- 1/4 teaspoon Black Pepper
- 1/4 teaspoon Basil
Instructions
To prepare the compound butter:
- Combine the softened butter, parsley, thyme, salt, pepper, garlic powder and basil in a small bowl.
- Work the ingredients together with a fork or spatula until the herbs are evenly distributed.
- Cover the butter and refrigerate until ready to use.
To prepare the corn:
- Place the rack in the bottom of your instant pot.
- Place ears of corn inside the pot stacking them in an alternating fashion. Place as many as will fit up to the fill line (a 6-quart instant pot should fit 6 full sized ears).
- Add 1 1/2 cups of water.
- Place the lid on and turn the valve to the sealing position.
- Cook on high pressure for 3 minutes.
- Quick release the valve.
- Remove corn from the instant pot, top with herb butter and serve.
Notes
- Ears of corn can be cooked with the husks on, just add 1 minute to the cooking time.
- For half ears of corn, stand them on end in the instant pot to fit as many as possible.
- For frozen ears of corn, add 2 minutes to the cooking time.
How to pick good corn on the cob
Look for husks that are green with no brown. The silken hair at the end of the husk should be golden in color.
Storage
- If you purchase fresh corn on the cob and don’t plan to cook it immediately, store it in the refrigerator with the husks on. While it is best cooked the same day it’s purchased, it can be stored up to 3 days in the husks.
- Wrapped cooked ears of corn in aluminum foil then place them in an airtight container and refrigerate for up to 4 days.
- To freeze cooked corn, use a knife to cut the kernels from the cob. Place them in a freezer bag for storage up to 12 months.
- Butter can be stored in an airtight container in the refrigerator for up to 5 days. Alternatively, tightly wrap the butter in parchment paper and place in a freezer container. Store in the freezer for 2-3 months.
Reheating
There are three methods to reheat cooked corn on the cob:
- Place in a microwave safe dish with a cover. Microwave in 20 second intervals until the corn is warmed.
- Preheat the oven to 350 degrees. Wrap the corn in aluminum foil, taking care to twist the ends closed. Place the wrapped corn in the over for 5-10 minutes until warmed.
- Heat a pot of water to boiling. Place the corn in the water for about 3 minutes.
Want To Save This Recipe?
Find more recipes like this:
PIN for later: